Multiple choice quiz online format has become quite popular everywhere we see. Whether it is taking up an online quiz in a classroom, or a trivia quiz on a website, the multiple choice quiz pattern has become the most used type of questions, we can see in surveys especially. And Google Forms is one of the best ways to create a multiple choice quiz.
In this article, we are going to discuss how to create a multiple-choice quiz in google forms in 4 easy steps. For whatever purposes you want to use the quiz you can use it, this is just the step into how you can create one.
Let’s first look into a bit about multiple-choice questions before moving forward.
In this Article
Key Takeaways
- Multiple choice questions are fundamental survey questions that provide respondents with multiple options to answer. They are commonly used in surveys, questionnaires, and even quiz
- There are different types of multiple choice questions like single select multiple choice questions, multi-select mcqs, dropdown menu, and so on.
- The steps to create a multiple-choice quiz are 4 simple and easy steps, to start with first is to set up the Google forms for the quiz.
- Then, add a multiple-choice question type from the dropdown menu in the question section. From there one can also add a multiple-choice grid, tick-box grid, or dropdown.
- Once that is done, customize the quiz with all the available settings in google forms and add timer + proctor with ExtendedForms. Finally, preview and share.
Overview of Multiple-Choice Questions
Multiple choice questions are fundamental survey questions that provide respondents with multiple options. Primarily, they can have single-select or multi-select answer options. These are the most fundamental questions of a survey or questionnaire, even in a quiz.
Hence, there are the following factors to keep in mind while designing Multiple choice questions –
- Have a fair idea of the concepts you want to cover in a question and they should be comprised of one idea one question.
- Questions should be crisp, simple which has relevant information, and be error-free.
- The answers should be relevant to the question.
Apart from the above factors to keep in mind, multiple choice questions consist of different types. That you can use to create a multiple-choice quiz. A few of them are-
- Single select multiple choice question
- Multi select multiple choice questions (checkboxes type)
- Dropdown menu
- smiley rating multiple choice questions
- Multiple-choice grid type
Steps to Create Multiple Choice Quiz
Here, in this post, we are going to show you how to create a multiple choice quiz in 4 easy steps. Let’s get started with it.
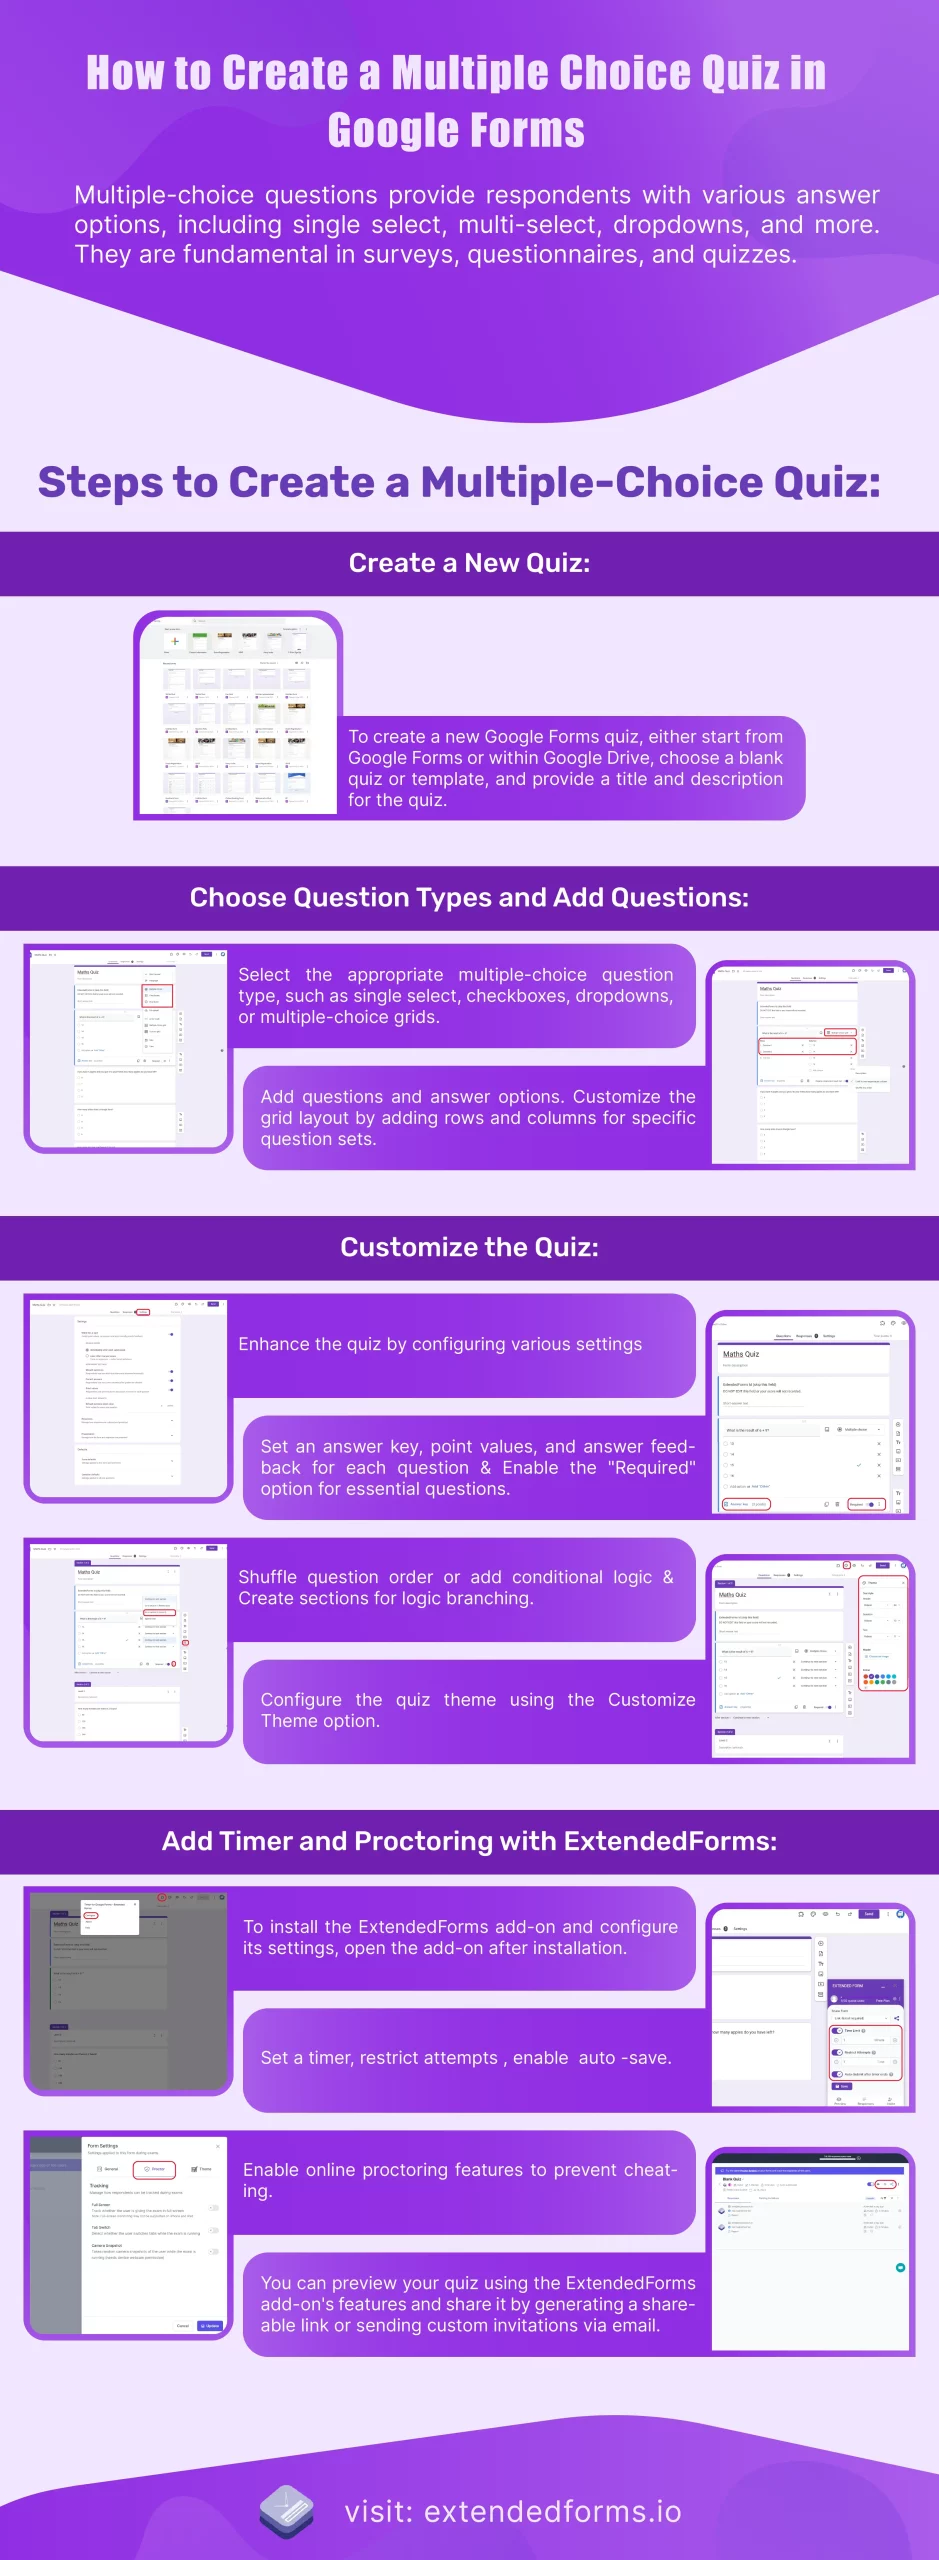
1. Create a New Quiz
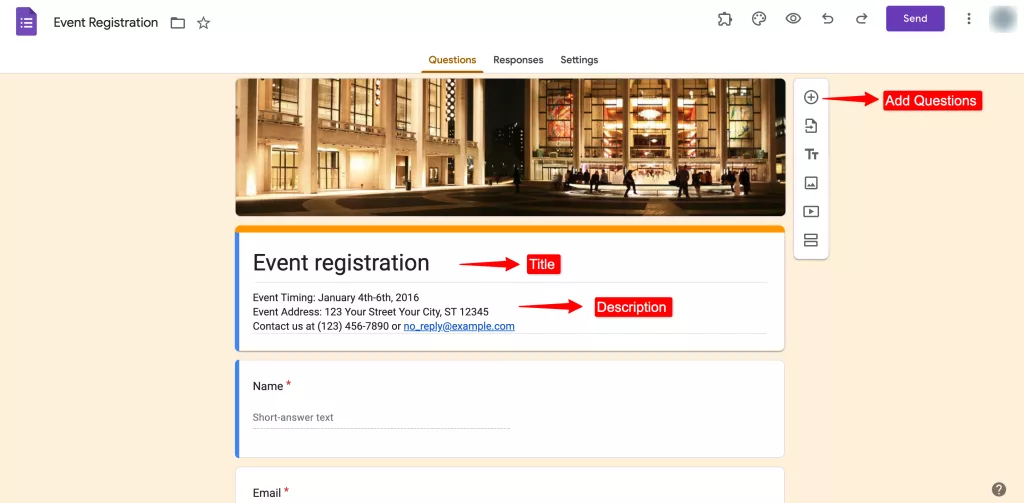
Let’s start by creating a google forms quiz from scratch. Go to Google Forms through a web browser – click here, or through G-Drive > New > Google Forms.
Choose either a blank quiz or from the template.
Once that is done, add the title and description to the quiz.
2. Choose Question types and Add Questions
Now let’s create multiple choice quiz questions and options. The Google forms have different multiple choice question types – multiple choice options, checkboxes, dropdown mcqs, and multiple-choice grids. They are the same yet different and can be used for different question purposes.
The multiple-choice option is the common type of question used in online quizzes. It goes like this, you ask one question and give a list of possible answers to choose from. Whereas, checkbox multiple-choice questions have more than one correct answer.
However, in the multiple choice grid, there are a number of sub-questions under the main question that have all the same answer options. In a grid way with columns and rows will be presented.
So, to create a multiple choice quiz, the MCQ format has to be added. Google Forms has different question types to choose from, however, we need only.
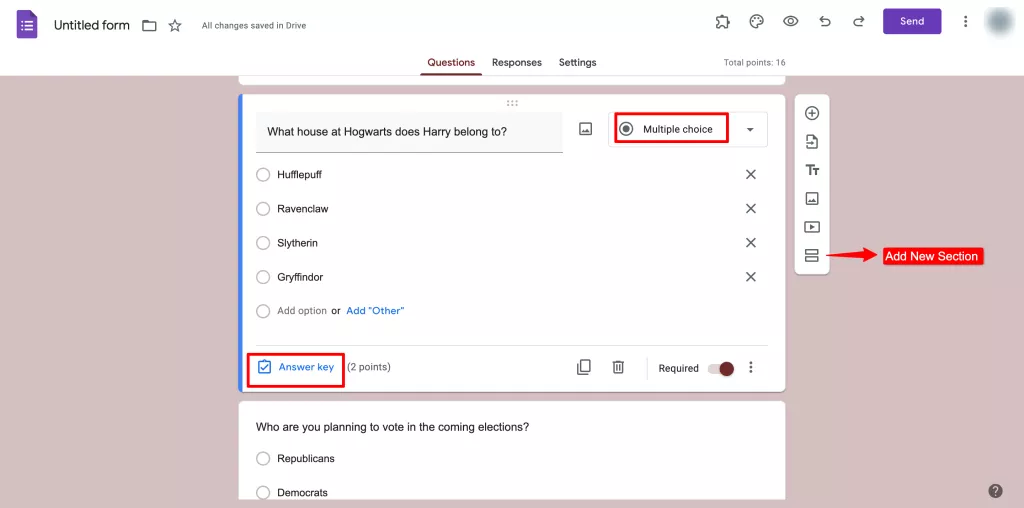
- Add the question by clicking on this ‘⊕’ add question icon. Write the question and from the dropdown on the right side, opt for the Multiple choice option.
- If want to add a dropdown or checkboxes option, opt for the same option from the dropdown.
- Then add the answer options for the question.
- Moving further, to add multiple choice grid question type, follow the above steps, instead of choosing the multiple choice option, opt for the Multiple-choice grid or Tick box Grid.
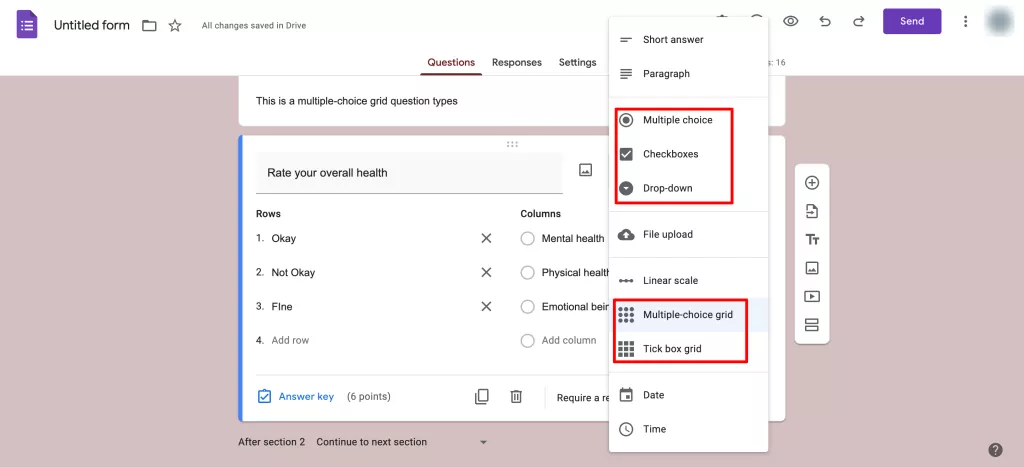
- As I mentioned earlier, it includes rows and columns you’ll find rows and columns options.
- The columns are the answer options and the rows are the question options. There can be only one set of answers for all the questions.
- You can add a reasonable amount of rows and columns by clicking on Add row and Add column options.
3. Make it a Customized Quiz
The next step here we have mentioned is to customize the quiz. To customize here means to make use of different functionalities of google forms that enhance the experience of taking up the quiz.
- In the question, Answer Key option along with point values for that question. Click on the option, select the correct answer, add point values (if you don’t want to keep default values for every question, that we can do from the settings), and also add answer feedback.
- Another thing, if any [or all] questions are important to answer then enable the Required button.
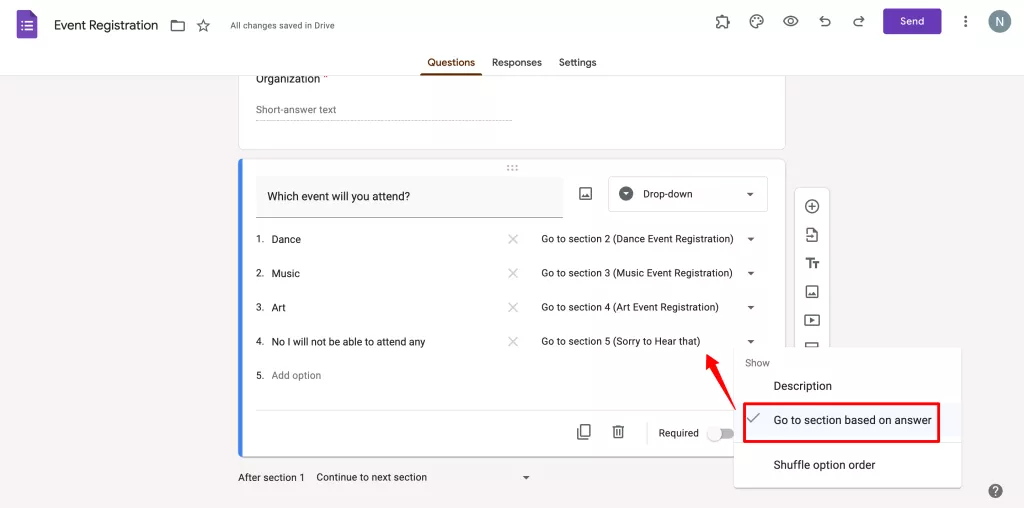
- You can also shuffle question order and add conditional logic to it. Click on this icon ‘፧’ in the particular question and enable the shuffle option order. Furthermore, to add logic branching, click on Go to section based on the answer option. Note that you must have created sections for this functionality to work.
- To create sections, click on Add Section button from the side column box. Add sections and mention the name of the section and description (if needed).
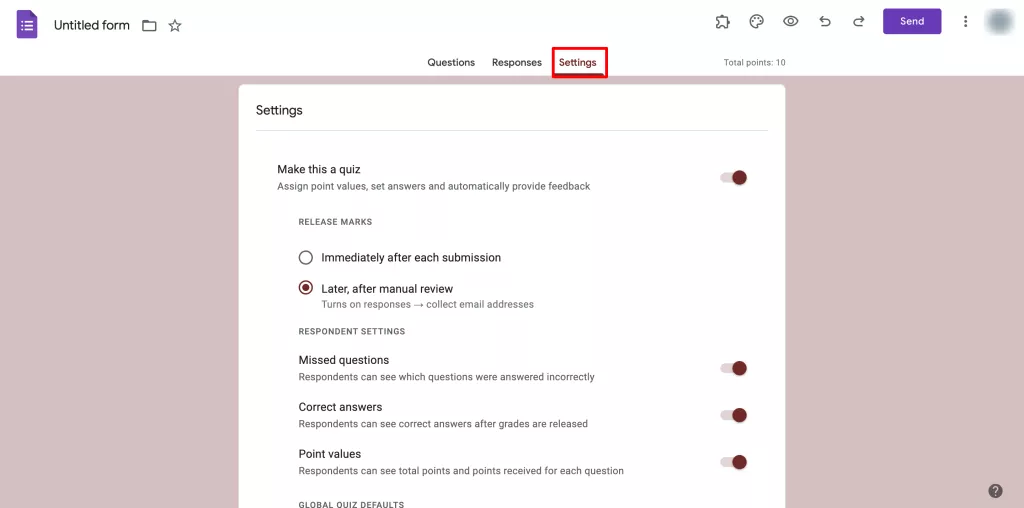
Further, we configure more settings under the Settings tab. You’ll see make this a quiz option that will be enabled if you have chosen a blank quiz or you can enable it from here.
Note* the feedback option will be available in the quiz form only.
Besides, you’ll then see an option for Release Marks, where you can choose which way to release marks to respondents.
- Apart from that, you can manage how responses will be collected and presented under the Responses and Presentation options simultaneously.
- Then under the Defaults option, you can enable the questions required and collect email addresses by default.
Besides, to customize the quiz theme, on Customize theme at the top bar. You can modify fonts, font sizes, header images, and theme colors.
Add Timer Add-on to the quiz
Google Forms has an add-on feature that allows you to install apps for different uses. And when it comes to creating a quiz/test, without a timer it is not a quiz. However, we have the perfect add-on that not only can provide you with a timer feature but also a proctoring feature to prevent cheating.
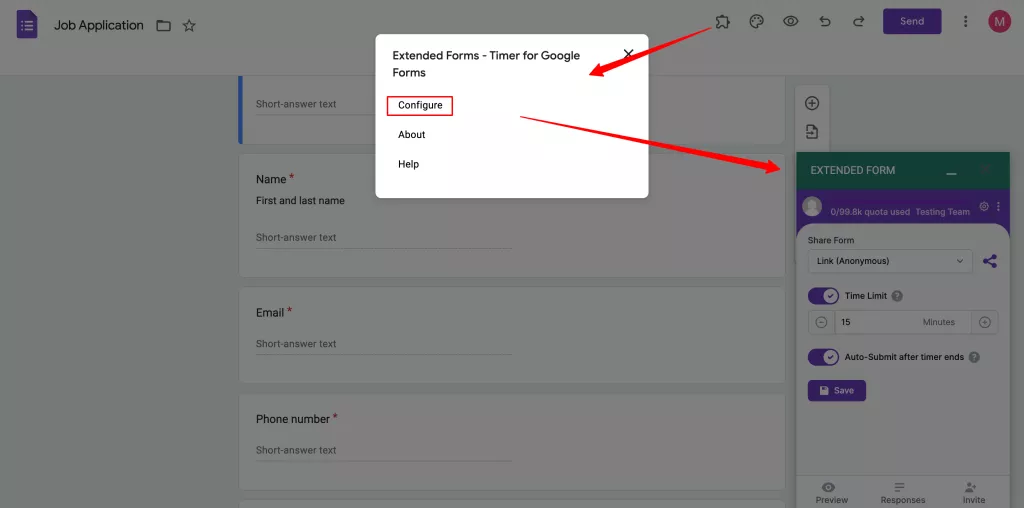
ExtendedForms is a Google form timer and proctor app that has other useful features to make the Google form journey better. To install and configure the settings follow the below steps.
- Go to More > Add-ons > ExtendedForms > Install.
- Once installed, we can see the add-on in the puzzle shape icon. [If you don’t see the icon, refresh your page]
- Click on ExtendedForms > Configure, and a settings box will appear on the left bottom side of the screen.
- From the settings box, you can set a timer, restrict attempts, and enable/disable the auto-save option. It also has a share form option that allows you to share forms anonymously, email-required, or invites-only.
- Further, you can add online proctoring click on the gear-shape icon beside the share form. It will lead to Form Settings on the main forms page of extended forms.
- In General settings, you’ll find the same settings that you configured before except it will also have the ‘accept responses date/time’ option to enable and choose the deadlines
- Click on the Proctor option, and you’ll see three different options for tracking, full-screen, tab-switch, and camera snapshot. Enable all the options to prevent cheating, you can also enable any one or two of them.
- Once that is done, update it.

4. Preview and Share Quiz
If you use extended forms then this is how you will have to preview and share the multiple choice quiz. Otherwise, you can preview and share google forms quiz through the default way in google forms itself.
- On the extended forms main form page, you’ll see an eye shape icon for preview. Preview it and if you want to change form settings, click on this ‘፧’ option and go to Form Settings.
- To share the form, click on the share icon on the form page, you can shorten and customize the URL (available under pro versions). Or click on send invitation button to send custom invites via email.
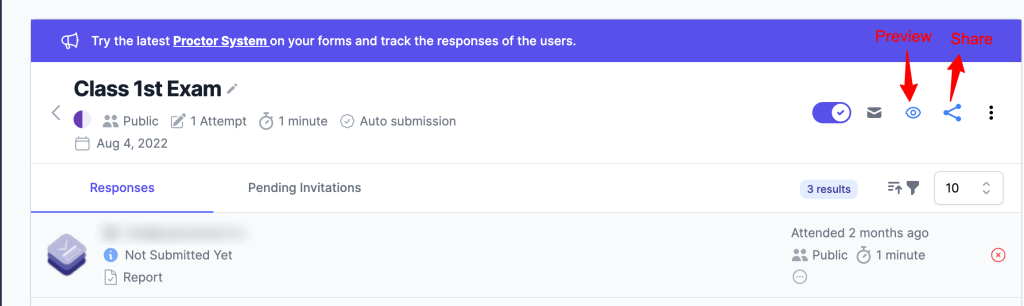
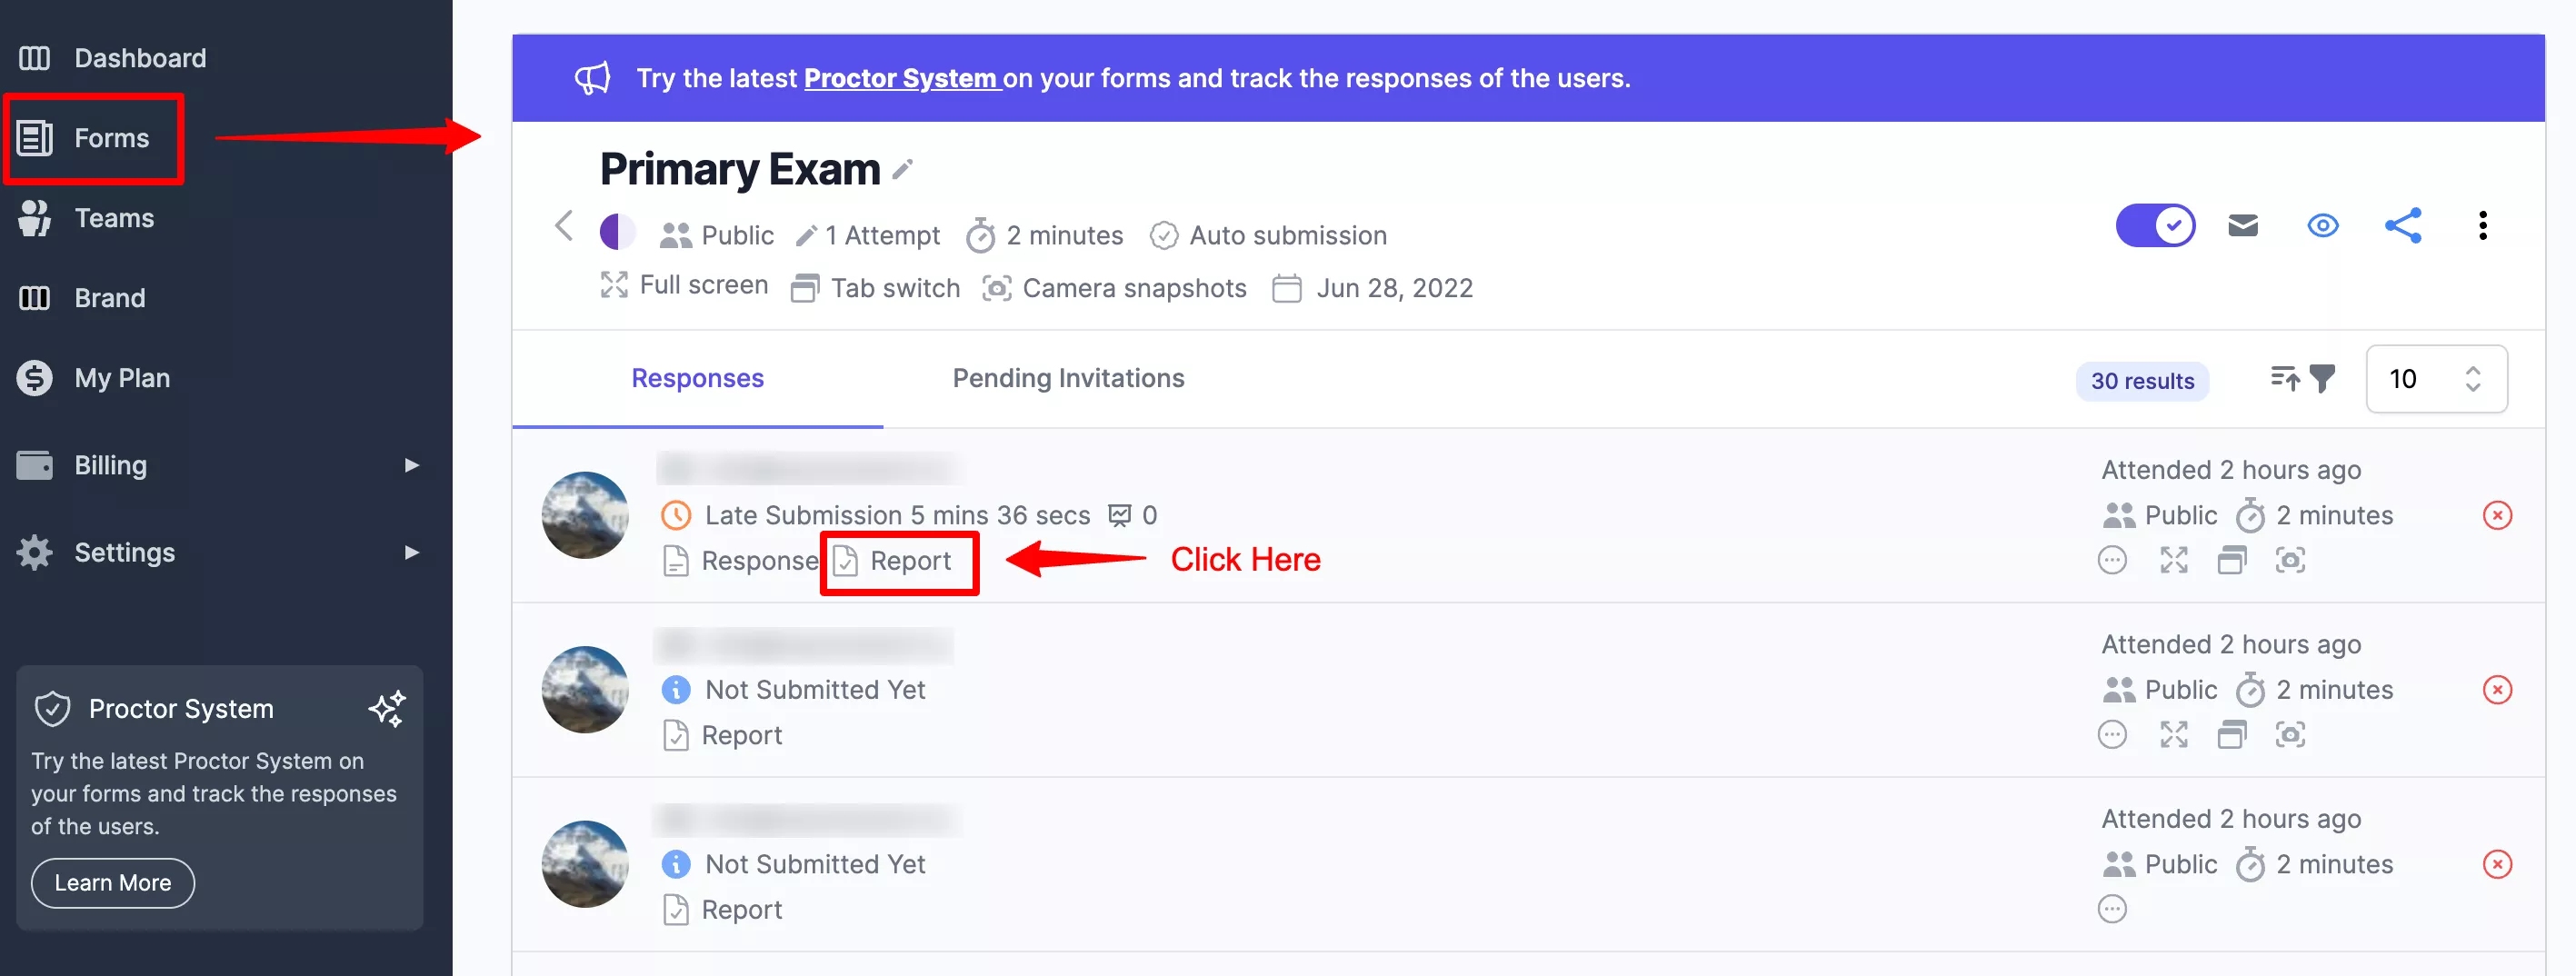
- Know that, After students submit the form, in the form section of the particular form you will find all the responses, and under everyone’s response, click on ‘Report’ you can check the report of it.
Wrap Up
This is so far how anyone can create a multiple choice quiz in Google Forms. As you may be aware of the Google Forms tool, you must know that this is a great multiple-choice quiz maker for beginners or anyone who wants to create a quiz, assessment, pre-screening interview questionnaire, or survey.
Besides, the tool has various apps to help it be more advanced and workable for everyone. As we mentioned one add-on in the article, ExtendedForms is a great app to try and get hands-on experience on. The app has a free basic version and paid versions with more features as well. You can check out the website for pricing and all the features it has along with many blogs for knowledgeable content.