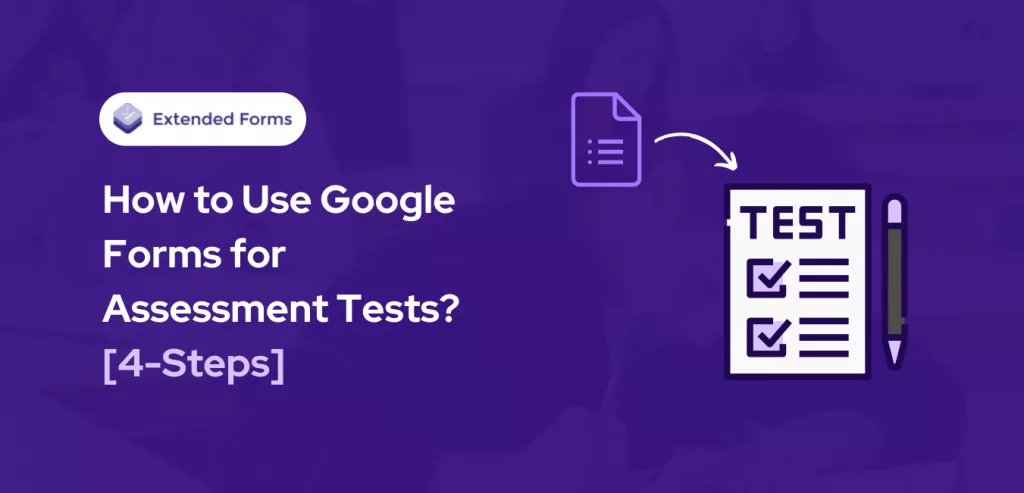
Thinking of a way to create assessment tests for your virtual learning? Then think no more, in this article, we are going to discuss together how to use Google forms for assessment tests.
If google forms also came to your mind for using it for assessment purposes then keep that thought. Because yes, it can be used for assessment and not only that but for many other purposes. Google Forms are a great way to collect data from students and efficient way to deliver assessments.
You can not only use it to create your own quiz/test but can edit other Google Forms as well. Anyway, in this post we have explained step-by-steps how you can create the google forms for assessment.
- Create Google Forms for Assessment
- Add Timer and Proctor Feature
- Preview & Share Form
- Bonus (optional): Add Online Assessment Form in Classroom
Key Takeaways
- Google Forms are useful for assessments because of its many features advantages. Like it is a self-grading tool that allows you to self-grade assessment tests and students can also get immediate feedbacks (it is only possible if you make the form into quiz)
- Further, google forms make the analysis simpler because of direct summary of responses available in real-time, or responses can be exported to google Sheets. Apart from that, it has conditional logic feature that allows to create personalised tests and deliver feedbacks.
- To create google forms for assessments, first setup the form, then customise the form, and configure the settings.
- Then install ExtendedForms for timer and proctor feature, add timer, and enable proctor settings in Form Settings. Then preview and share.
- However, if want to assign the work to students without sharing link or via email and streamlining the classwork, add the assessment test to Google Classroom.
Why use Google Forms for Assessments?
We all are aware of the popularity of Google Forms and why is it. Because not only it is a free tool to explore and use but it is simple yet a great form builder for anyone who wants to create assignments, online assessment forms, surveys, quizzes, and so many other use cases.
The list may go on, but if you don’t know why you should use google forms as an assessment tool then I am going to tell you a few advantages/features of google forms that are useful for using google forms for assessment.
- It is a self-grading tool – that means it allows you to self-grade assessment tests and doesn’t have to spend hours grading tests. And students can also get immediate feedback on their answers. If you make the form into a quiz, you can point values, feedbacks and that will be shown to the respondents.
- Google Forms make the analysis simpler – You can directly see the summary of responses or individual responses in real-time in Google Forms itself. Besides, responses can also be exported to Google Sheets without any effort for detailed analysis.
- Personalized tests – Google Forms can make conditional logic in tests, allowing you to make personalized tests for each student based on their responses.
- Deliver incorrect and correct feedback – If it’s not obvious until now, then google forms allows you the option to provide feedback for every answer, you can give feedback for correct answers and incorrect answers as well. This option is only available if you make the form into a quiz.
Steps to Use Google Forms for Assessment Tests
Now that you know why google forms for assessment is needed, let’s look into the steps to see how you can create assessments with google forms.
1. Create Google Forms for Assessment
To create the google forms for assessment, the first step is to set up the google form for assessment. I have divided this part into two sections first is to set up the google form and add questions and the second part is to configure settings and customize the form.
Set up Google Forms with Questions
- Go to Google Forms through G-DRIVE > New > Google Forms, or you can navigate it through a web browser – click here. Choose either an assessment template or a blank quiz.
- Add Title and description to the form for specifying the which and what’s of the assessment test.
- Next, select the types of questions to be included in your form. With Google Forms, you can choose from MCQs, short & long sentences, checkboxes, tick-box grids, and even upload files. Besides, to up your assessment test game you can also import videos and images as questions or options.
- If you have chosen an assessment template or blank quiz then you’ll get the option of adding answer key/feedback to every question. So you can add feedback to every question and even individual point values if not default.

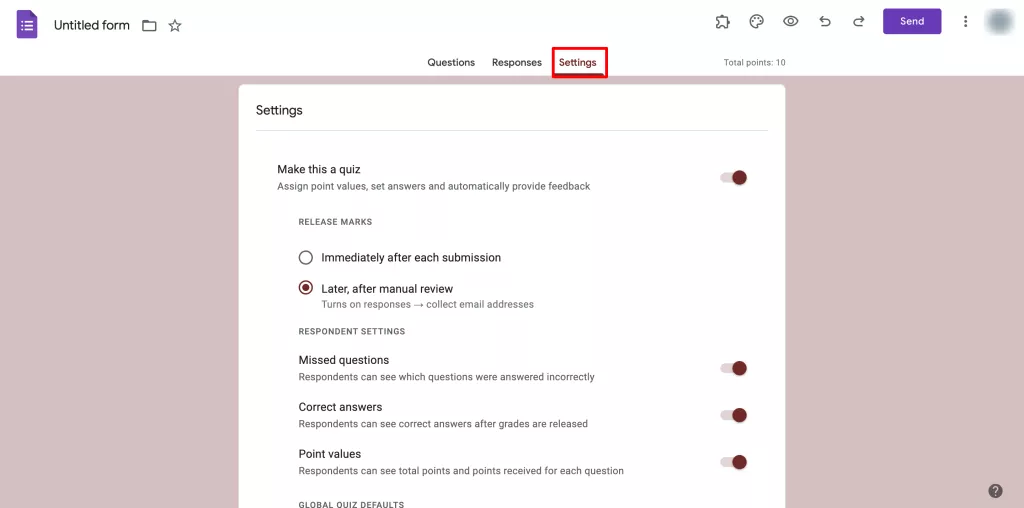
Configure Settings & Customize Form
Once, the adding questions to your test part are done. Next is to configure the options. This is not a strict steps procedure, you can configure settings before adding questions as well.
- So, if you have selected a blank quiz or assessment form template, then under the ‘Settings’ tab you’ll see the ‘make this a quiz’ option enabled, under which you choose how to release marks.
- Apart from that, you can manage how responses will be collected and presented under the Responses and Presentation options simultaneously.
- Then under the Defaults option, you can enable questions required and collect email addresses by default.
- Moving further, to customize the form click on Customize theme at the top bar. You can modify fonts, font sizes, header images, and theme colors.
2. Add Timer and Proctor Feature
Once you have created the google forms for assessment, the next step to include using google forms for assessment evaluation and reflection is to add a timer and proctoring feature. To do so, we have to install the ExtendedForms add-on.
- Go to More > Add-ons > ExtendedForms > Install.
- Once installed, we can see the add-on in the puzzle shape icon. [If you don’t see the icon, refresh your page]
- Click on ExtendedForms > Configure, and a settings box will appear on the left bottom side of the screen.
- From the settings box, you can set a timer, restrict attempts, and enable/disable the auto-save option. It also has a share form option that allows you to share forms anonymously, email-required, or invites-only.
- Further, if want to add deadlines, click on the gear-shape icon beside the share form. It will lead to Form Settings on the main forms page of extended forms. Under the General tab, navigate to the ‘accept responses date/time’ option and enable it and choose the deadlines.
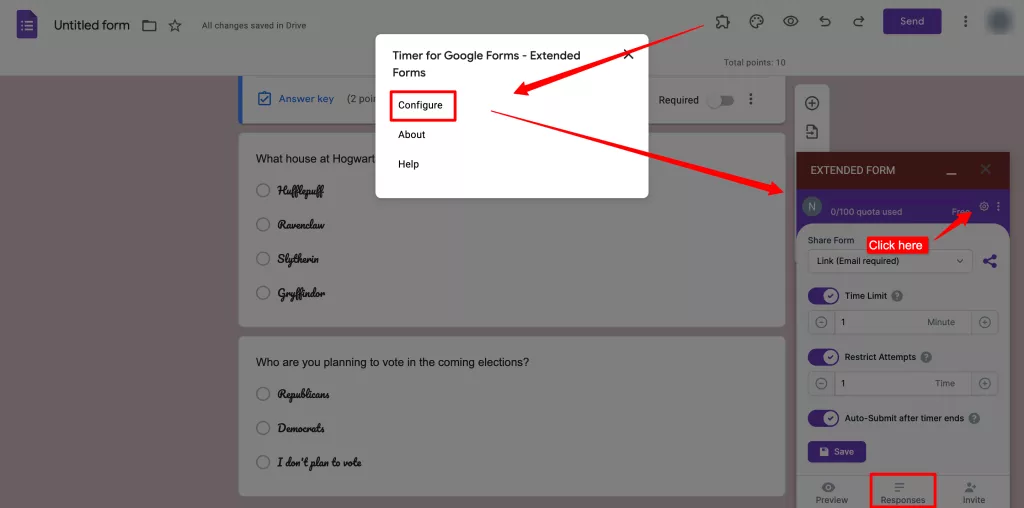
- Then click on the Proctor option, you’ll see three different options for tracking, full-screen, tab-switch, and camera snapshot. Enable all the options to prevent cheating, you can also enable any one or two of them.
- Once that is done, update it.

3. Preview & Share Form
After updating the proctor feature, preview the form & share the form.
- On the main form page, you’ll see an eye shape icon for preview. Preview it and if you want to change form settings, click on this ‘፧’ option and go to Form Settings.
- While previewing, you’ll get an idea of how it will look for test takers. You’ll see a message screen, click on ‘get started and it will show proctor is active. Then it will show you all proctor features and ask you to enable the camera, and once that is done you can start the exam.
- To share the form, click on the share icon in the form page, you can shorten and customize the URL (available under pro versions). Or click on send invitation button to send custom invites via email.
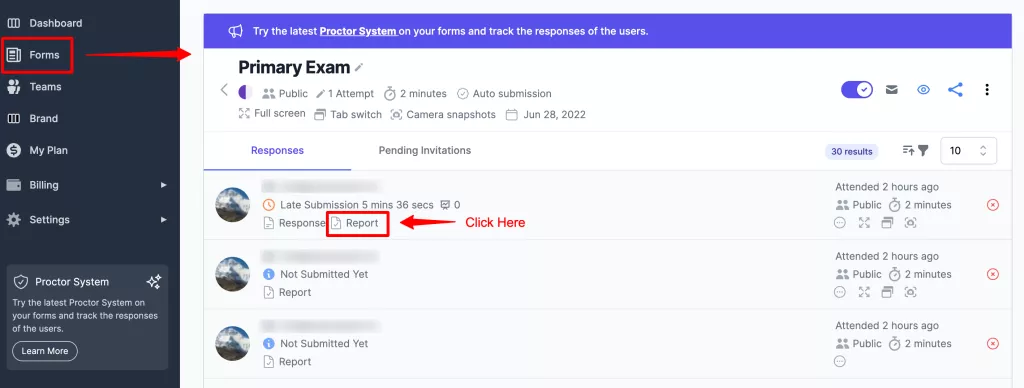
- Know that, After students submit the form, in the form section of the particular form you will find all the responses, and under everyone’s response, click on ‘Report’ you can check the report of it.
So, this is technically the final step if you don’t want to assign tests to students in classwork. You can view responses in the extended forms dashboard only and if you have kept the immediate marks released option then google forms will self-grade the assessment tool. Otherwise, you can grade it and send marks in an excel sheet.
4. Bonus (optional): Add Online Assessment Form in Classroom
This is an optional step, but if you are using google forms for assessment then with help of google classroom you can assign assessment tests to students and not have to share the form or link specifically. Everything can be done from adding classwork/tasks, to assigning students to it, adding grades, and students can hand it in the classroom only.
So, to add an online assessment form in the classroom we can do it via the ExtendedForms dashboard. However, apart from that if you have not created a class in Classroom you’ll have to do that from the google classroom tool itself.
- Sign in to Google Classroom with your google account. If you (teacher) have not created a class, then click on the ➕icon > Create class. Further, the join class option students can click on to add on to the class created by the teacher with the help of code given to students by the teacher.
- Once you’ve created a class, you can add a task of the assessment test from the Classwork tab inside the class. However, if you already have a class in the classroom app then adding tasks from extended forms is way easier.
- Under the People tab, all the students you have invited to join the class and teachers as well will be shown. You can invite teachers and students from this tab.
To do so,
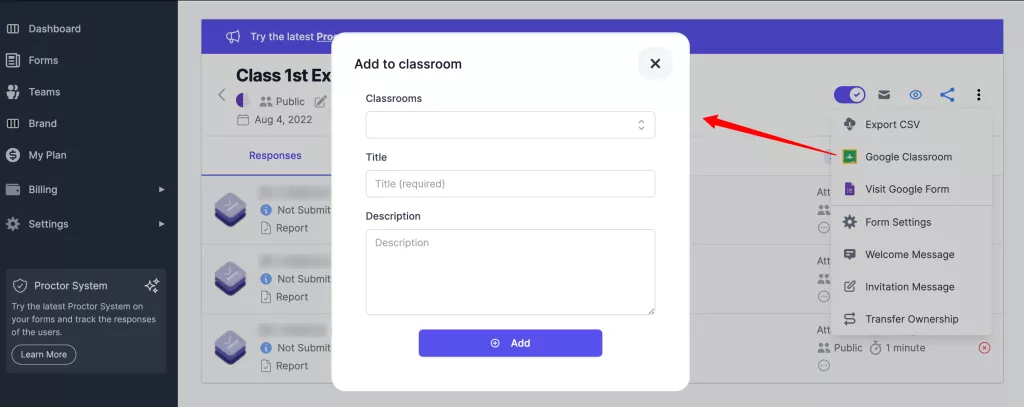
- In the settings box of the extended form in google forms, click on the ‘Responses’ option. It will take you to the EF dashboard in the same form section.
- Click on the ፧ icon > Google Classroom, a dialogue box will appear.
- Under classrooms, select the class you want to add the assignment to, then add the title of the assignment, and description of it.
- Once done, click on Add button. A task will be added to the classwork section.
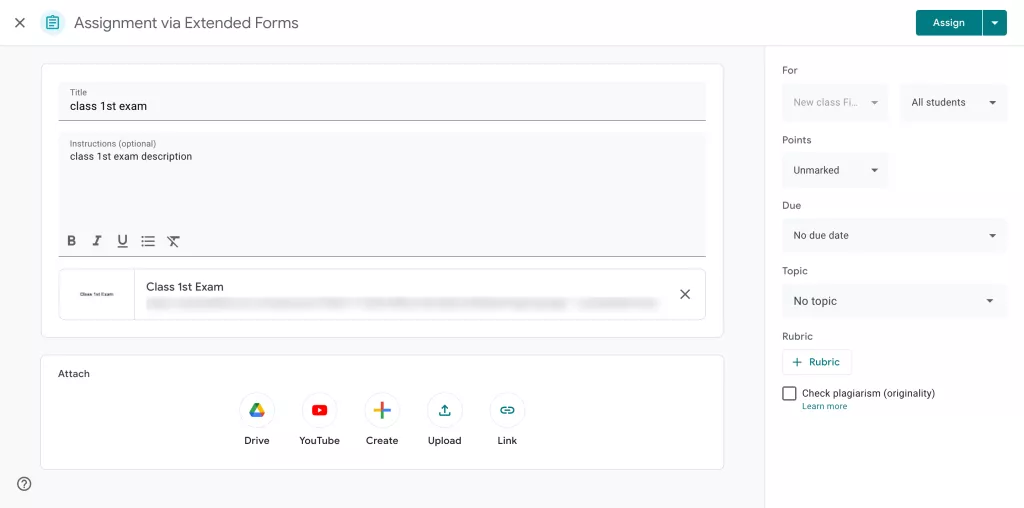
- In Classroom, under the Classwork tab, you will see the newly added task which is still in draft.
- To assign it, click on it, click edit assignment, there you can see all the options, the title, description, and attach option (you can attach more files if you want) however, the google form for assessment is already attached.
- On the right side, add points to the task, due date, and topic.
- Once configured it, on the top right corner you can see the Assign option. From the drop-down, you can select from the assign, schedule (then add the date and time to assign the assignment), and save draft options.
- Once you’ve assigned the assignment, you’ll see the total number of students assigned to it. And after students submit their assignments, in the number of handed-ins. And we are done here!
Wrap Up
Here we are ending the article on how to use google forms for assessment tests. Above steps are the way to create assessments with google forms and that is how you can use google forms as an assessment tool.
They are very easy and simple steps to follow. If you are looking to create assessments then what better time than now and what better way then Google Forms.
If you are using google forms then ExtendedForms is a must-try app, it is free to install and free to use but it comes with many pro features that are also very interesting to use. Like branding, custom invitation, welcome message (in different languages), customize URL, start/stop accepting responses, and so much more.
Try out the free version and if you like it (which I think you would) then you can upgrade the add-on