Looking for an easy way to create an intake form using Google Forms? We have got you covered.
Collecting information from clients, team members, or participants is a common yet crucial task for many organizations. An intake form simplifies this process by standardizing data collection and ensuring you capture all the necessary details.
Here, in this blog, we will take you through a detailed guide on how to create an intake form using Google Forms.
Table of Contents
Why Create an Intake Form?
An intake form is the first step in gathering essential information efficiently. It streamlines data collection, ensures consistency, and minimizes back-and-forth communication. Here’s why you should consider using one:
- Standardized Information: Ensures you capture the same details from every client or participant.
- Time-Saving: Reduces the need for follow-up questions and manual data entry.
- Organized Data: All responses are automatically stored and easily accessible.
- Enhanced Professionalism: Shows clients you have a clear, organized process.
- Customization: Tailor the form to specific needs, whether it’s for client onboarding, feedback, or event registration.
In short, an intake form simplifies your workflow and improves the overall experience for both you and your respondents.
Steps to Create an Intake Form Using Google Forms
Step 1: Navigate to the Google Forms and Create New Forms
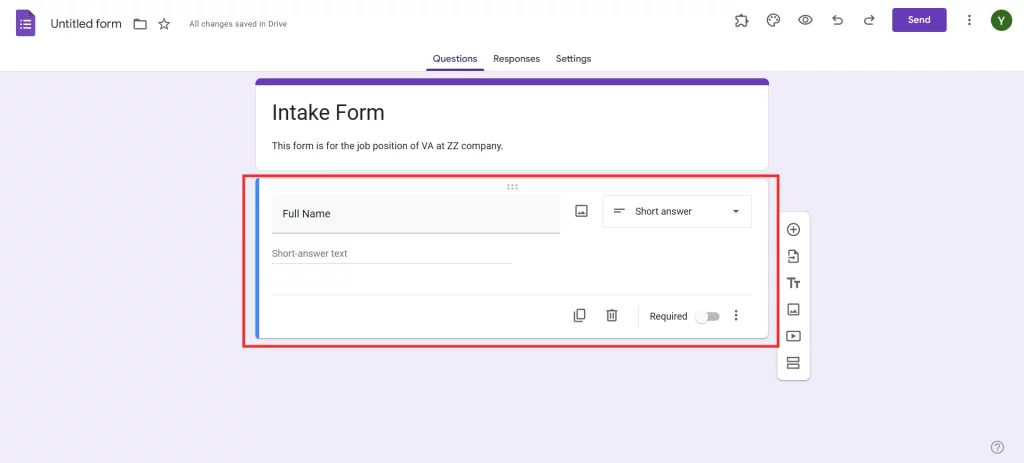
The very first step to creating an intake form is to navigate to Google Forms and create a new form. Either click on the (+) icon to create a form from scratch, or you can use the ready-made template and customize it according to your requirements.

Once you create your form, don’t forget to add the relevant title and a short description for users to get idea about the purpose of the form.
Looking for extensive customization of the timer in Google Forms? Read, ExtendedForms Unveils: Customized Timer Themes.
Step 2: Add Necessary Questions
The next step to creating an intake form is to add the necessary questions. We suggest you keep your questions short and to the point. This will prevent users from getting overwhelmed.

Google Forms is a versatile tool that offers you various question types like multiple-choice, linear scale, grid-based, paragraph, and more. Select one that is relevant to the question. For instance, you can use the short answer question type when asking for their name. And use a linear scale question type when asking for any skill proficiency.
Make sure you have asked applicants all the necessary questions. For instance, their contact number, qualifications, skills, and more.
Are you a business owner who wants to create a form? Read, How to Make a Customized Business Form With Google Forms? (4 Easy Steps).
Step 3: Customize the Theme
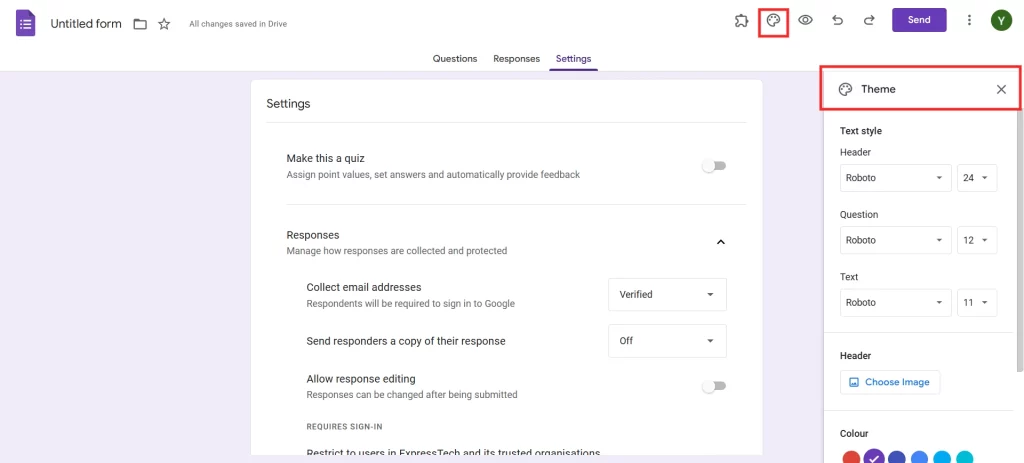
With Google Forms, you can easily customize the theme of your forms. This will help you align your forms with your brand identity. Click on the palette icon on the top right corner of the interface. From here, you can customize the font color, font sizes, color of the form, and more. You can also add the header image.

Step 4: Link Your Intake Form to Google Sheets
One of the most powerful features of Google Forms is its integration with Google Sheets. This allows you to automatically store and organize responses in a spreadsheet for easy analysis.

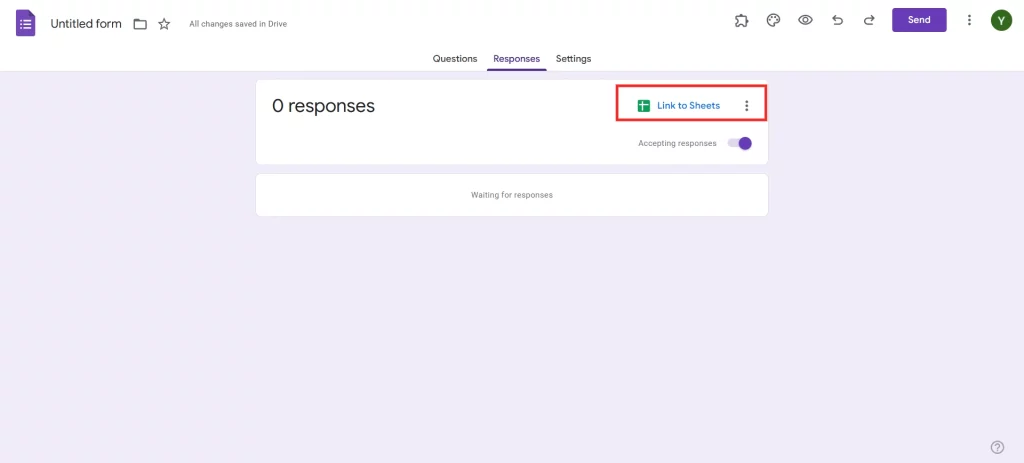
To link your form to Google Sheets, click the “Responses” tab at the top of the form. Then, select the Google Sheets icon. You’ll have the option to create a new spreadsheet or link to an existing one. Once linked, all responses will be automatically populated in the sheet in real time.
This integration makes it simple to sort, filter, and analyze data, especially if you’re handling a large volume of responses. It also facilitates collaboration, as you can share the Google Sheet with team members for review or further processing.
Step 5: Add Legal and Consent Field
If your intake form collects sensitive information, it’s important to include legal disclaimers and consent fields. Start by adding a section that explains how the collected data will be used and stored. This transparency builds trust with respondents and ensures compliance with data privacy regulations.
To add a consent field, insert a new question and choose Checkbox as the format. Label it with something like, “I agree to the terms and conditions.” Make this field required so respondents can’t submit the form without acknowledging your terms.
Step 6: Preview and Share
Before floating your form to the public, ensure everything is in place. Click on the eye icon on the top left corner of the interface and preview your form.

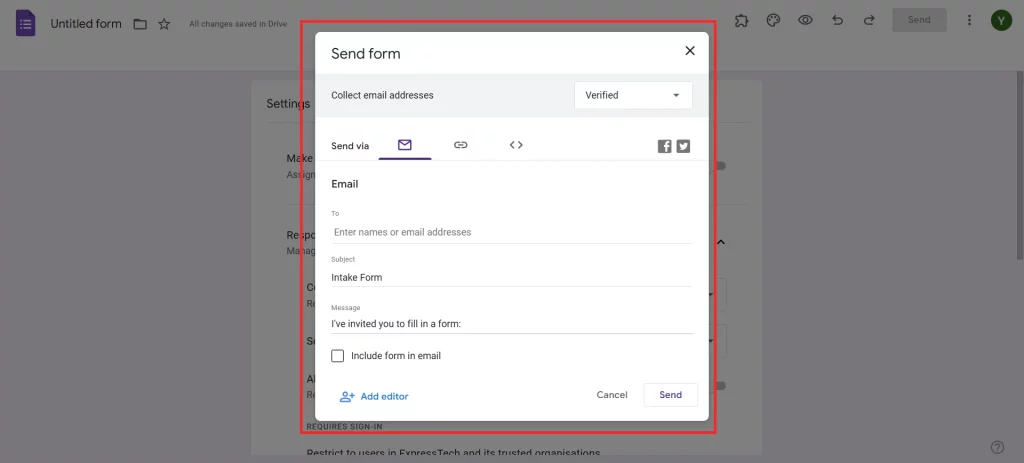
To share your form, click the “Send” button in the top right corner. You can distribute the form via email, generate a shareable link, or embed it on your website. If you’re sharing the link, consider using a URL shortener to make it more user-friendly.
Considering Everything
Creating an intake form using Google Forms is a straightforward yet powerful way to streamline your data collection process. From customizing themes to linking responses with Google Sheets, these steps ensure you build a form that’s both functional and professional.
Whether you’re onboarding new clients, gathering feedback, or organizing event registrations, an effective intake form simplifies workflows and enhances data accuracy. Plus, with Google Forms, you have the flexibility to tailor the form to your specific needs—without the complexity of advanced software.
We hope this blog has helped you create an intake form. If you like reading this, also read our detailed guide on How to Add a Hyperlink to Google Forms. (7 Simple Steps) .


