Don’t know how to make a Google Form public? We have got you
Google Forms has become an indispensable tool for creating surveys, collecting feedback, organizing events, and even conducting quizzes. But here’s the catch: a well-crafted form is only useful if your audience can access it seamlessly. Making a Google Form public ensures that anyone with the link can respond, breaking down unnecessary barriers and boosting your response rate.
Whether you’re conducting a customer satisfaction survey, organizing an event, or collecting feedback from a broad audience, making your form publicly accessible is essential.
In this blog, we will give you a detailed guide on how to make a Google Form public.
Table of Contents
Steps to Make a Google Form Public
Step 1: Open the Form in Google Forms
First, go to Google Forms, enter your Google account, and sign in. On your dashboard, choose the form to be made public or click on the new form to create a new form you wish to publish. Make sure once more that your form contains all necessary questions or fields, and descriptions and looks alright. This is the time when you can make all the difference – make sure all the interfaces look neat and intuitive.

A beautiful form also means an attractive design or layout of a form that makes responding to it less complicated. There is always a benefit to including a short, catchy introduction that informs the audience why there is a form in front of them. This sets expectation as well as ensures the users are rendered more sensitive.
Want to create an order form for your business? Read, How Do You Create a Google Forms Order Form? (4 Easy Steps)
Step 2: Click Settings, Then Responses
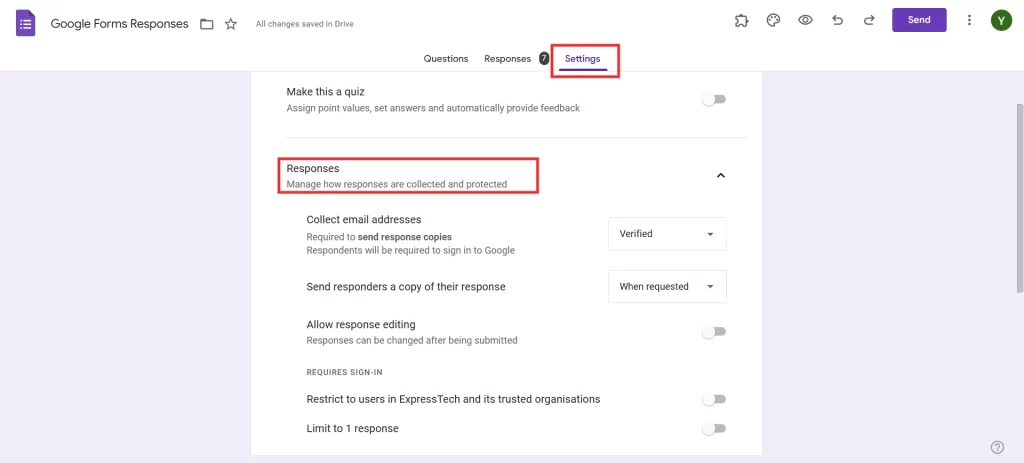
When your form is ready you go to the top right corner of the screen and click the gear icon. Doing this will take you directly to the Settings where you can further adjust who has access to your form. Go to the tab of the Responses to change the settings for access.
Here, you will be able to limit responses to specific users only, although this is the setting usually applied for organizational pages. If you want to make your form public you will need to configure these options. This step means that anybody with a link can get in regardless of whether one has a google account or not, or one is in the organization.
Step 3: Toggle All Options to the off Position
Under the Responses tab, you’ll see several checkboxes and toggles. To make your form accessible to the public:
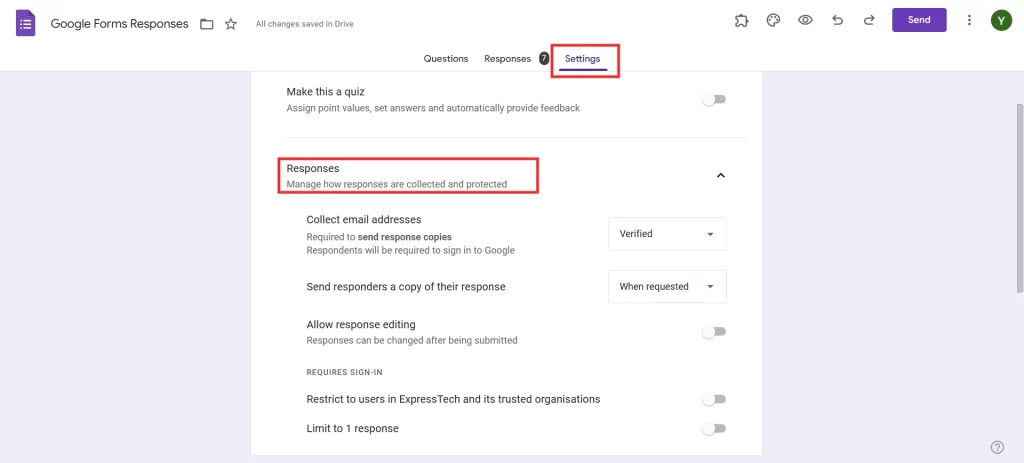
- Turn off the “Limit to 1 response” option. This prevents Google from requiring users to sign in to submit their answers.
- Uncheck the “Requires sign-in” box. This is crucial for allowing non-Google users to access your form.
- Review any other restrictions or permissions and disable them if they could block public access.
Step 4: Click the Send Button
Finally, with your settings in place, you should be ready to share your form. Located at the top right corner of the screen, press the purple Send button. This will open a window with other sharing options in a drop-down list you just click on it.
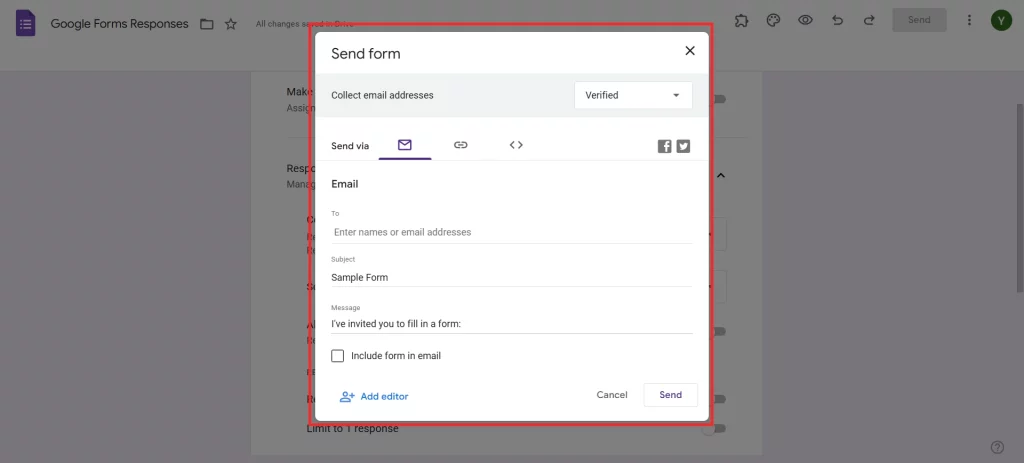
It is possible to submit the form directly to the recipient’s email address, get a URL for the form, which can be shared, and place the form on a website. All these have their merits based on the target audience of any particular article. For example, when the recipients have to be selected, the message is sent through email, while when the message has to go viral, a shareable link through a social media account is appropriate.
Step 5: Choose How You’d Like to Share Your Google form
Google Forms offers multiple sharing options, giving you flexibility based on your audience:
- Email: You can enter specific email addresses to send the form directly. This method is great for targeted surveys or small groups.
- Link: Click the link icon to generate a shareable URL. You can shorten the link for easier sharing, especially on social media platforms.
- Embed: For websites or blogs, select the embed option and copy the HTML code. This allows you to integrate the form directly into a webpage, providing a seamless experience for visitors.
Consider your audience’s habits when choosing a sharing method. For instance, if you’re reaching out to a younger audience, sharing the link via social media might yield better results.
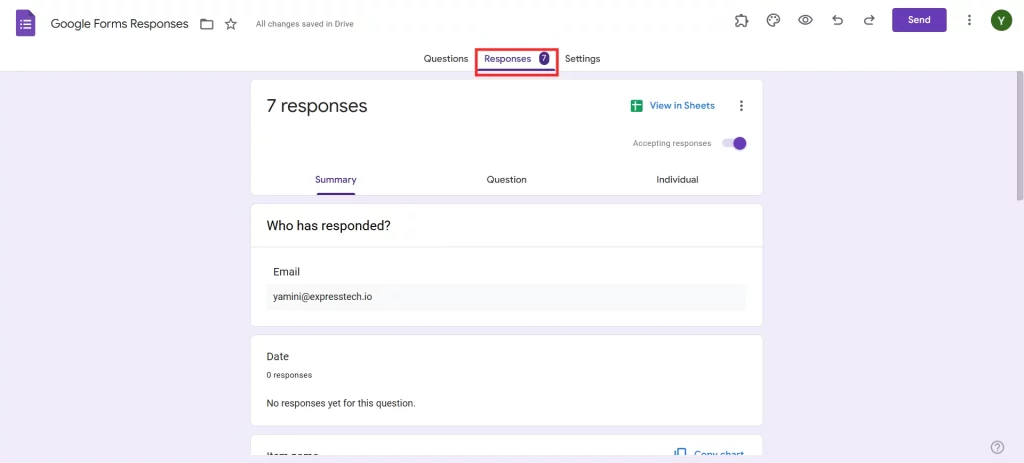
Step 6: Click on the Responses Tab to See Feedback
After sharing your form, you’ll want to monitor responses. Click on the Responses tab to view all submissions. Google Forms provides a summary of responses, individual answers, and even the option to export data to Google Sheets for more in-depth analysis.
The Responses tab is your command center. Here, you can:
- View real-time responses.
- Analyze trends and patterns through the summary view.
- Export responses to Google Sheets for detailed analysis or reporting.
Pro Tip: Enable email notifications to stay updated whenever someone submits a response. This is especially useful for time-sensitive surveys or events.
Enhance security by adding CAPTCHA to Google Forms. Read, How to Add CAPTCHA to Google Forms? (4 Easy Steps) to know more.
Why Make a Google Form Public?
Want to level up your Google Form? Consider using the Extended Forms add-on. It lets you add a countdown timer, making it perfect for quizzes, timed surveys, or any situation where you want to create urgency.
How to Set It Up:
- Visit the Google Workspace Marketplace and search for Extended Forms.
- Install the add-on and open your form.
- Navigate to the add-ons menu, select Extended Forms, and configure your timer settings.
This feature is particularly useful for educators, quiz creators, and anyone running time-sensitive forms. It keeps respondents focused and adds a layer of engagement.
Pro Tip: Create Timer-Based Google Forms with Extended Forms
Want to level up your Google Form? Consider using the Extended Forms add-on. It lets you add a countdown timer, making it perfect for quizzes, timed surveys, or any situation where you want to create urgency.
How to Set It Up:
- Visit the Google Workspace Marketplace and search for Extended Forms.
- Install the add-on and open your form.
- Navigate to the add-ons menu, select Extended Forms, and configure your timer settings.
This feature is particularly useful for educators, quiz creators, and anyone running time-sensitive forms. It keeps respondents focused and adds a layer of engagement.
Conclusion
Making a Google Form public is a simple yet powerful way to ensure your form reaches its full potential. By following these six easy steps, you can create an accessible, user-friendly form that invites participation from a broader audience.
Whether you’re conducting surveys, organizing events, or collecting feedback, a public form breaks down barriers and maximizes response rates. Don’t let restrictive settings hold you back—make your form public, share it far and wide, and watch the responses roll in!
If you liked reading this blog about making a Google Form public, also consider reading our detailed guide on How to Italicize in Google Forms (4 Easy Ways) and How to Grade Google Forms. (6 Easy Steps).
