Looking for an easy way to create a dropdown in Google Forms?
Google Forms has become a go-to tool for creating surveys, quizzes, and registration forms thanks to its user-friendly interface and powerful features. Among its various question types, the dropdown stands out for its ability to present multiple options in a compact, organized format. Whether you’re designing a registration form, collecting feedback, or planning an event, the dropdown feature can help streamline the respondent’s experience.
Here, in this detailed guide, we will show you how to create a dropdown in Google Forms.
Table of Contents
Steps to Create a Dropdown in Google Forms
Step 1: Open Google Forms
The very step to creating a dropdown in Google Forms is to go to the Google Forms website and start creating a new form. Google Forms offers 2 different ways to start creating a form: First is to create a form from scratch and second is to create a form from the pre-built templates.
For the guide, we will create a form from scratch.
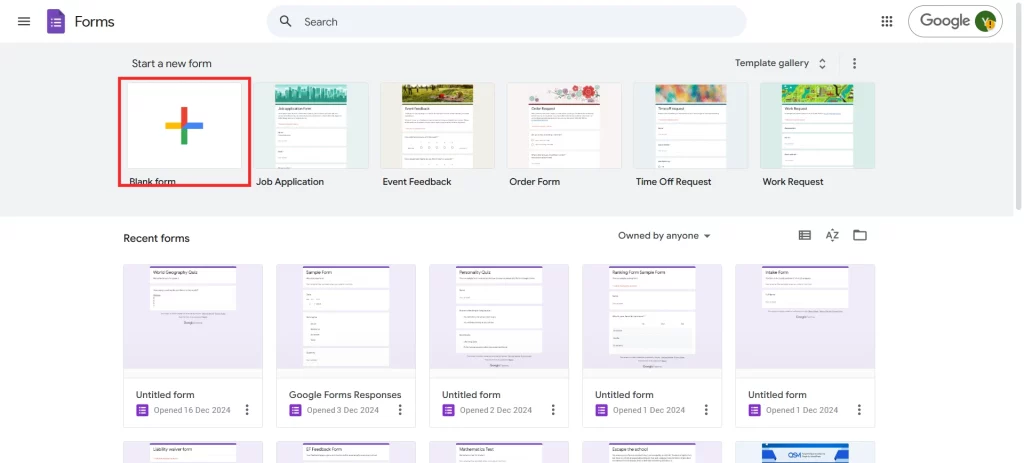
Once you click on the (+) icon, make sure to name your form and give a brief description of its purpose.
Want to add audio to the Google Forms? Read, How to Add Audio to Google Forms? (5 Easy Steps)
Step 2: Add Questions
Now, you will need to add questions to your Google Forms. Click on the (+) icon to add a question. Type the question data.
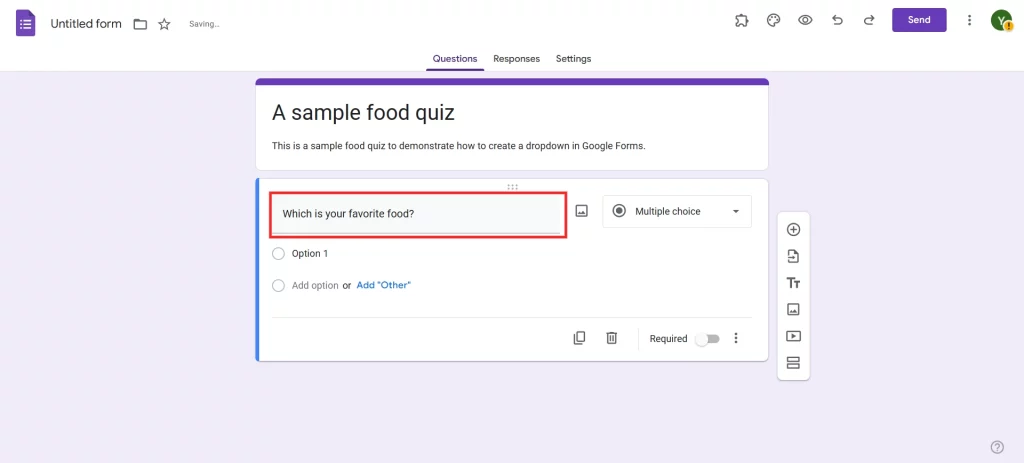
Here, you will find multiple options to customize your questions.
Step 3: Select ‘Dropdown’ Question Type
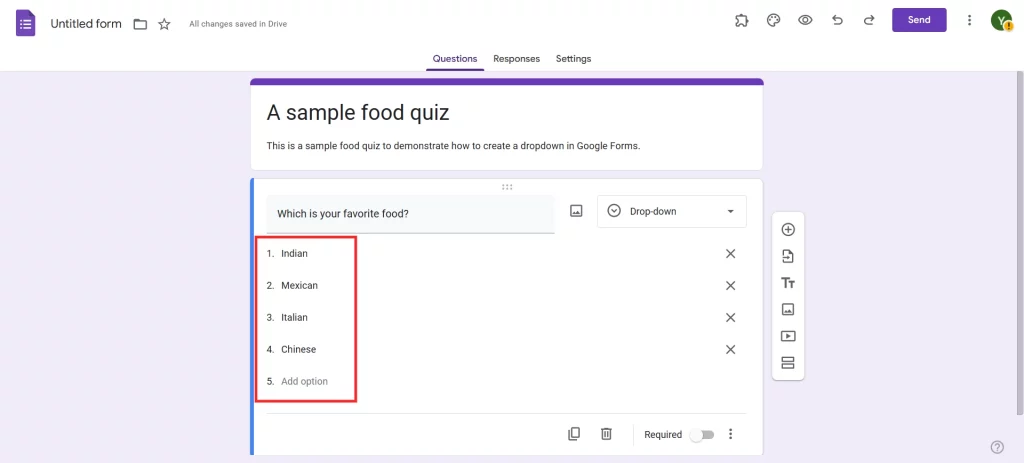
Google Forms is a versatile tool that offers various question types. Locate the dropdown menu next to the question field, which is usually set to “Multiple Choice” by default. Click on it, and from the list, select Dropdown. The interface will now adapt to fit the dropdown form style, allowing you to add options in a compact format.
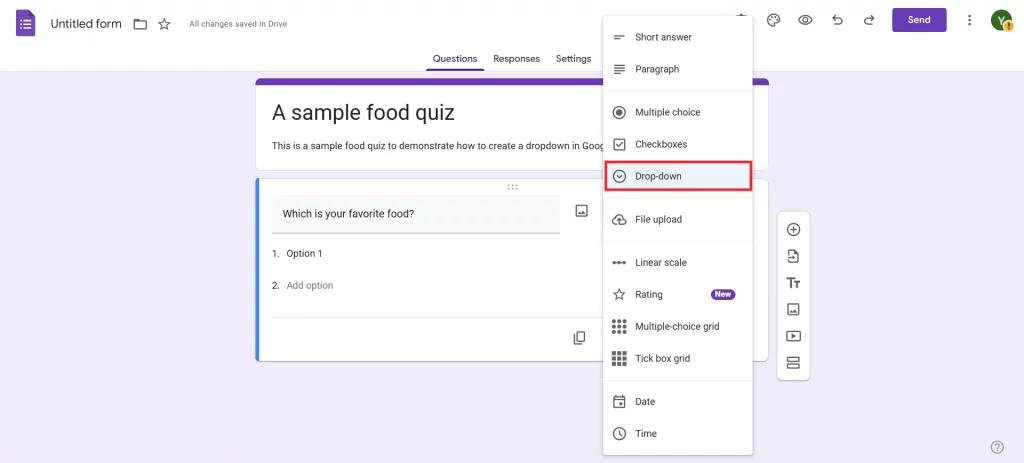
Step 4: Add Options
Now, it’s time to populate the dropdown list with options. Click on “Option 1” and type the first choice. For example: “Italian.” Press Enter to add more options, such as “Mexican,” “Indian,” and “Chinese.” If you make a mistake, hover over the option and click the trash icon to delete it. To rearrange options, click and drag them into your preferred order.
Step 5: Preview and Share
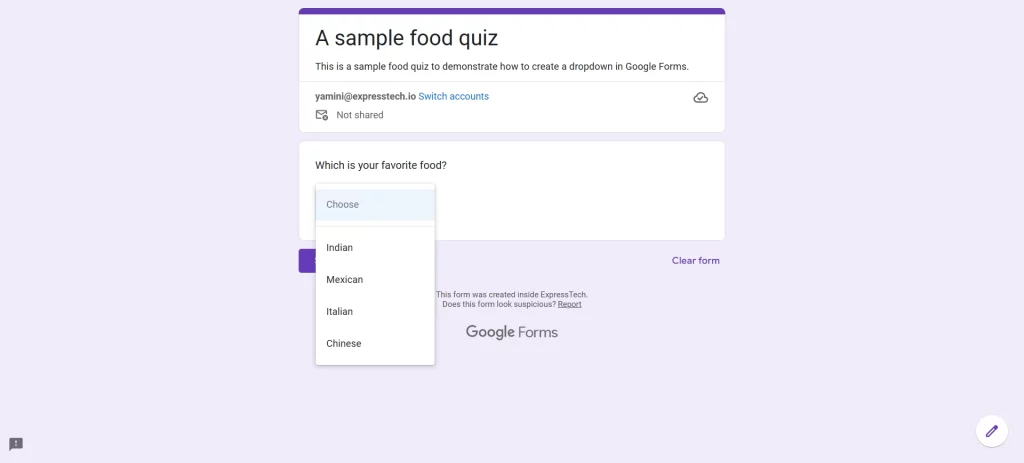
Your dropdown is now ready! Before sharing the form, preview it to ensure everything looks as intended. Click on the eye icon in the top-right corner to preview your form. Test the dropdown question by selecting an option. Once satisfied, click the send icon (paper plane) to share the form via email, link, or embed it on a website.
Bonus tip: Shorten the URL when sharing the link for better readability. You can also restrict responses to one per person or allow respondents to edit their submissions.
Are you a business owner looking to add a logo to your Google Forms? Read, How to Add a Logo to Google Forms.(4 Easy Steps)
When to Use the Dropdown in Google Forms?
Dropdowns are perfect for scenarios where a clean and concise user experience is essential. They limit screen clutter and make it easier for respondents to choose from a long list of options. Here are some examples:
- Registration Forms: Ask participants to select their city, state, or preferred event session.
- Feedback Surveys: Gathering ratings or preferences, such as choosing a product category.
- Application Forms: Allowing applicants to pick their qualifications or area of expertise from a predefined list.
- Event Planning: Capturing meal preferences or seating arrangements.
Pro Tip: Create Timer-Based Google Forms With ExtendedForms
ExtendedForms enhances the capabilities of Google Forms by addressing limitations like time tracking and response control. Here’s why you should consider it:
- Add a Timer to Google Forms: ExtendedForms lets you set a timer for quizzes, exams, or time-bound surveys. This ensures respondents stay focused and complete the form within a specific period.
- Secure Proctoring Options: For academic or competitive settings, the tool offers proctoring features, reducing the chances of cheating during online assessments.
- Streamlined Setup: Unlike other complex add-ons, ExtendedForms integrates seamlessly with Google Forms. It’s easy to install and use, requiring no extensive setup.
- Real-Time Response Tracking: Monitor the progress of your respondents in real-time, gaining valuable insights while the form is active.
- Enhanced User Experience: ExtendedForms creates a polished experience for both administrators and participants, ensuring smooth navigation, especially in high-stakes environments.
Perfect for educators, HR teams, and event organizers, ExtendedForms transforms Google Forms into a robust tool tailored to modern needs.
In Conclusion
Creating a dropdown in Google Forms is a straightforward yet powerful way to enhance the user experience. By following these 5 easy steps, you can design professional forms that are both functional and visually appealing. Whether you’re organizing a corporate survey or planning a casual event, the dropdown feature ensures simplicity and efficiency.
Try experimenting with dropdowns in your next form and elevate your data collection process. And if you want to go a step further, consider integrating advanced features like timers with ExtendedForms for a smarter, more engaging experience.
If you like reading this blog on how to create a dropdown in Google Forms, also read how to Grade Google Forms. (6 Easy Steps) and How to Prevent Google Forms Spam? (7 Easy Ways).


