Increasingly, teachers are embracing online learning whether that means posting assignments online in Google Classroom, emailing works to students/parents, or posting it on their website. However, Google Forms can be used by teachers no matter what platform they are using to assign work. In this post, we are going to look into how you can create an assignment with Google Forms.
We will see two-step process to create an assignment with Google Forms. As we all know, it is a famous google tool that allows you to create assignments, quizzes, assessments, and what not. With all the modifications done to Google Forms in last few years, they have become an essential tool for digital classroom.
If you are new to Google Forms or just coming back to it again. Read on to find out how to create an assignment with google forms.
Key Takeaways
- There are two-steps process to create an assignment with Google Forms – Create assignment with Google Forms and send them or move forward and add to Google Classroom.
- Generally, it will better to follow both the steps and do it that way because Google Classroom is one of the best digital classroom for teachers and students.
- To connect google forms assignments with google classroom as a classwork, ExtendedForms will come into help as it has classroom integration.
- To add task directly from ExtendedForms to Google Classroom, first create a google form, install extended forms, configure it with timer and other basic settings.
- Go to the main page of ExtendedForms via Response option, go to Google Classroom and add a task. Once that is done, assigning it to students and adding grades will have to be done from the classroom app itself.
Two steps to creating an assignment with Google Forms
Using google forms for assignments is a reliable option of teachers but adding it to google classroom is one of the best way to use both tools for assignments. Here, into two different ways the process is divided, you can stop after first step but we would suggest to follow the other step as well.
1. Creating Assignment with Google Forms
To prepare google forms for assignments, it is important to start with setting up google forms for both ways. However, this default step is for all those who don’t use google classroom or have experience with assigning the google classroom forms quiz. You just have to create it in google forms and send that.
- To start with, we have to set up a google form. To start with, go to Google Forms through G-DRIVE (you must have a google account, if not then create one), or you can navigate it through a web browser – click here.
- Select a ‘blank form’, ‘blank quiz’, or select from an education template. Then add the title and description to the form for assignment submission.
- Create the form by smartly choosing the question types. Google form has different questions to choose from like MCQs, short & long sentences, checkboxes, tick-box grid, and even a file upload option.
- To make the assignment more interesting we can even import videos & images.
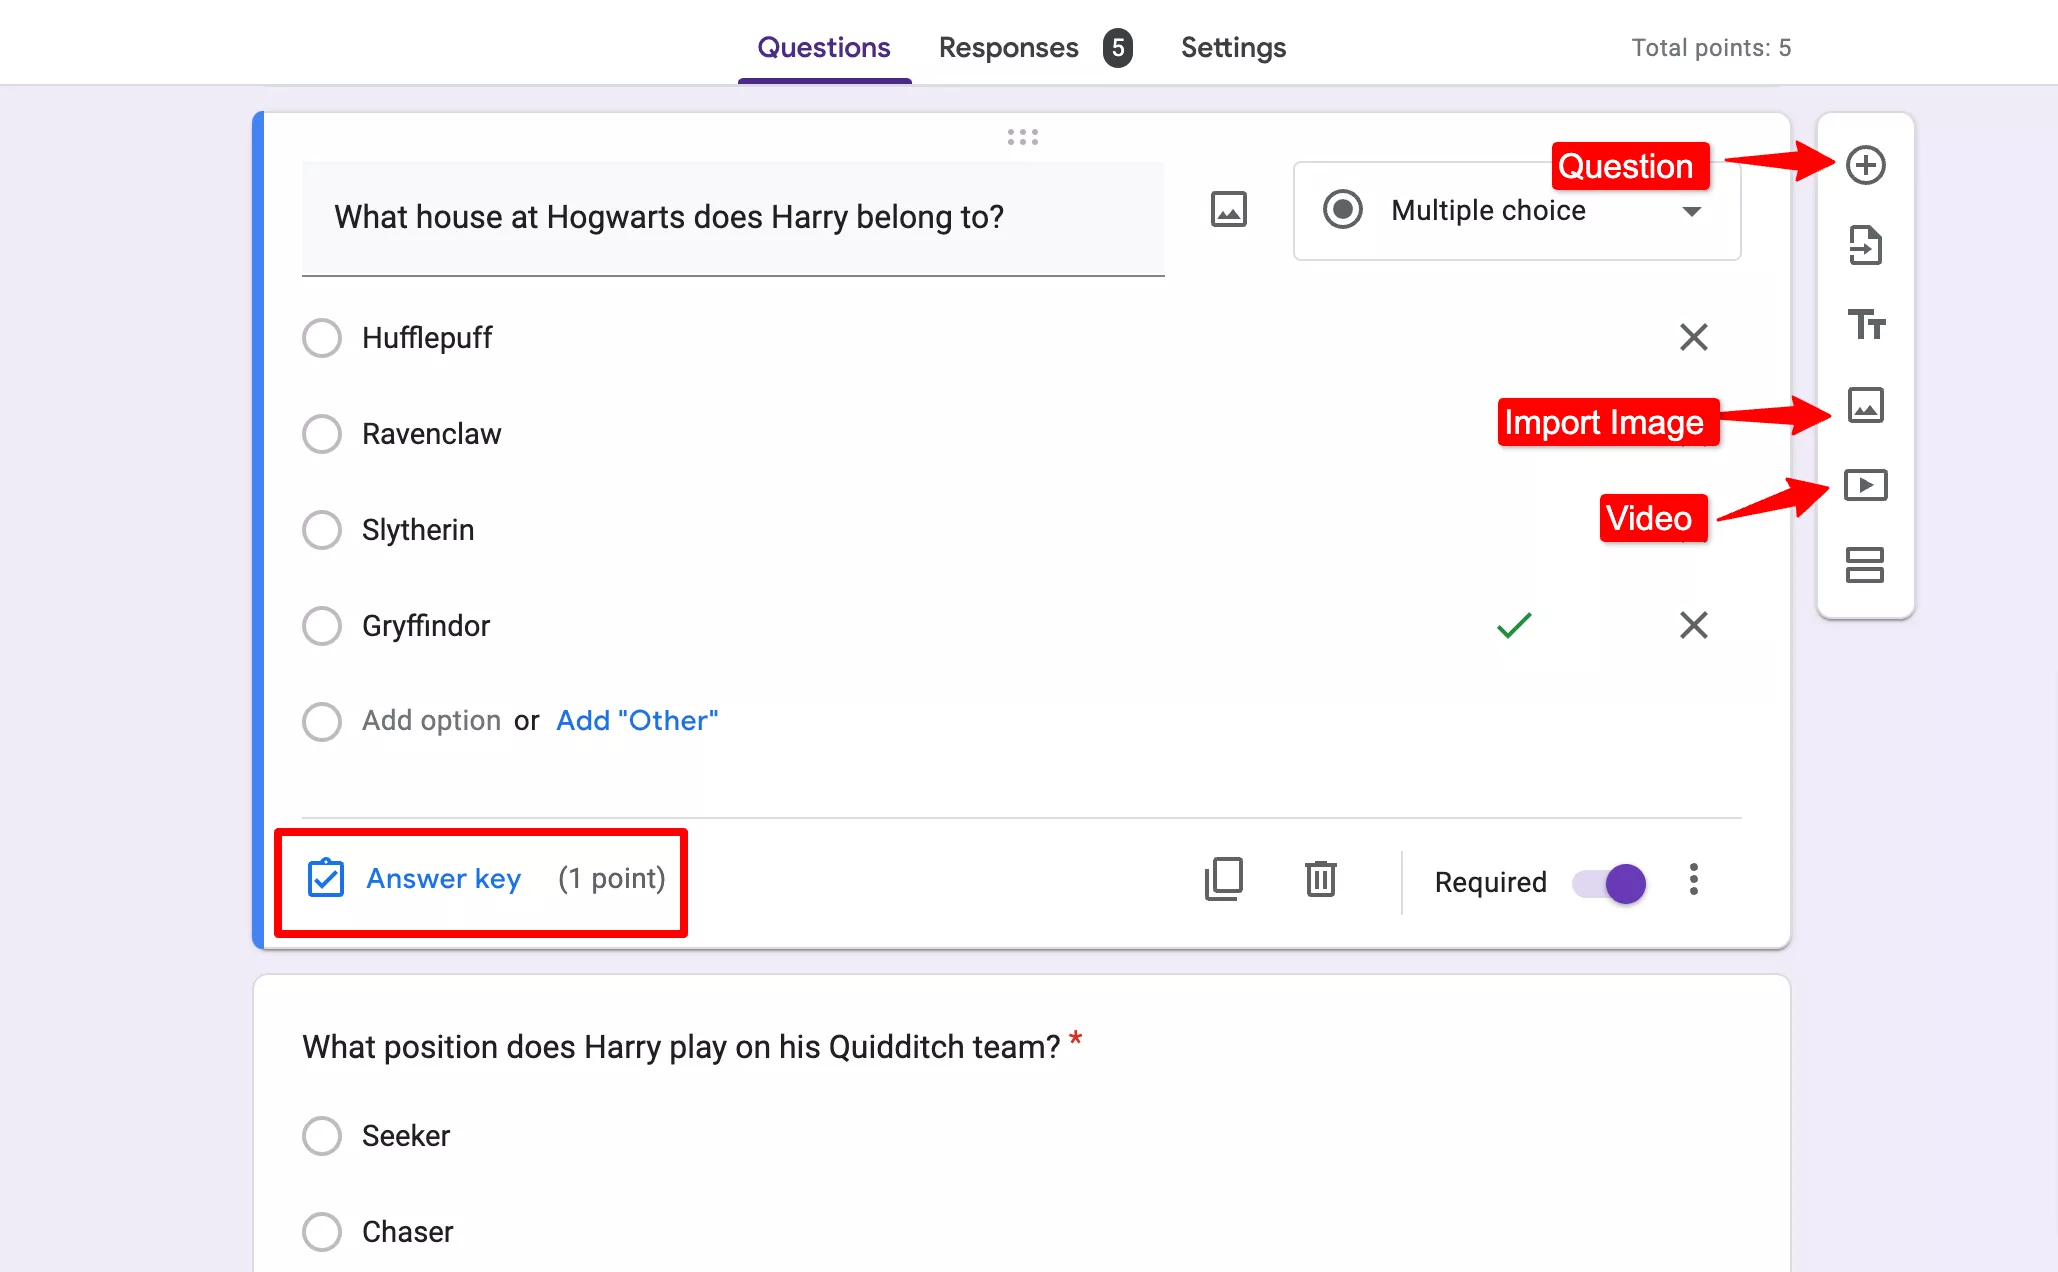
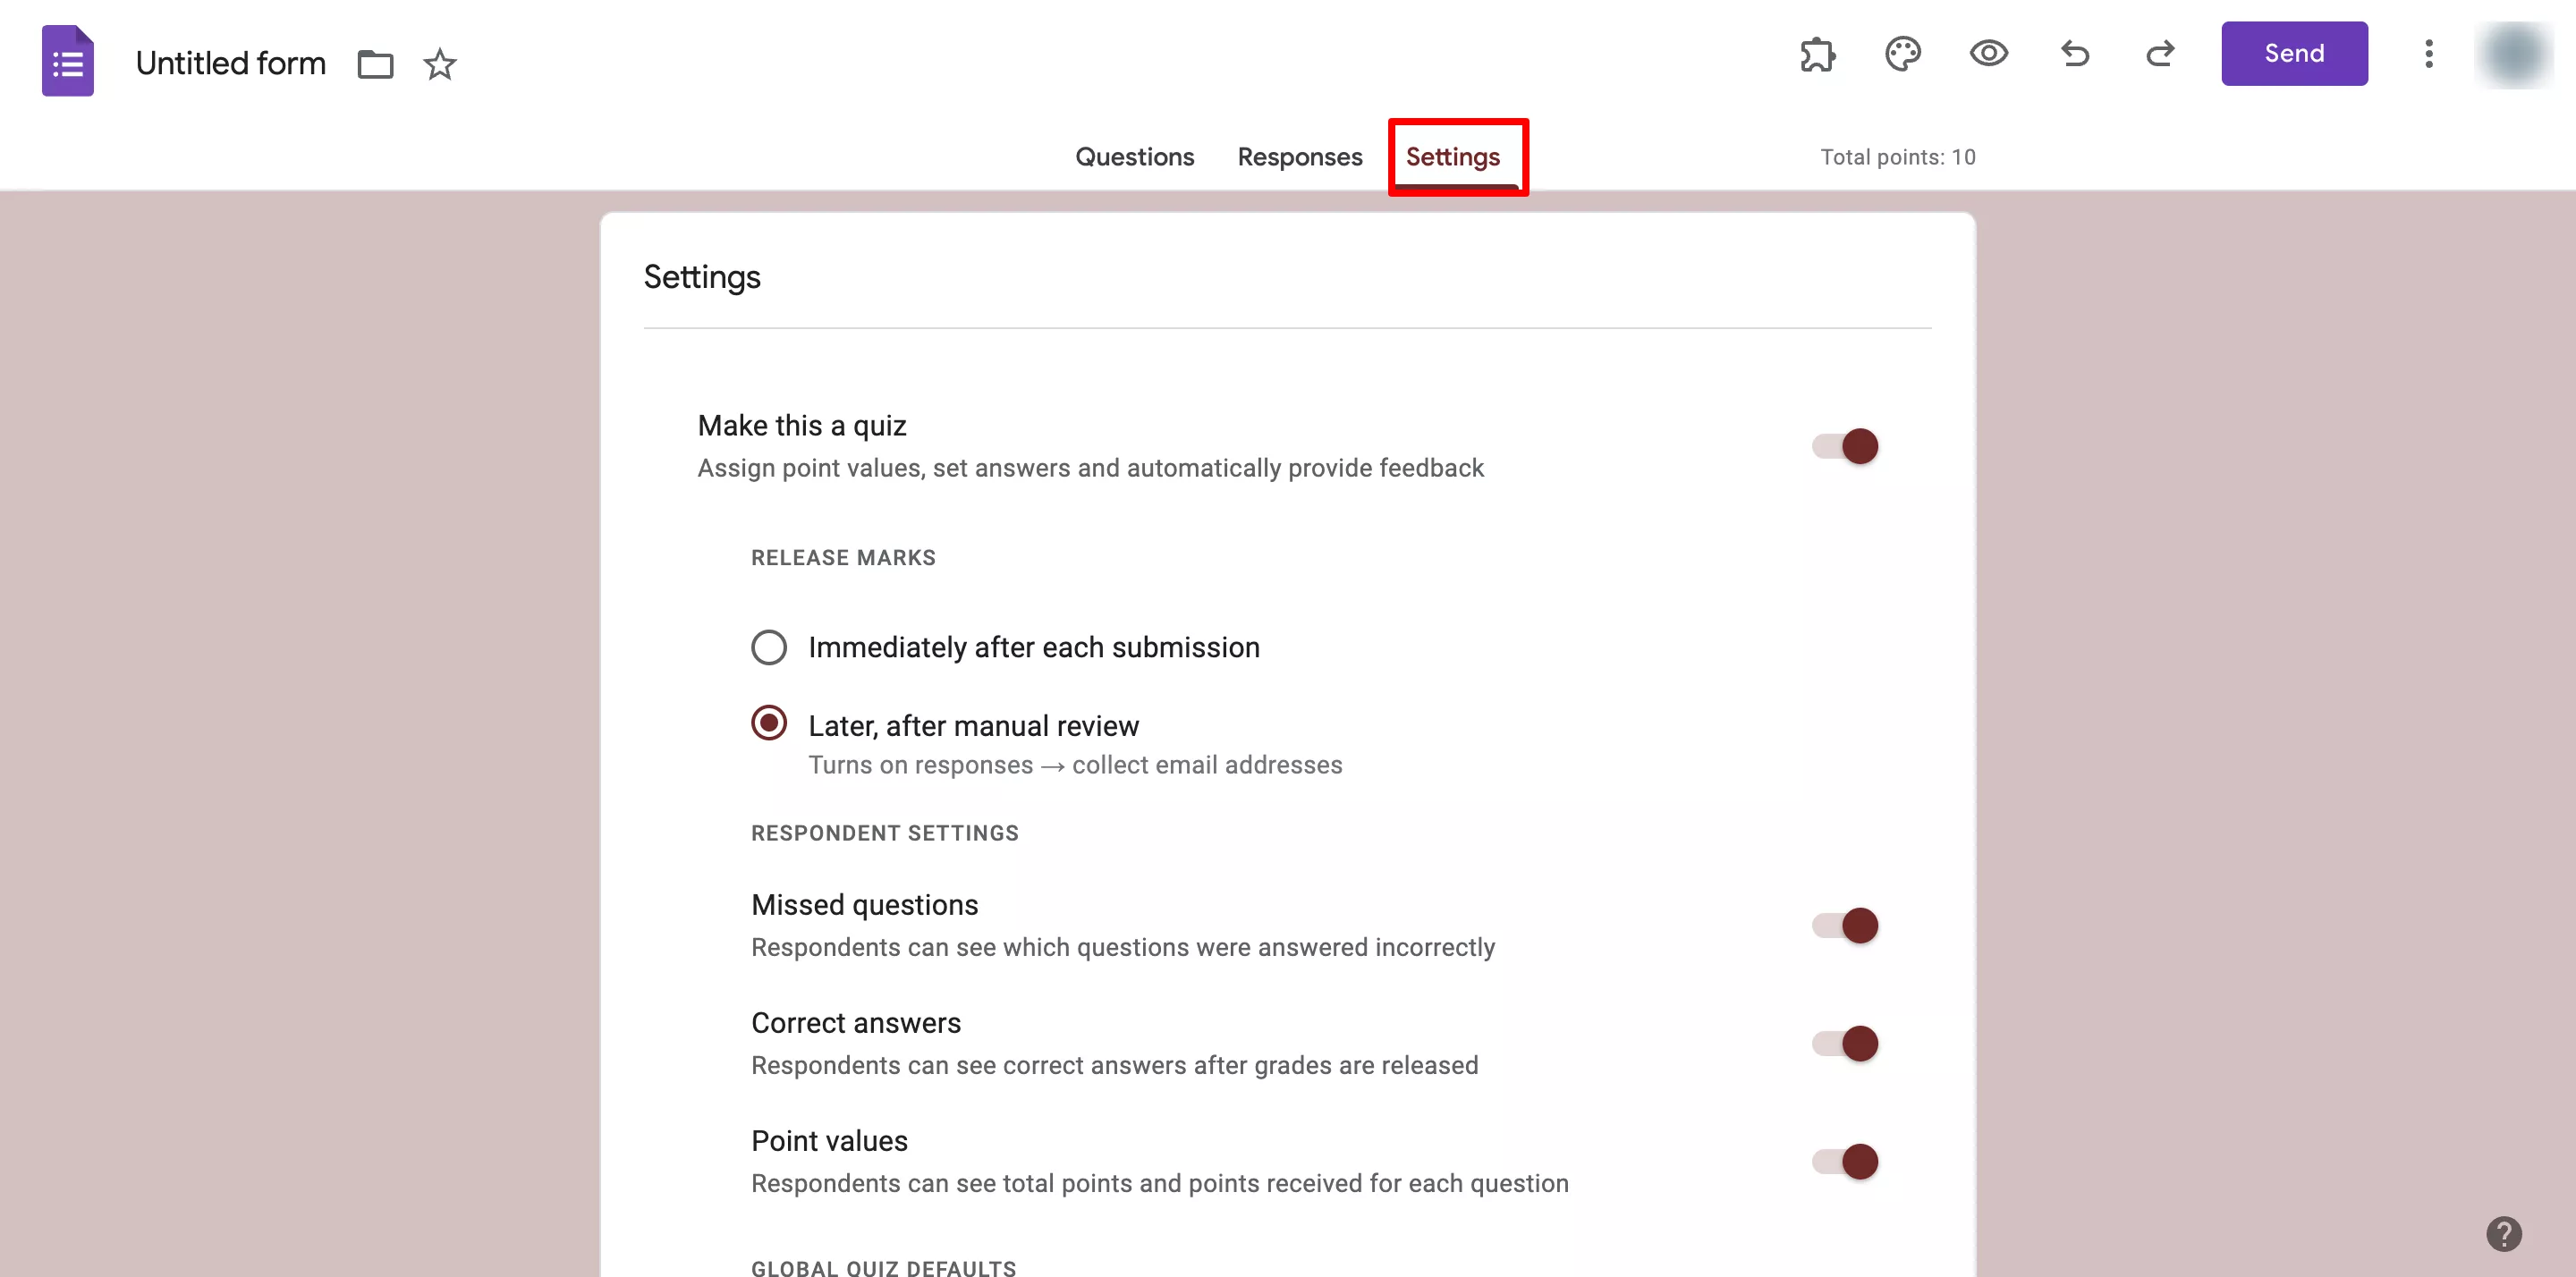
- Further, we have the option to customize Google Forms for assignments. Firstly, configure basic settings under the ‘Settings’ tab. Besides, if you want to make the form a quiz (enable the quiz option), if you’ve not already chosen a blank quiz. You can also configure further options like ‘point values’, ‘missed questions’ ‘show progress bar’, etc
- Under every question, add answer feedback (if you have made the form into a quiz), you can also add individual point values to all the questions.
- Customize the form theme under the same option at the top bar. You can modify fonts, font sizes, header images, and theme colors.
- Then, connect forms-sheets, so to get all the responses in excel format. Go to the Responses tab, click on the excel sheet icon, and the google form will be connected with a spreadsheet.
- Once we have created the form and everything in it. The next step will be to add a timer or a deadline to make the assignment with google form a bit advance.
Add ExtendedForms app for timer
To add a timer, we have to first install the add-on for that process –
- Go to More > Add-ons > ExtendedForms > Install.
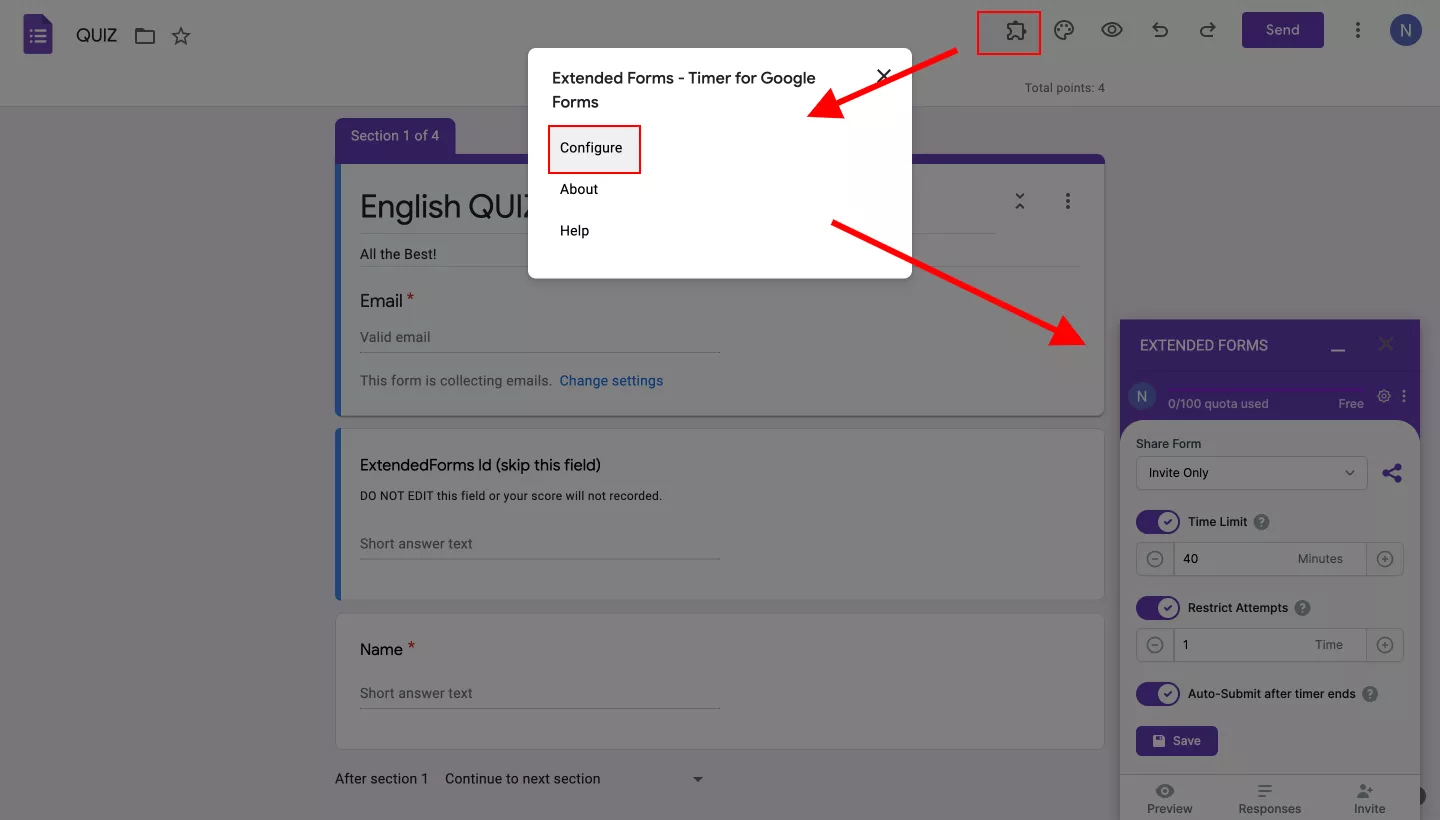
- Once installed, we can see the add-on in the puzzle shape icon. [If you don’t see the icon, refresh your page]
- Click on ExtendedForms > Configure, and a settings box will appear on the left bottom side of the screen.
- In that, we can configure basic settings, like timer, restrict attempts, auto-save option, and how you would like to share form.
- In short, you can add a timer from the settings easily, if needed you can also disable the timer feature.
- Further, if you want to add deadlines, click on the gear-shape icon beside the share form. It will lead to Form Settings on the main forms page of extended forms. Under the General tab, navigate to the ‘accept responses date/time’ option and enable it and choose the deadlines.
- Update the settings and share the form with students. If you upgrade to the pro version, you’ll get the option to shorten and customize the link. Or send invites with a custom invitation message.
This is one way to create an assignment with Google Forms. However, there is an expanded step to create an assignment with google forms and add it to google classroom.
So, if you don’t want to add an assignment in Google Classroom you can stop right here. However, the classroom is a google app created for educators and students to streamline classroom management like assigning classworks, adding people, assigning points, etc.
2. Adding it to Google Classroom and assigning it to students
Hence, if you want to see how to push assignments with google forms in google classroom. Follow these below steps.
With the help of ExtendedForms, we are going to add classwork tasks from the add-on dashboard itself. But first, let’s set up the google classroom and then assign it to students.
- Sign in to Google Classroom with your google account. If you (teacher) have not created a class, then click on the ➕icon > Create class. Further, the join class option students can click on to add on to the class created by the teacher with the help of code given to students by the teacher.
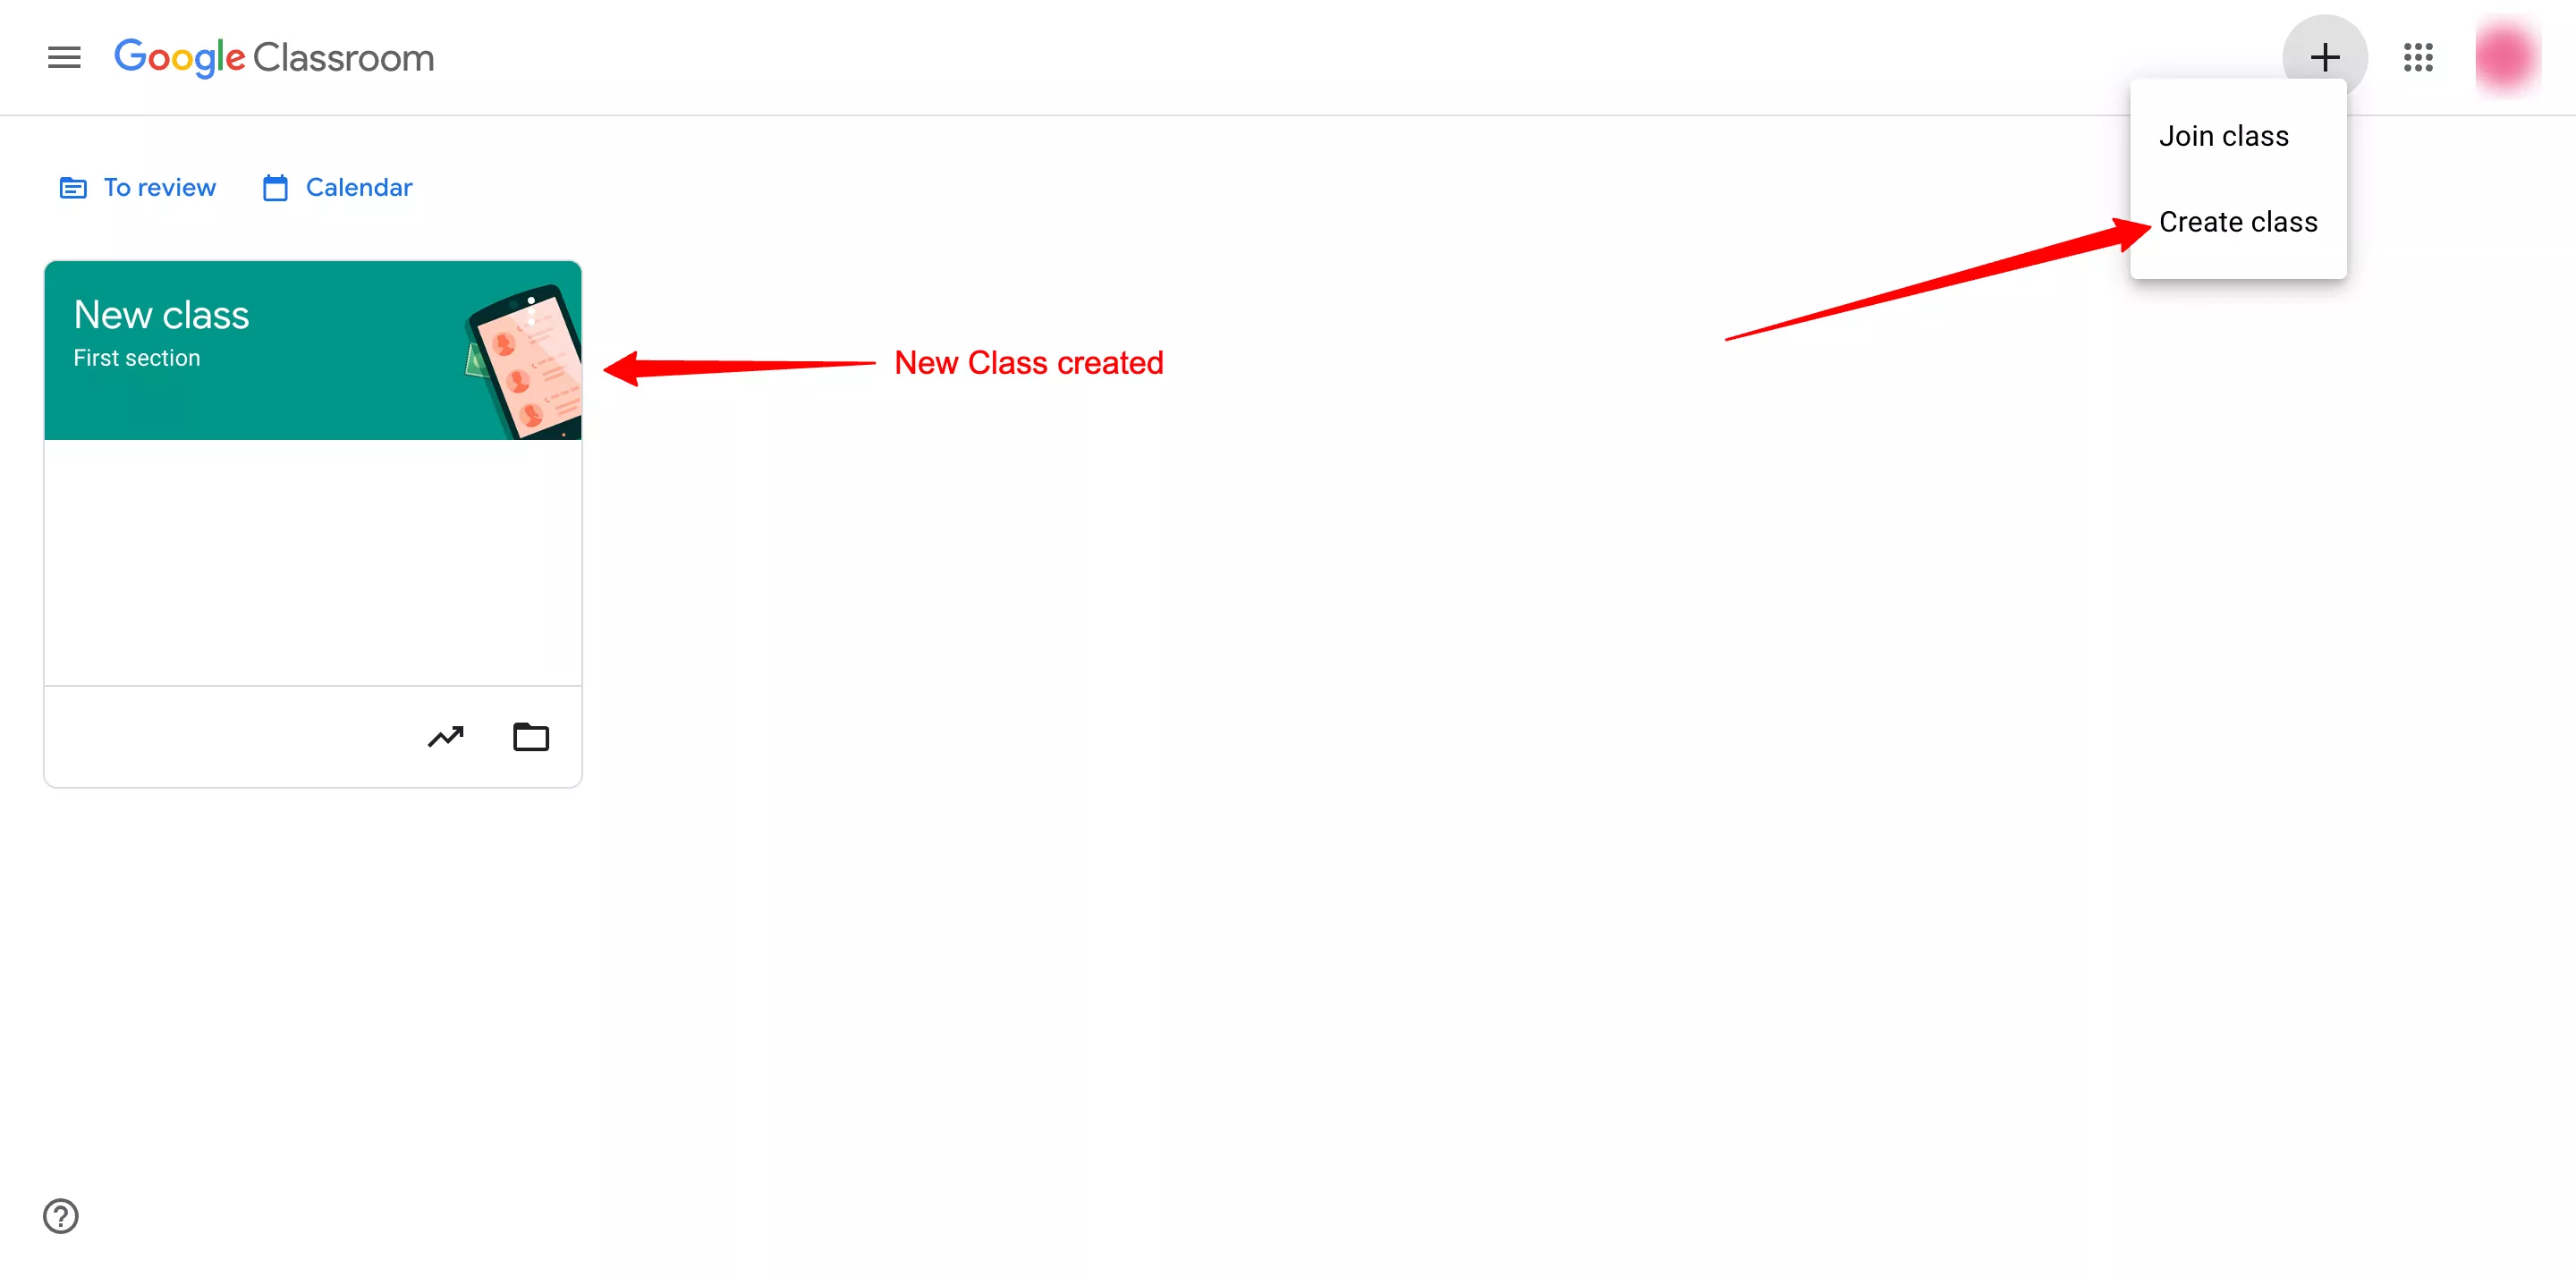
- A pop-up dialogue box will appear to create a class, add the class name, section, subject, and room. Then click on create, you’ll see on the homepage a new class has been created which will be useful for you and students to differentiate all classes and add different assignments as per the class.
- Click on the new class you’ve created, under ‘stream’ you can see all the classwork, information, people assigned inside every task, etc. Along with that google meet link to conduct a class and class code that teachers can provide to students to join the class created. And the upcoming box that will show all the work due in soon.
- In the Classwork tab, students will find all the tasks added by you. You can create classwork from this tab itself.
Note* (If you already have a class created in the classroom and you are well versed with classroom features, then you can directly create a task from the extended forms dashboard once you’ve created the assignment with google forms, for that go to add classwork from extended forms section directly)
- Under the People tab, all the students you have invited to join the class and teachers as well will be shown. You can invite teachers and students from this tab.
- Lastly, under the Marks tab, all the students’ marks for every task will be shown in table format.
Now, that we know about the what and hows of google classroom, let’s add a google form for assignment submission in the classroom and assign it to students.
Add Classwork from Extended Forms
- In the settings box of the extended form in google forms, click on the ‘Responses’ option. It will take you to the EF dashboard in the same form section.
- Click on the ፧ icon > Google Classroom, a dialogue box will appear.
- Under classrooms, select the class you want to add the assignment to, then add the title of the assignment, and description of it.
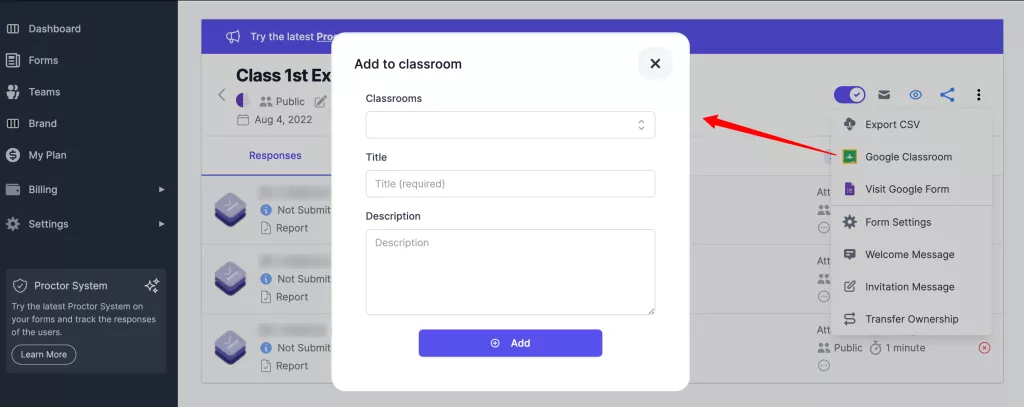
- Once done, click on Add button. A task will be added to the classwork section.
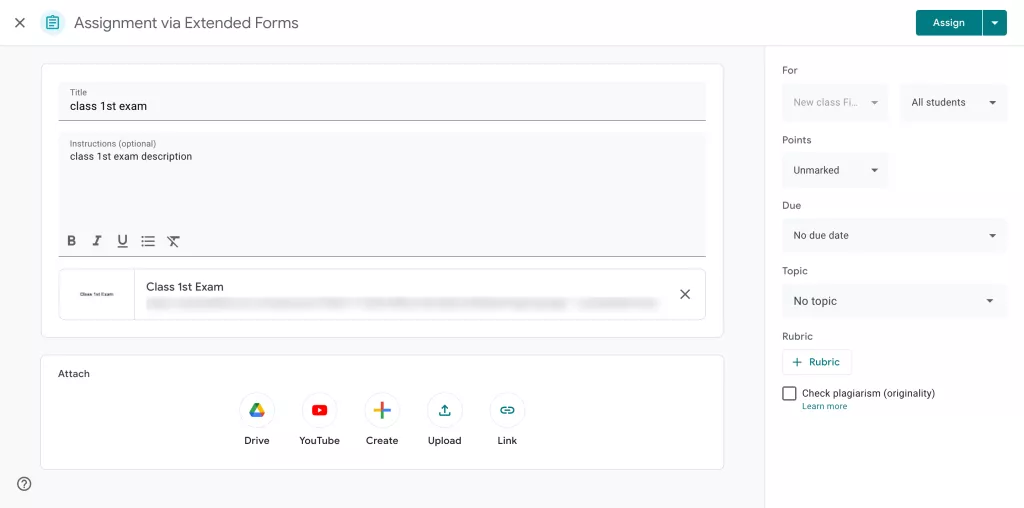
- Again go to google classroom, under Classwork you can see the newly added task which is still in draft.
- To assign it, click on it, click edit assignment, there you can see the title, description, and attach option (you can attach more files if you want) the google form is already attached.
- On the right side, add points to the task, due date, and topic. Further for better evaluation, click on the Check plagiarism box (note that you can enable originality reports on 5 assignments per class).
- Once configured everything, on the top right corner you can see the Assign option. From the drop-down, you can select from the assign, schedule (then add the date and time to assign the assignment), and save draft options.
- Once you’ve assigned the assignment, you’ll see the total number of students assigned to it. And after students submit their assignments, in the number of handed-ins. And we are done here!
The Final Words
Here’s how to create an assignment with google forms and with google classroom. The steps may be long however once you practically do it, you’ll get it very easy and quick to create assignments with google forms.
If you have used google classroom before, you might have a piece of good knowledge about it. So the steps become swifter and from extended forms, you can easily add a task. ExtendedForms is a great timer and proctor google forms add-on. Along with classroom integration and timer feature you can also add a proctor feature to the assignment. So that students can’t cheat while working on the assignment.
ExtendedForms is a must-try app if you consistently use Google Forms. It has a lot in store for you, other than the features mentioned above in the article. You can try the free plan in which you get a timer and proctor feature. Apart from that, for other features like branding, invitation message, customize URL, start/stop accepting responses, etc features you’ll get in paid versions.