We are all guilty of bending some rules and not always following them to some extent. However, we can definitely prevent cheating during online exams. How you may think so? In this post, we have discussed different ways and one specific way with help of the ExtendedForms add-on to prevent cheating in Google Forms.
It is likely impossible to put a stop to cheating during exams, but we can certainly prevent unethical practices to happen. That being said, Google Forms make teachers’ life easier by offering a system that allows the creation of assessments or quizzes.
Before diving into various ways to prevent cheating let’s dive into different cheating tricks respondents do. Like opening a new tab, previewing forms beforehand, texting answers to friends, sharing forms, and so on.
Luckily, we can counter these practices using the same technology to our advantage. Let’s see how to prevent cheating in Google Forms.
- Different ways to prevent cheating in Google Forms
- Create Google Forms
- Enable Google Form Proctor
- Preview the Output & Share Form
Key Takeaways
- There are different ways to prevent cheating in Google Forms like – adding sections, shuffling questions & answers, broadening question structure, and using timer.
- Apart from that, to prevent cheating in Google Forms online proctoring is one of the best way. ExtendedForms have the proctor feature that allows users to track respondents performance and prevent cheating.
- To enable proctor feature, create a form, install ExtendedForms add-on, go to it’s main dashboard, from there go to Forms section, select the form and go to Form Settings.
- Navigate to Proctor option and enable all the options, update it and share the form.
Different ways to prevent cheating in Google Forms
Though Google Forms don’t have in-built advanced features that are reliable to prevent cheating. But it has various options that allow you to prevent cheating in Google Forms to an extent. Here are a few of the ways that you can do to stop unethical ways.

1. Using Sections to Prevent Previewing
If your Google Form doesn’t have sections, then quiz/exam takers can in advance view all the questions. However, if you start adding sections to your form, it will prevent students from previewing the whole form without giving the test. A Form’s sections feature split the form into sections that cannot be viewed unless a particular section is not answered.
Besides, you can also add a password to the form to prevent respondents from moving ahead. What you can do to set up a password is, add a short answer question and using the data validation feature add a requirement (like a specific number or phrase).
2. Add Logic Branching
Google Forms doesn’t have the feature for creating a question bank for different assessments. However, with logic branching (or conditional logic) you can create a similar type of experience. For multiple choice and dropdown type questions, you can create conditional logic.
Besides, you’ll have to create different sections to create logic branching. Based on the answers responded, it will take respondents to a particular section.
3. Shuffle Questions and Answers
The best way to try to prevent copying is by shuffling the Q&As. To shuffle questions, go to ‘Settings’ under ‘Presentation’ you’ll see the shuffle question order option, enable it. Besides, you can also shuffle answer options, select a question, and click on this icon ፧ at the bottom of the question field. Then, click on the ‘shuffle option order.’ This will be tricky for respondents to copy from others.
4. Broadening Question Structure
Don’t limit yourself to just multiple-choice questions, because the same patterns will help students to identify it and cheat accordingly. Broadening the structure of questions will be hard to cheat and help you test your student’s knowledge effectively.
You can consider options like sequence questions (using a checkbox grid), reading passages, image/video-based questions, Likert scale types, etc. This will make assessments complex and difficult to screen creepers to copy.
5. Using Timer
Another way you can prevent cheating in Google Forms is by adding a countdown timer. It will not only make your form a bit more competitive but also doesn’t give you much time to delve into copying from others.
Google Forms doesn’t have an in-built timer but it has add-ons that you can install and use. One of the timer add-ons you can try is ExtendedForms, it is a great countdown timer app you can use.
How to prevent cheating with ExtendedForms Proctor
As mentioned earlier, there are different ways to prevent cheating in Google Forms. However they may or may not be a foolproof plan, but we have a way to prevent cheating that is on-demand for remote exams, quizzes, or any use cases that requires it.
Online Proctoring is an excellent way to prevent or not face any trickery situations or allow students to do such things. ExtendedForms proctor is helpful for that, it prevents copying during online exams, which leads to optimizing tests & quizzes.
Here are the 3 steps guide to prevent cheating in google forms. Let’s get right into it.
Create Google Forms
Before configuring the proctor feature, set up and create google forms.
- Navigate to Google Forms – here, select a ‘blank form’ or ‘blank quiz. You can also select any of the pre-configured forms from the Google form’s Template Gallery.
- Enter the title & description, add different sections, and different question & answer types – MCQs, checkboxes, Likert scale, short, and long answer types, even if needed you can import images & videos, and import questions.
- Further, configure form settings and a little bit of customization. Go to the ‘Settings’ tab, from there you can convert the form into a quiz, set how to release marks, and add default point values (you can add points individually in every question).
- Apart from that, we can configure ‘responses,’ ‘presentation’ and ‘default’ options.
- Then, to customize the form, click on the ‘Customize theme’ option at the top navigation bar. From there, add the header image, change fonts, font sizes, and theme colors.
Enable Google Form Proctor
- You can also directly through Forms to add the add-on, go to ‘More’ at the top right corner, go to Add-on > ExtendedForms > Install it.
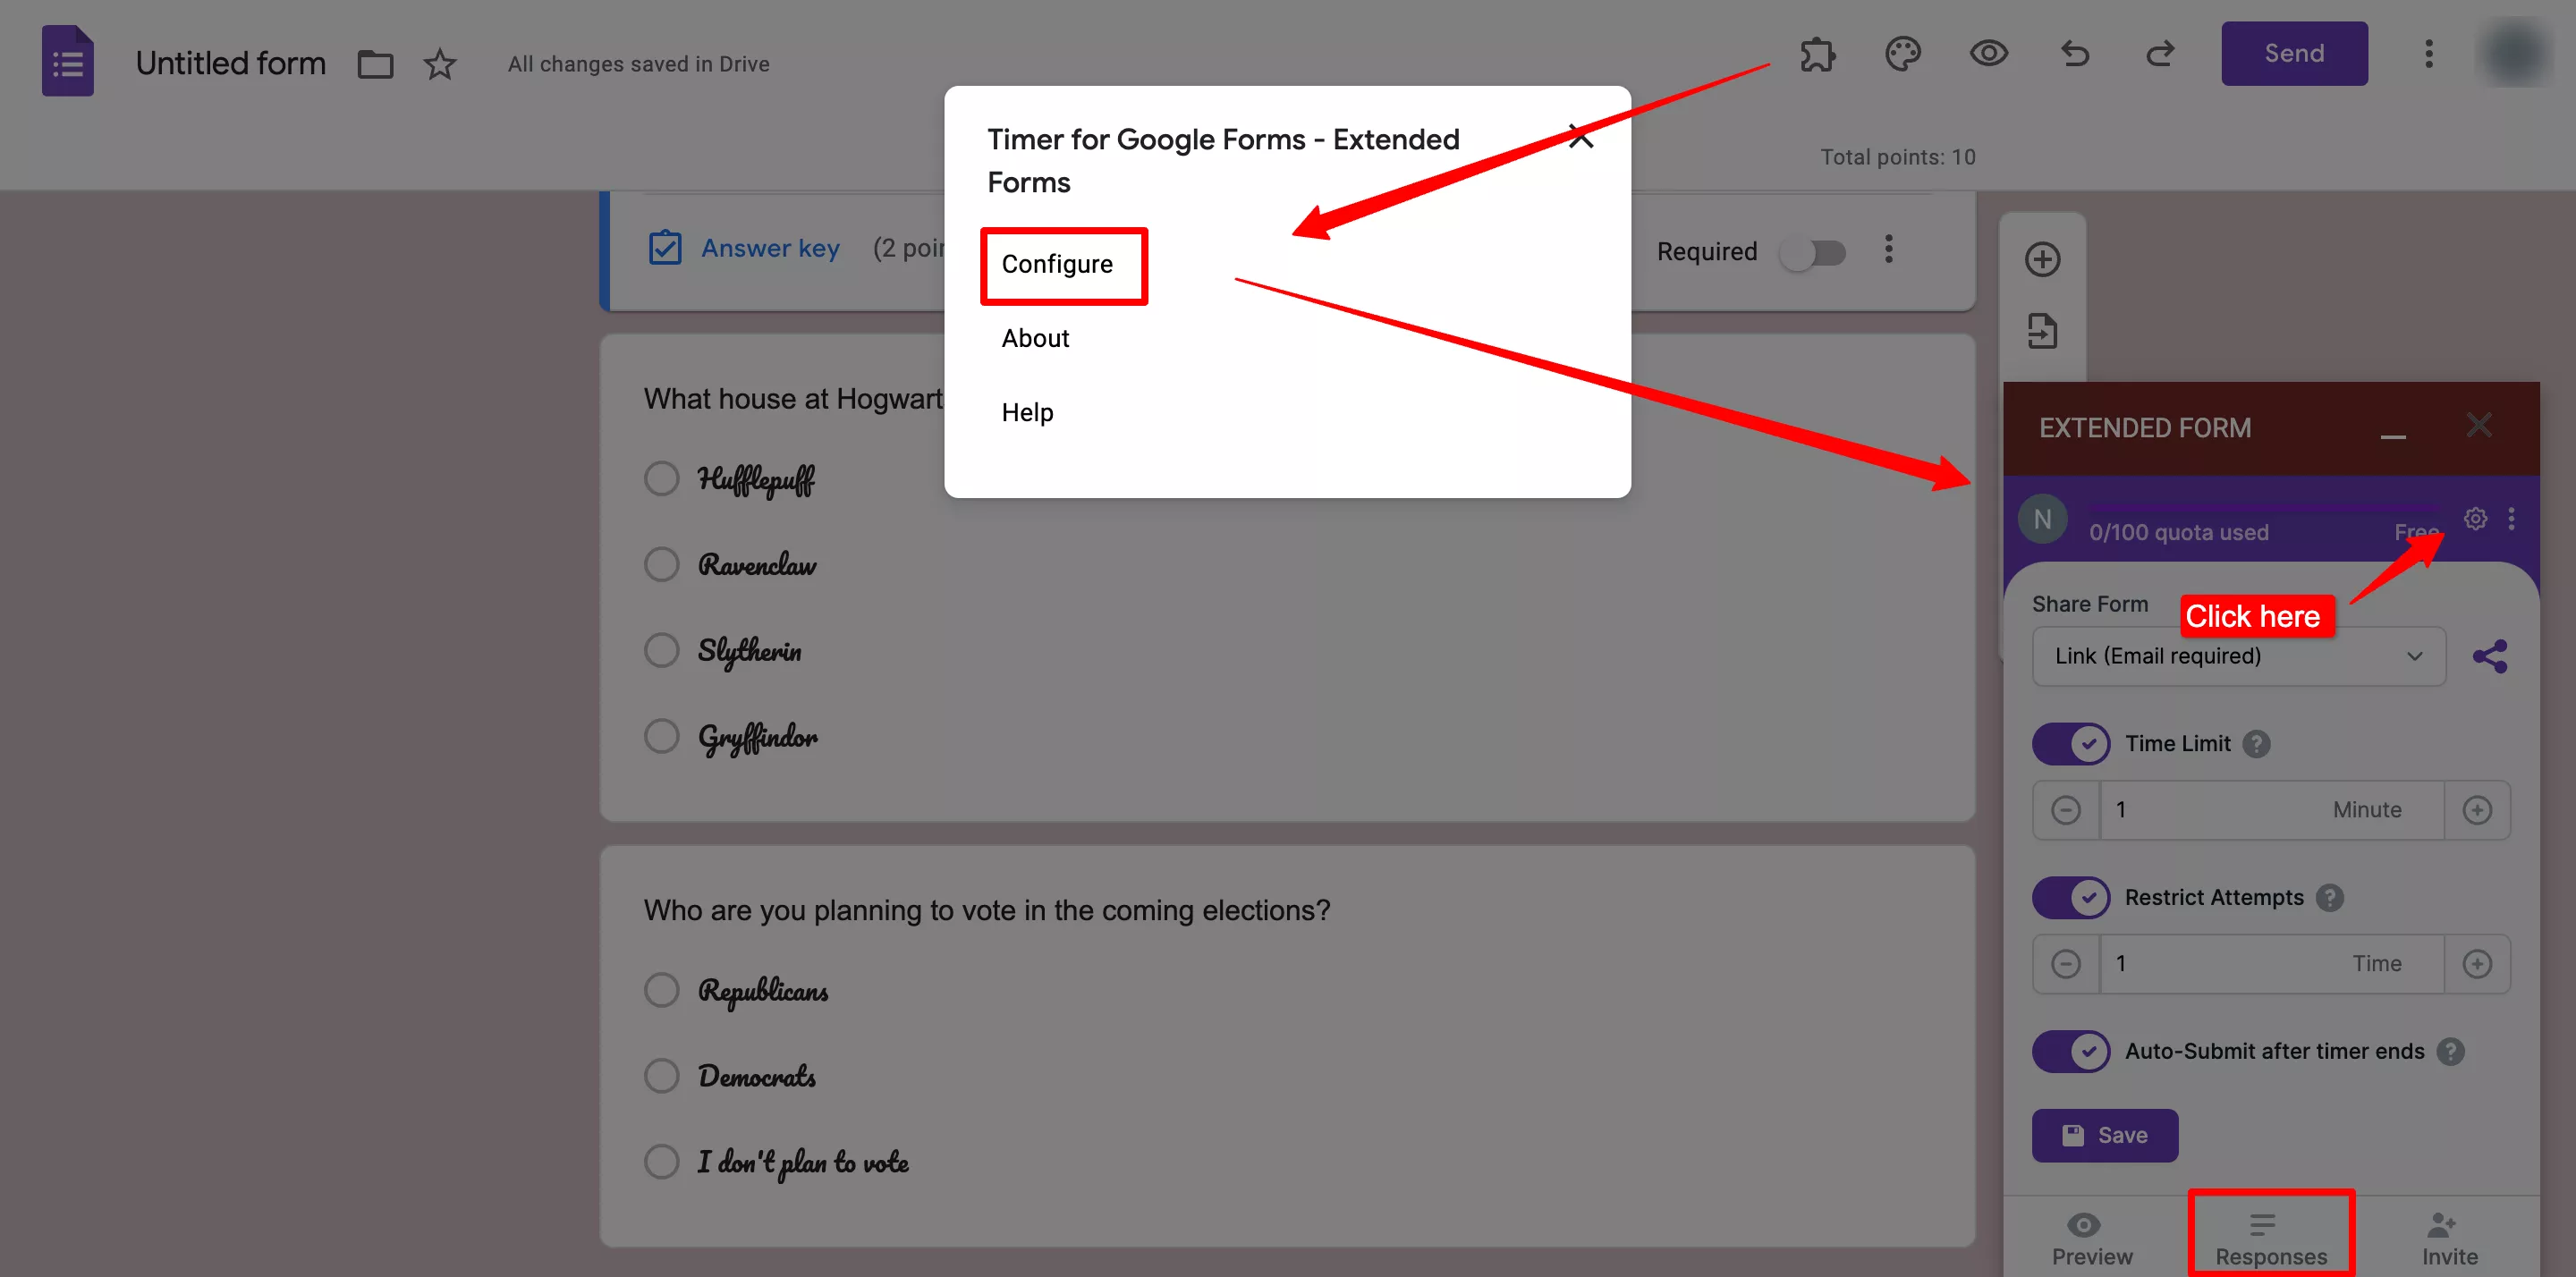
- If you have installed the Extended Forms Addon correctly, then you must see the Extended Forms in the Addons Menu. Click on the puzzle-shaped icon.
- Click on the Extended Forms Addon then on Configure.
The ExtendedForms settings box will appear at the bottom right of the page. You can configure most of the settings in the newly opened Settings Box, but here we have to dive further to see how proctoring in google forms will work.
To get the full view of the Extended Forms Settings hit the ‘Responses’ in the configuration box to navigate to the Extended Forms Website.
Either, you can click on ‘gear shape’ beside the ‘quota used’ shown in the ExtendedForms settings box. It will directly open to form settings where we basically want to head to configure proctor options.
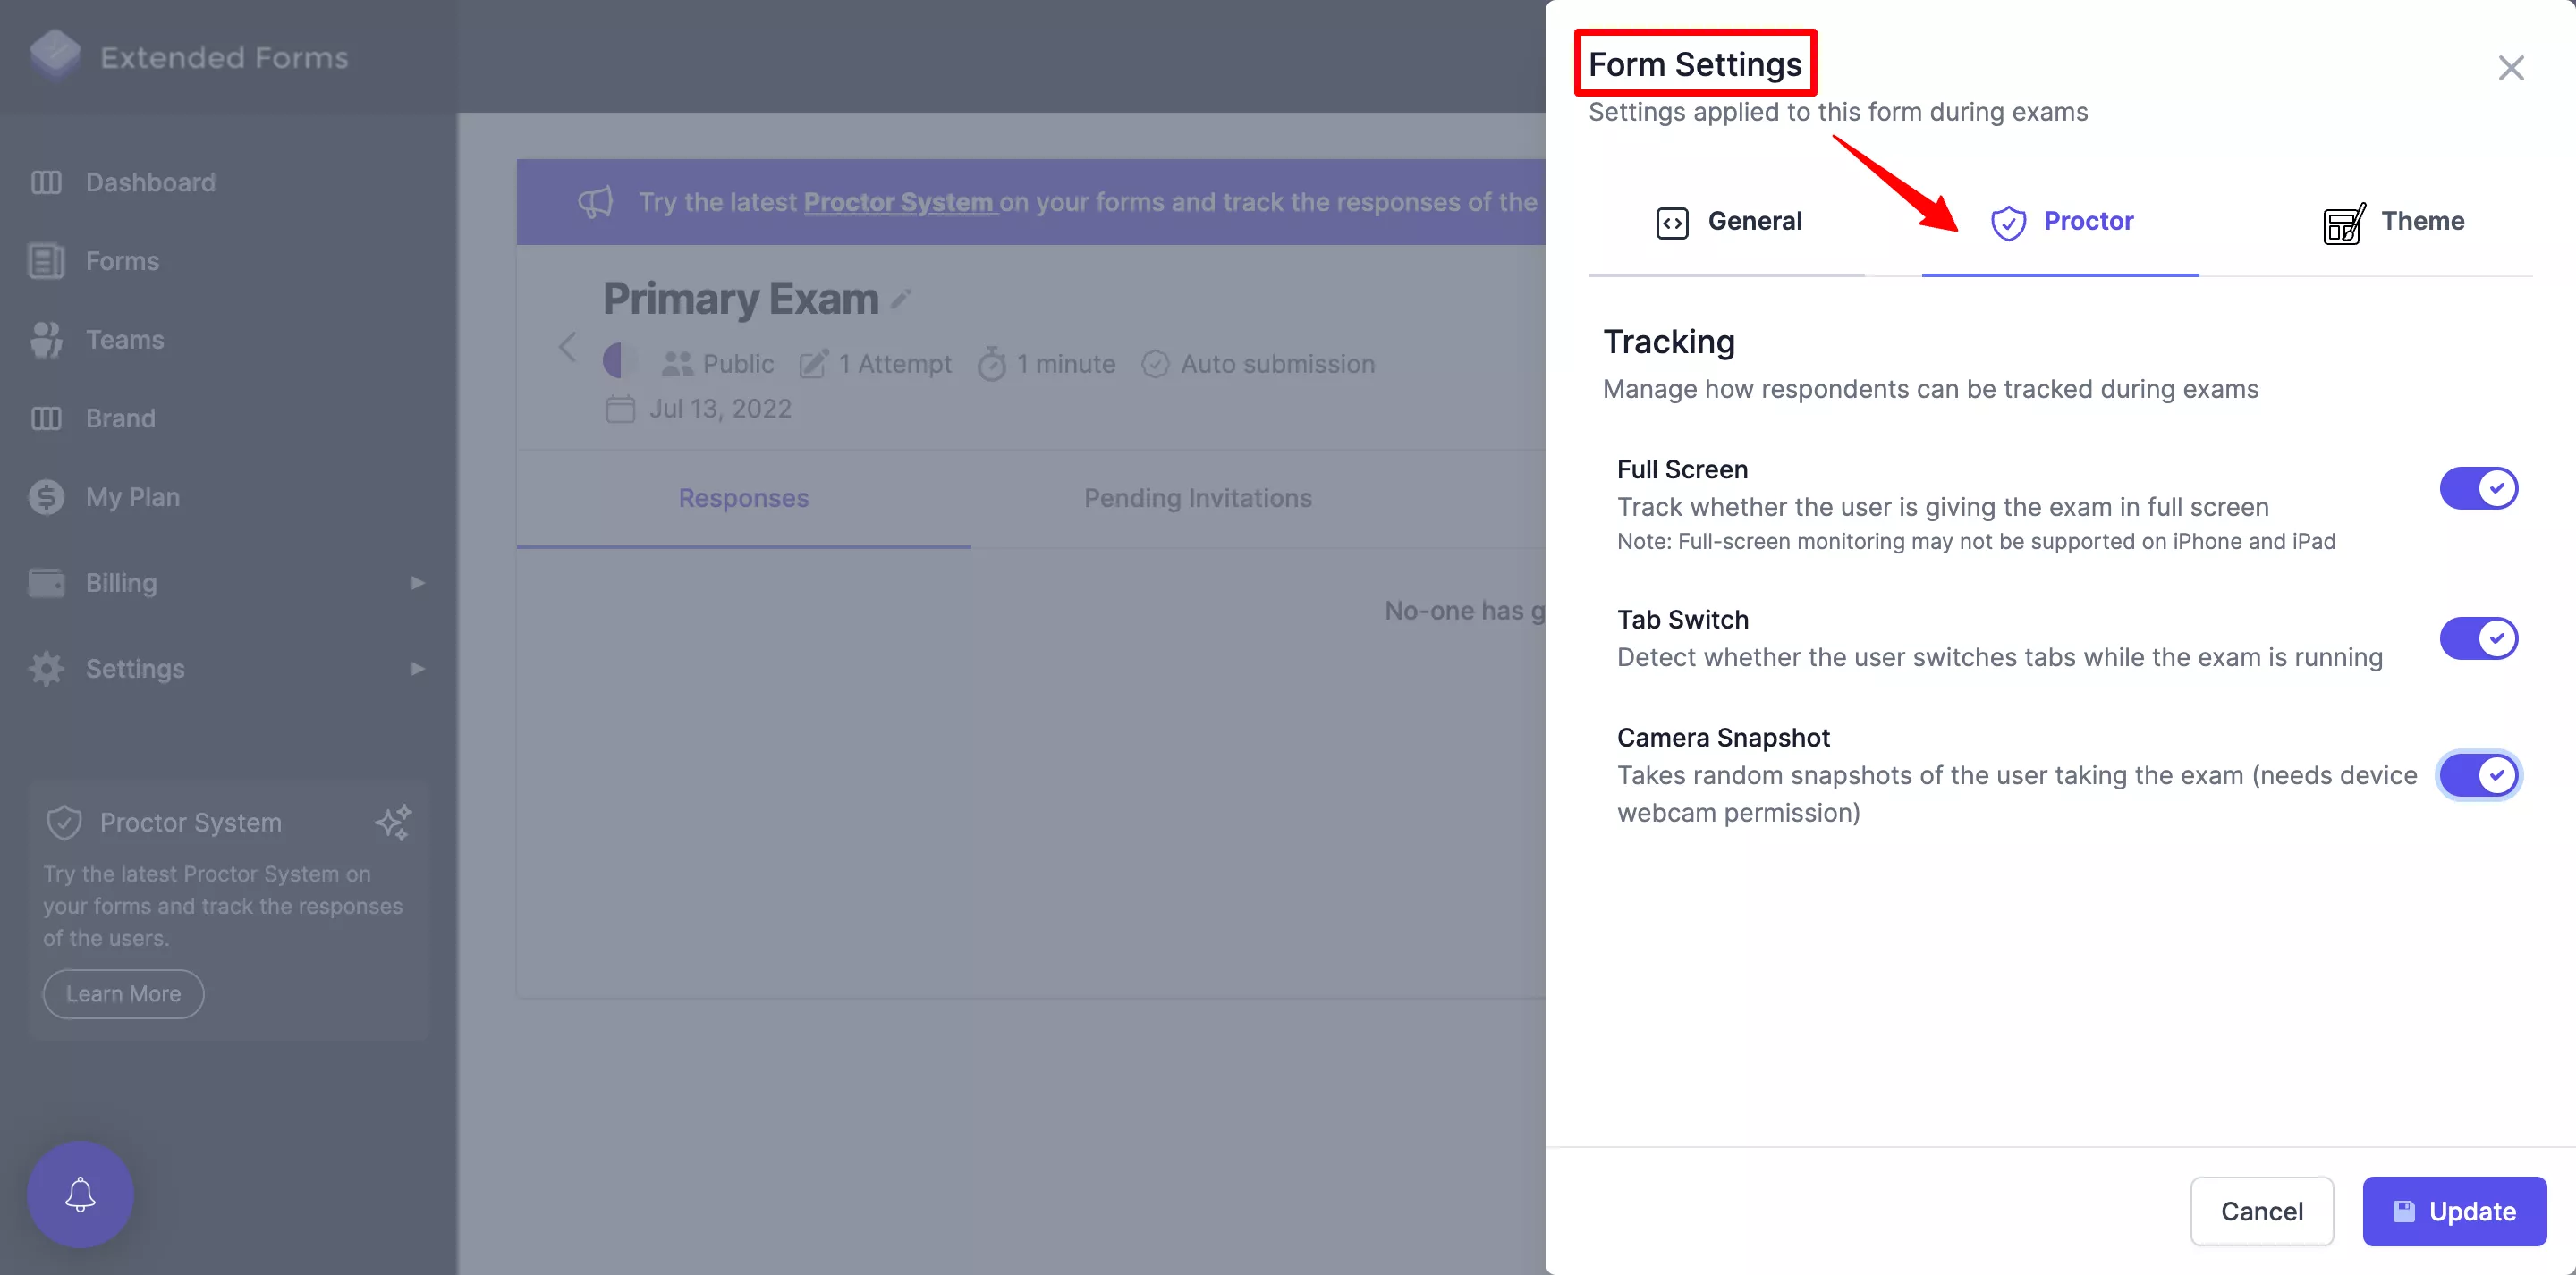
- Once we are there, a Form Settings dialogue box will be shown with different settings applied to the form. Configure the ‘General’ settings which we have already done in the forms, apart from that you can hide email-id from respondents and also add deadlines.
- Then, you’ll see the ‘Proctor’ feature, navigate to it and you’ll see three options to enable.
- Full Screen – Enable it if you want to track whether users are giving exams in full screen or have minimized the screen. If respondents exit the full-screen mode while giving the exam is still running, it will affect their scores.
- Tab Switch – Enable it to detect tab switching during the exam is running.
- Camera Snapshot – This you must enable to take camera snapshots of a user randomly while taking the exam and it is necessary to provide webcam permission from the exam taker.
Preview the Output & Share Form
- Once you are done with it, Update the settings, then preview and share the form.
If you preview the form, you’ll see how it will look to your students or anyone taking up the form.
So, once you have shared the form with your audience and they open it – a welcome message will be shown, you’ve to click on ‘Get Started.’
- Once you click on that, a pop-up will appear that says ‘Proctor is Active.’ Respondents are to go through a series of proctor features that are enabled by you.
- Click on the ‘Next’ button it will show the full-screen mode option, then again click on the next button
- The ‘Do not switch tabs’ statement box will be shown (you cannot switch tabs while giving exams),
- Further, will be the ‘camera snapshots’ option, click on the ‘Enabled’ option and then allow the camera settings from the pop-up box that will appear on the top. The app will be able to take your camera shots randomly at intervals (based on the time duration).
- Once you have taken the snapshot, the process will be done and your exam will be started.
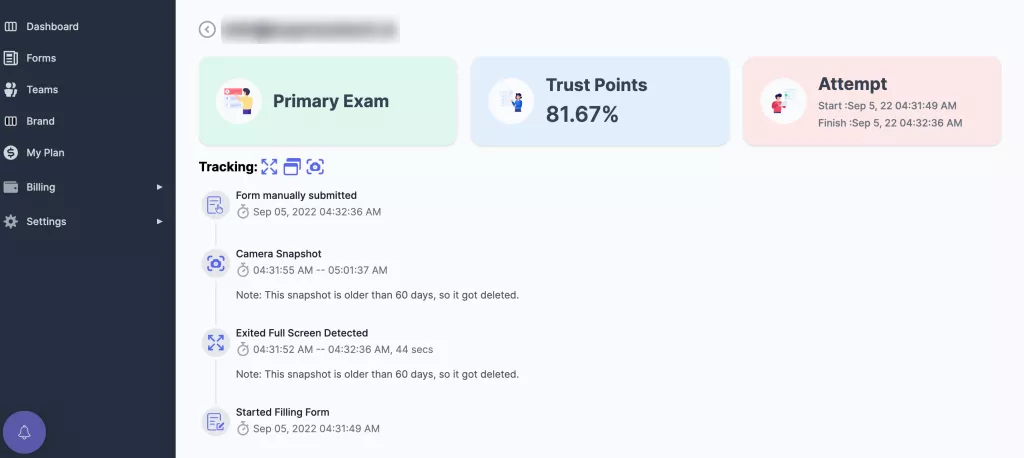
Then on that particular form page in ExtendedForms, you can see all the responses and pending invitations. Along with that, we can view individual reports to see all the tracking details of the respondents and trust scores.
Wrap Up
This is how anyone can prevent cheating in google forms. You just need an added feature or specifically an add-on to make your process as simple as it can get. With ExtendedForms we have made sure to help create Google Forms more advanced for different purposes.
I hope this guide was helpful to you and will encourage you to create exams or quizzes via Google Forms and also with ExtendedForms add timer feature and now proctor functionality as well.