In this insightful guide, our spotlight shines on the art of harnessing to collect data with Google Forms. Your trusty, sidekick Google Forms empowers you to seamlessly amass information from a diverse audience.
Whether you’re crafting a concise single-question survey or orchestrating an intricate multi-section quiz, bid farewell to the days of deciphering scribbles or tabulating on paper. Embrace the efficiency of collecting data with Google Forms.
Google Forms data collection can vary for different use cases like obtaining feedback, gathering inventory data, or assessing with quizzes. But the procedure for Google Forms data collection remains the same!
Table of Contents
Prefer watching over reading? Watch the video here.
Steps to Collect Data with Google Forms
We are going to look into two different approaches to Google Forms data collection. The first one is the default way through Google Forms itself. Another way that we are going to mention in this article will be with the help of a Google Forms add-on – ExtendedForms app.
Step 1: Steps to Set a Timer for the Google Form Quiz
Create Form
- To start with, we will first have to set up the Google Form. Either you can directly go to Google Forms, or navigate through Google Drive and select ‘Blank Form or ‘Blank Quiz.’
- Write down the title and description to introduce yourself and the purpose of the form.
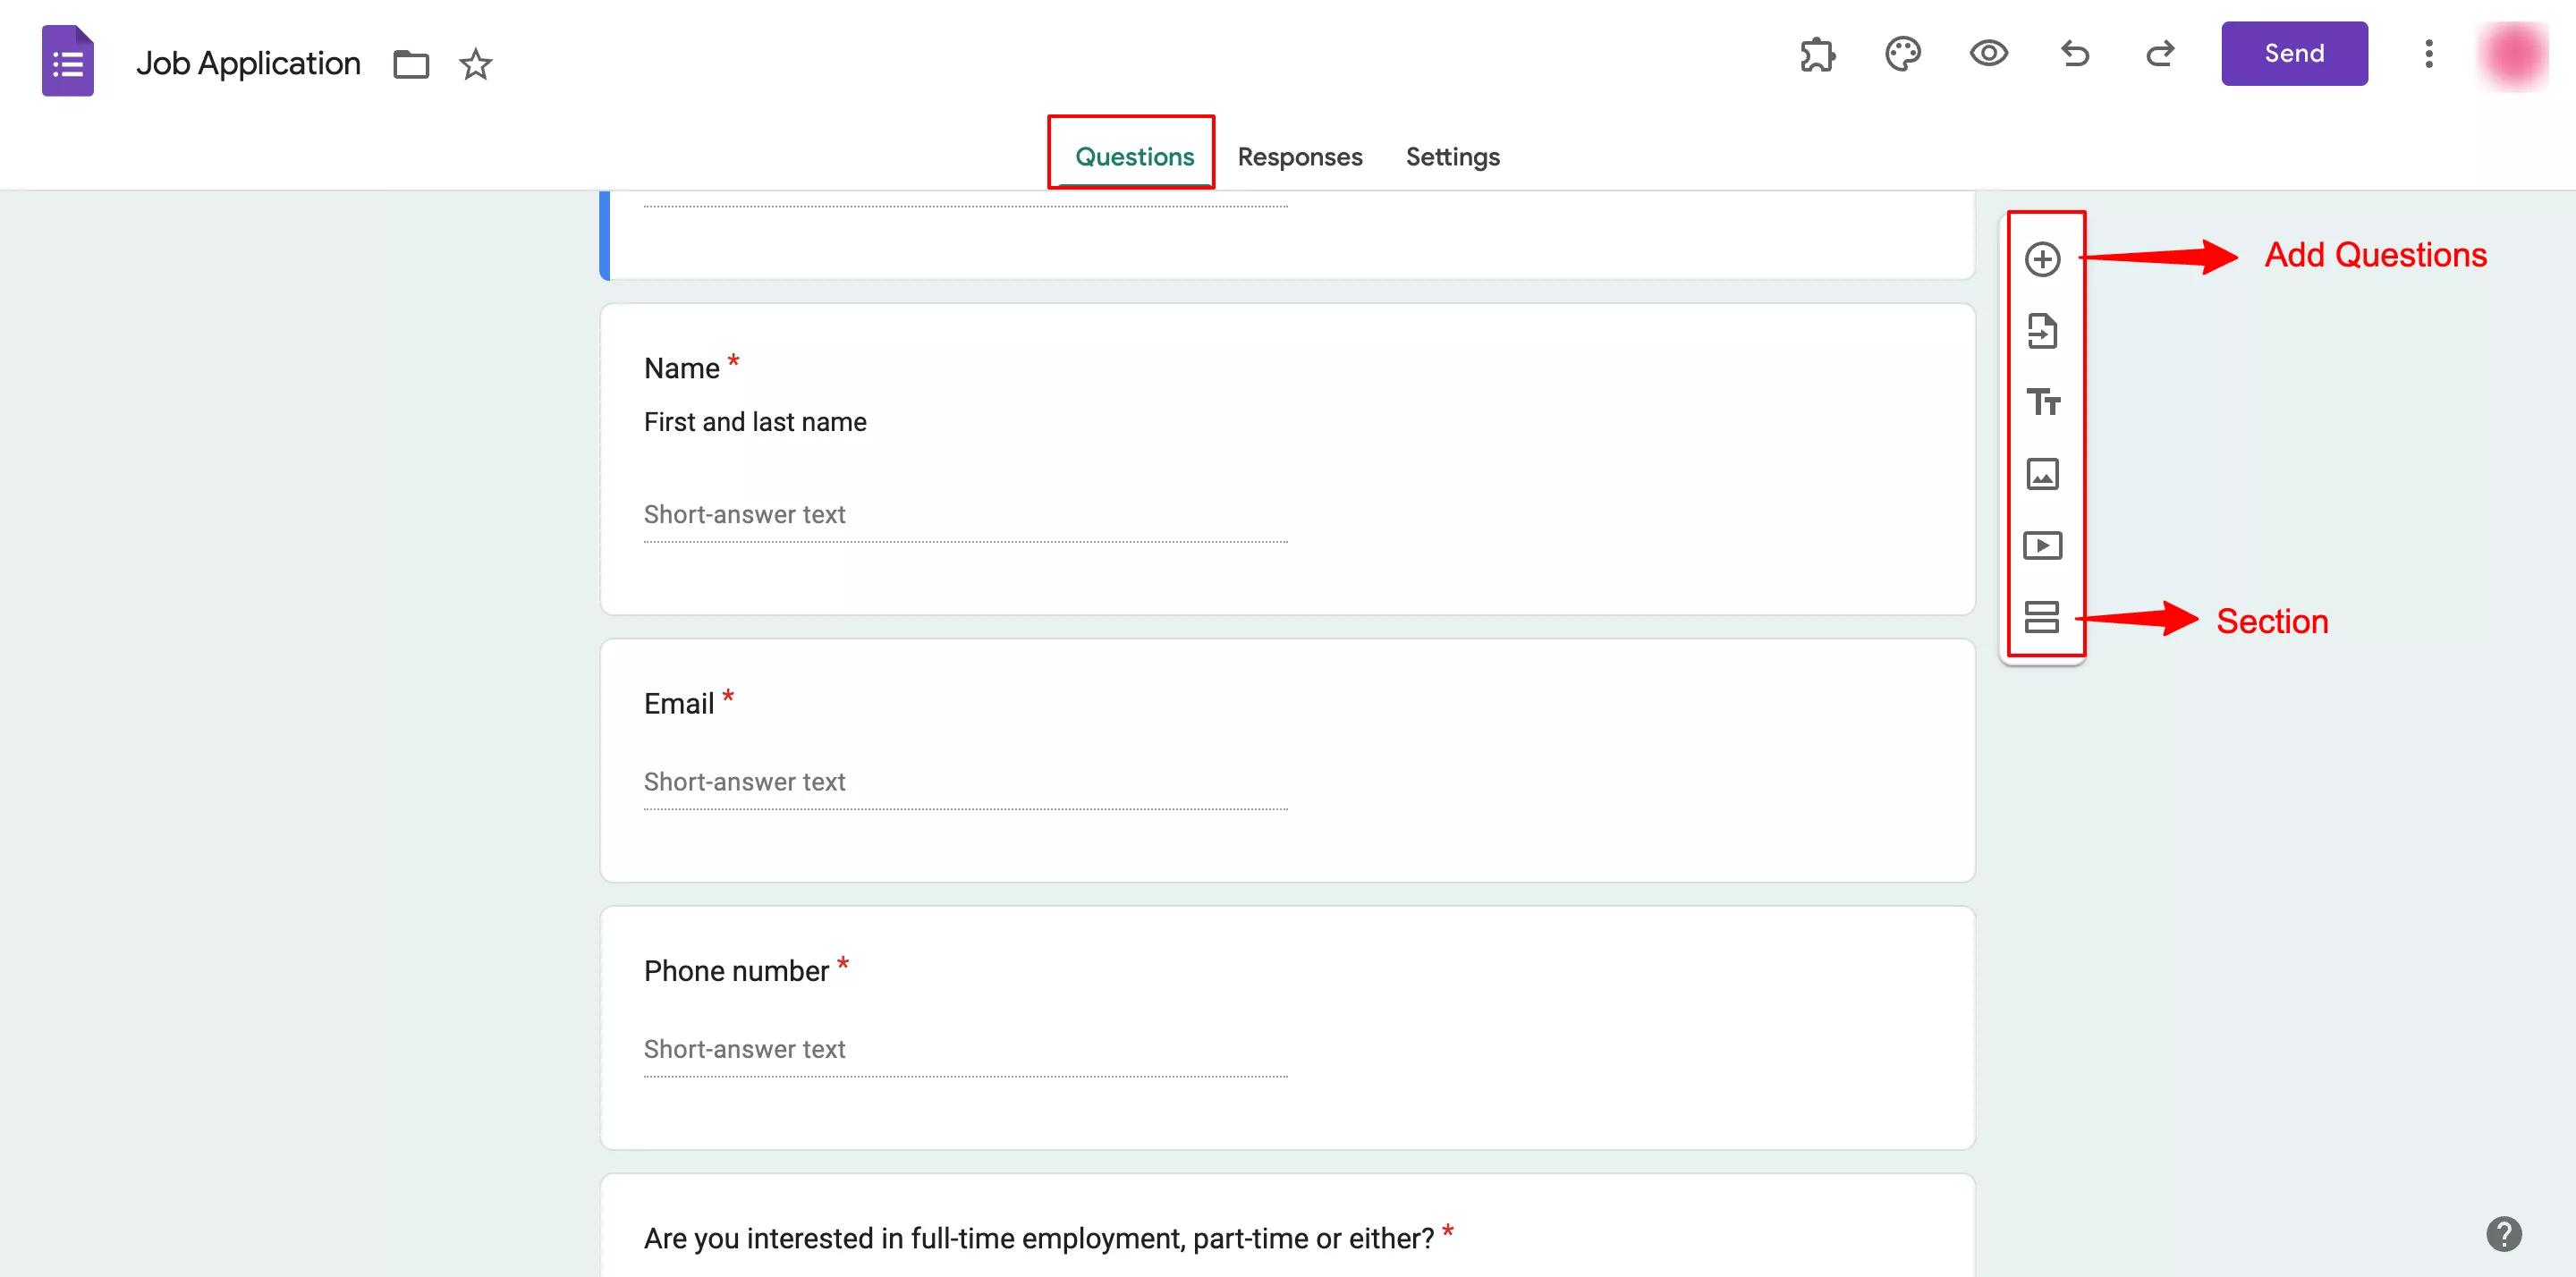
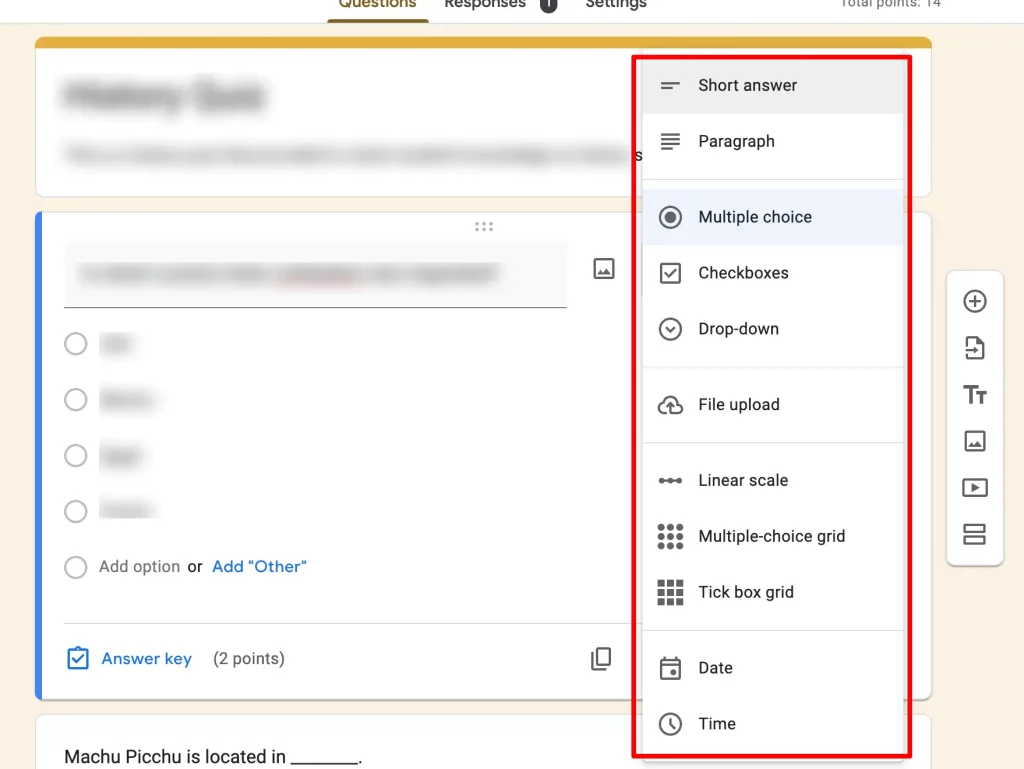
- Then smartly choose your Q&A type, whether yes/no, multiple choice, single choice, or you can add images or videos. Moving further, write the questions ensuring it is properly framed.
- Whether you are creating a survey, test, feedback form, or job application form, Google Forms allows you to design any type of questions with different question types.
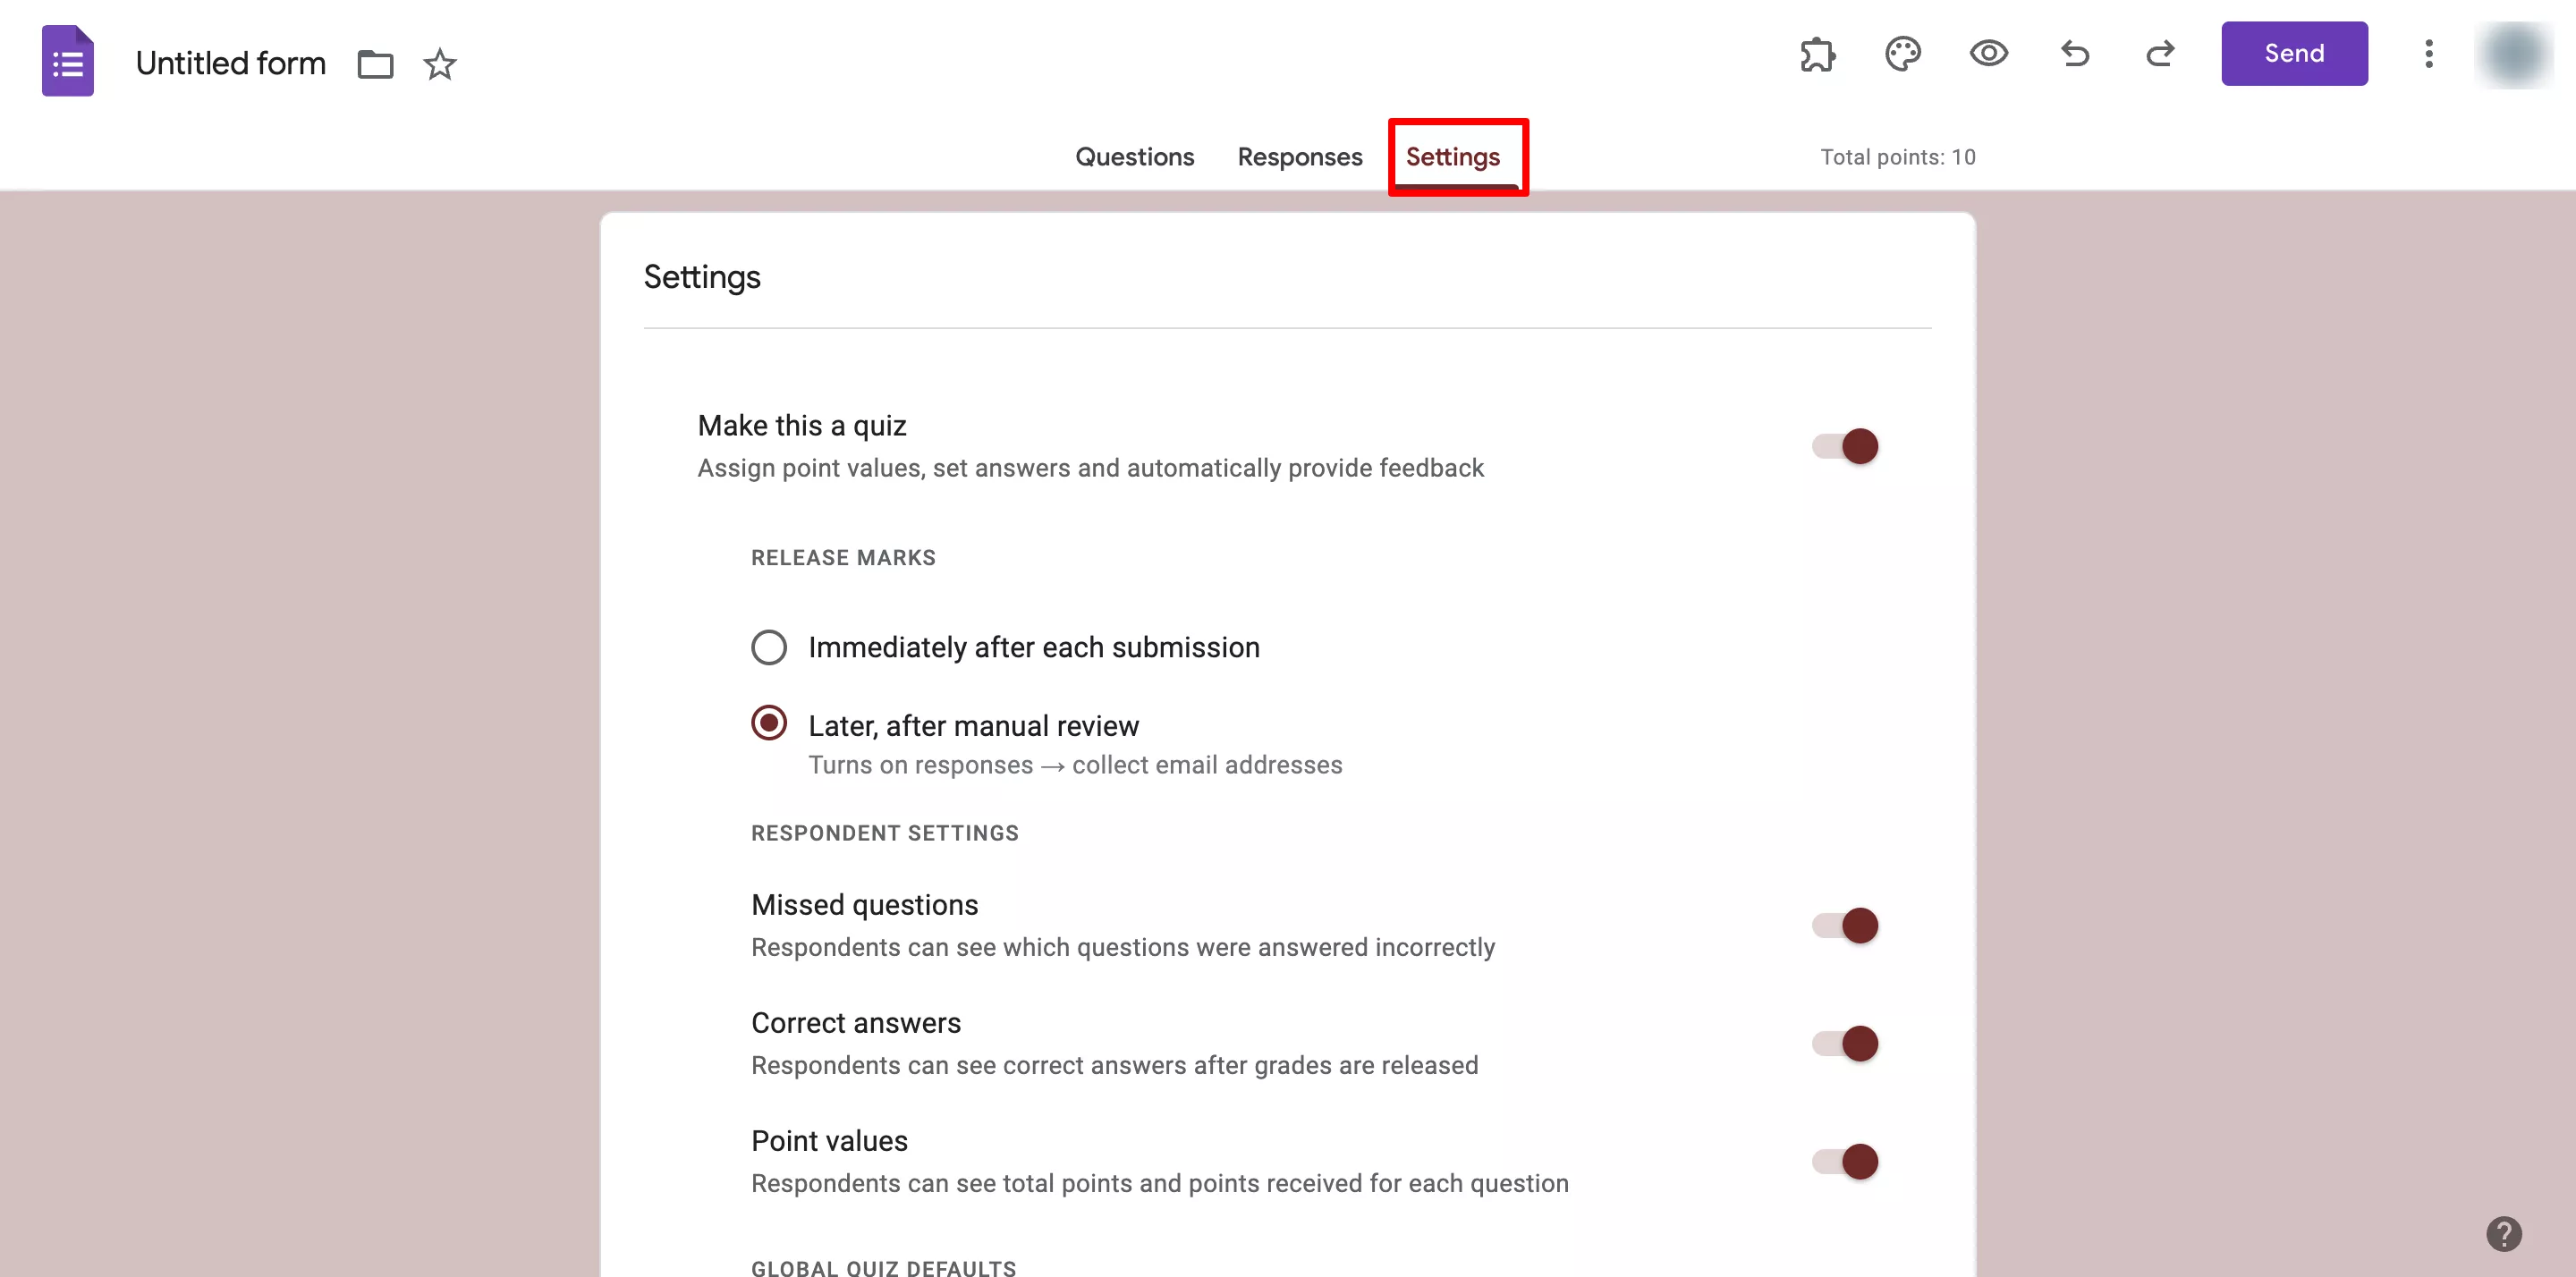
- Further, you can customize your Google Forms. First, configure basic ‘Settings’ you’ll see various options to customize like – the ‘Responses’ Settings,’ ‘Presentation’ tab, and Defaults settings.
- Besides, if you make the form a quiz (enable the quiz option), then you can also configure ‘release marks’ and ‘respondents settings.’ You can collect email addresses, add a limit per response, show a progress bar, etc.
- Furthermore, you can also personalize your Google Forms by customizing the theme of it. Go to ‘Customize Theme’ and add a header image, different fonts, and color theme of the form.
Ready to go one step ahead with your timers in Google Forms? Read ExtendedForms Unveils: Customized Timer Themes.
Send Form
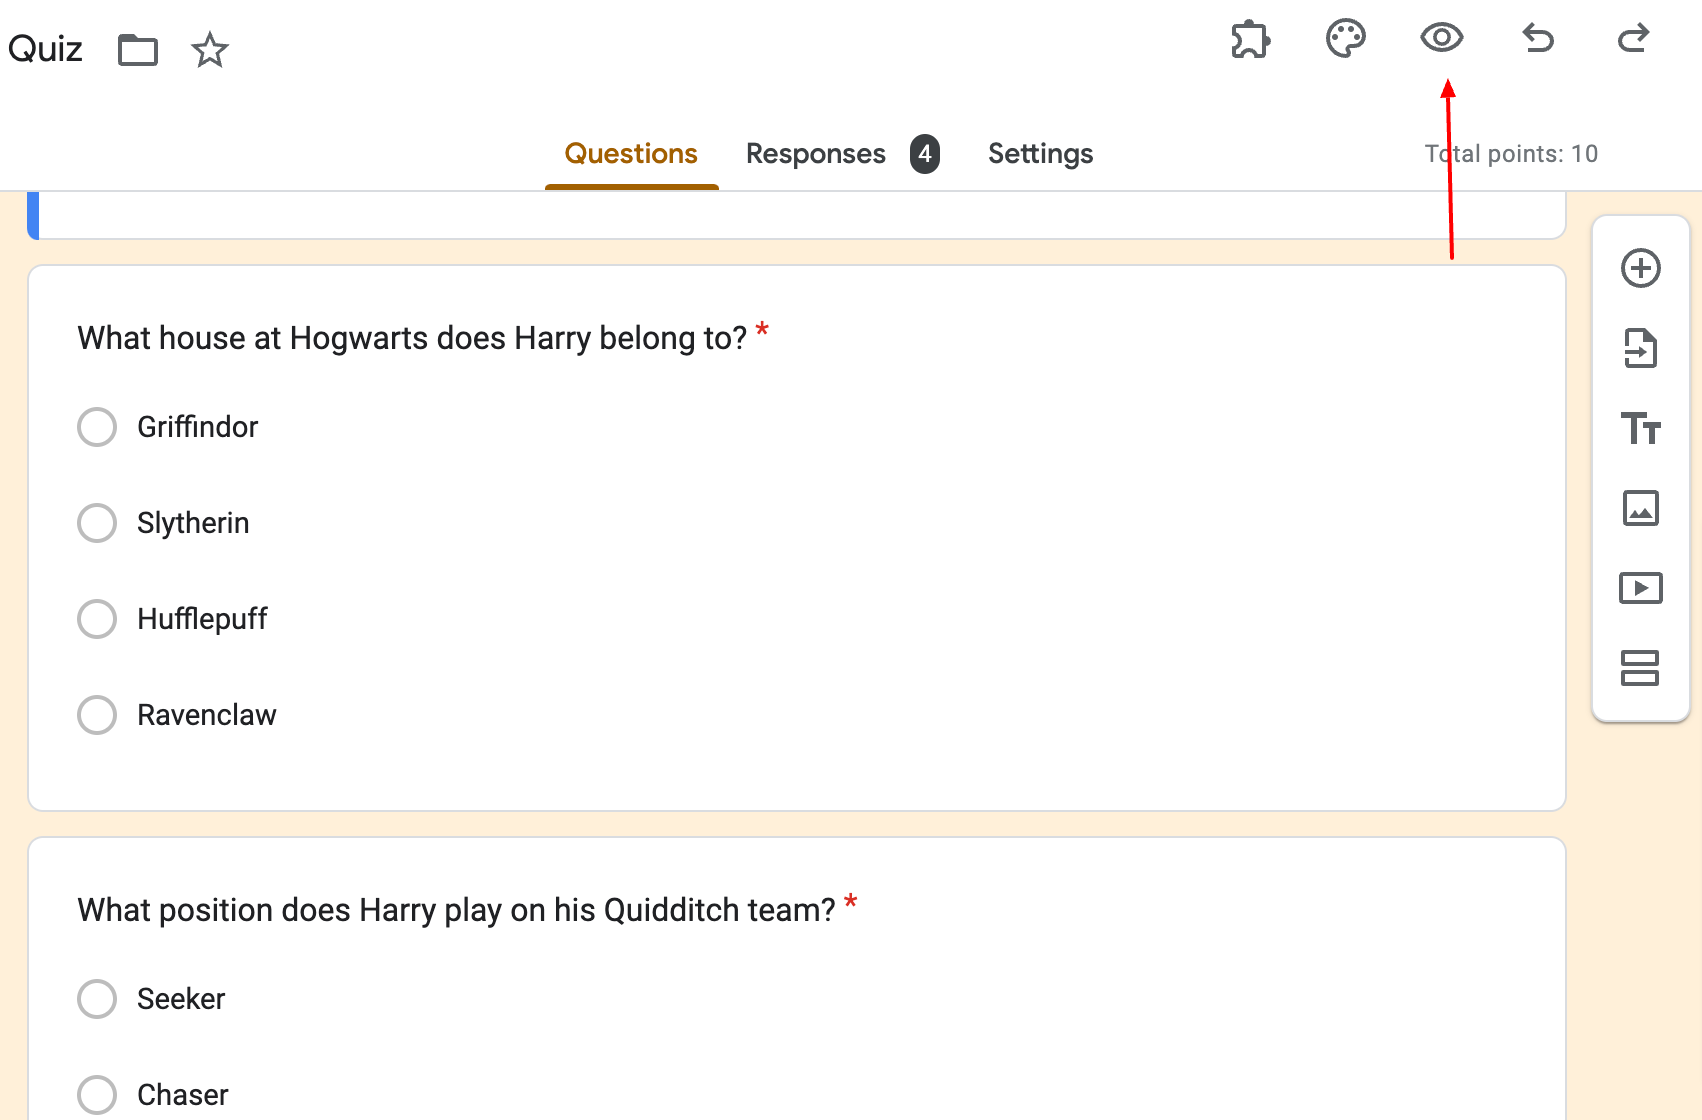
- Once you have created your quiz, configure & customize it. It’s time to share your form to collect data with Google Forms. But before that, preview your form to get an idea and feel of what your form will appear to respondents. Click on the eye icon to preview the quiz.
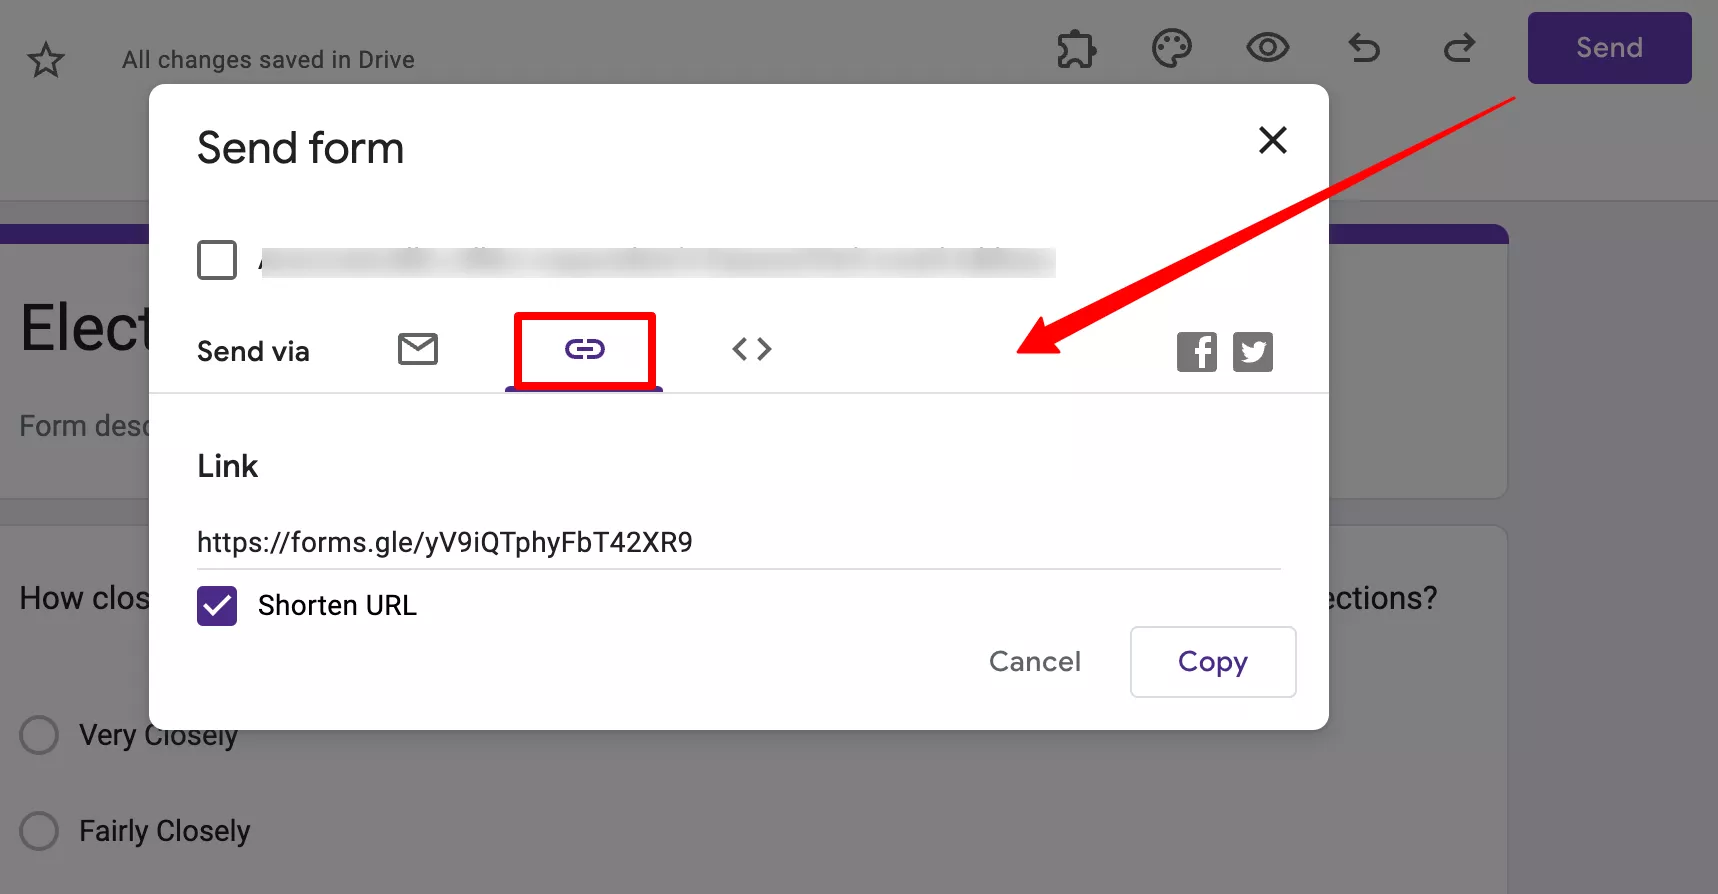
- When you are ready to send it to your audience, click on the ‘Send’ button. You can send it via email, a link, or embed the form as an iframe in your webpage.
Collect & Review Responses
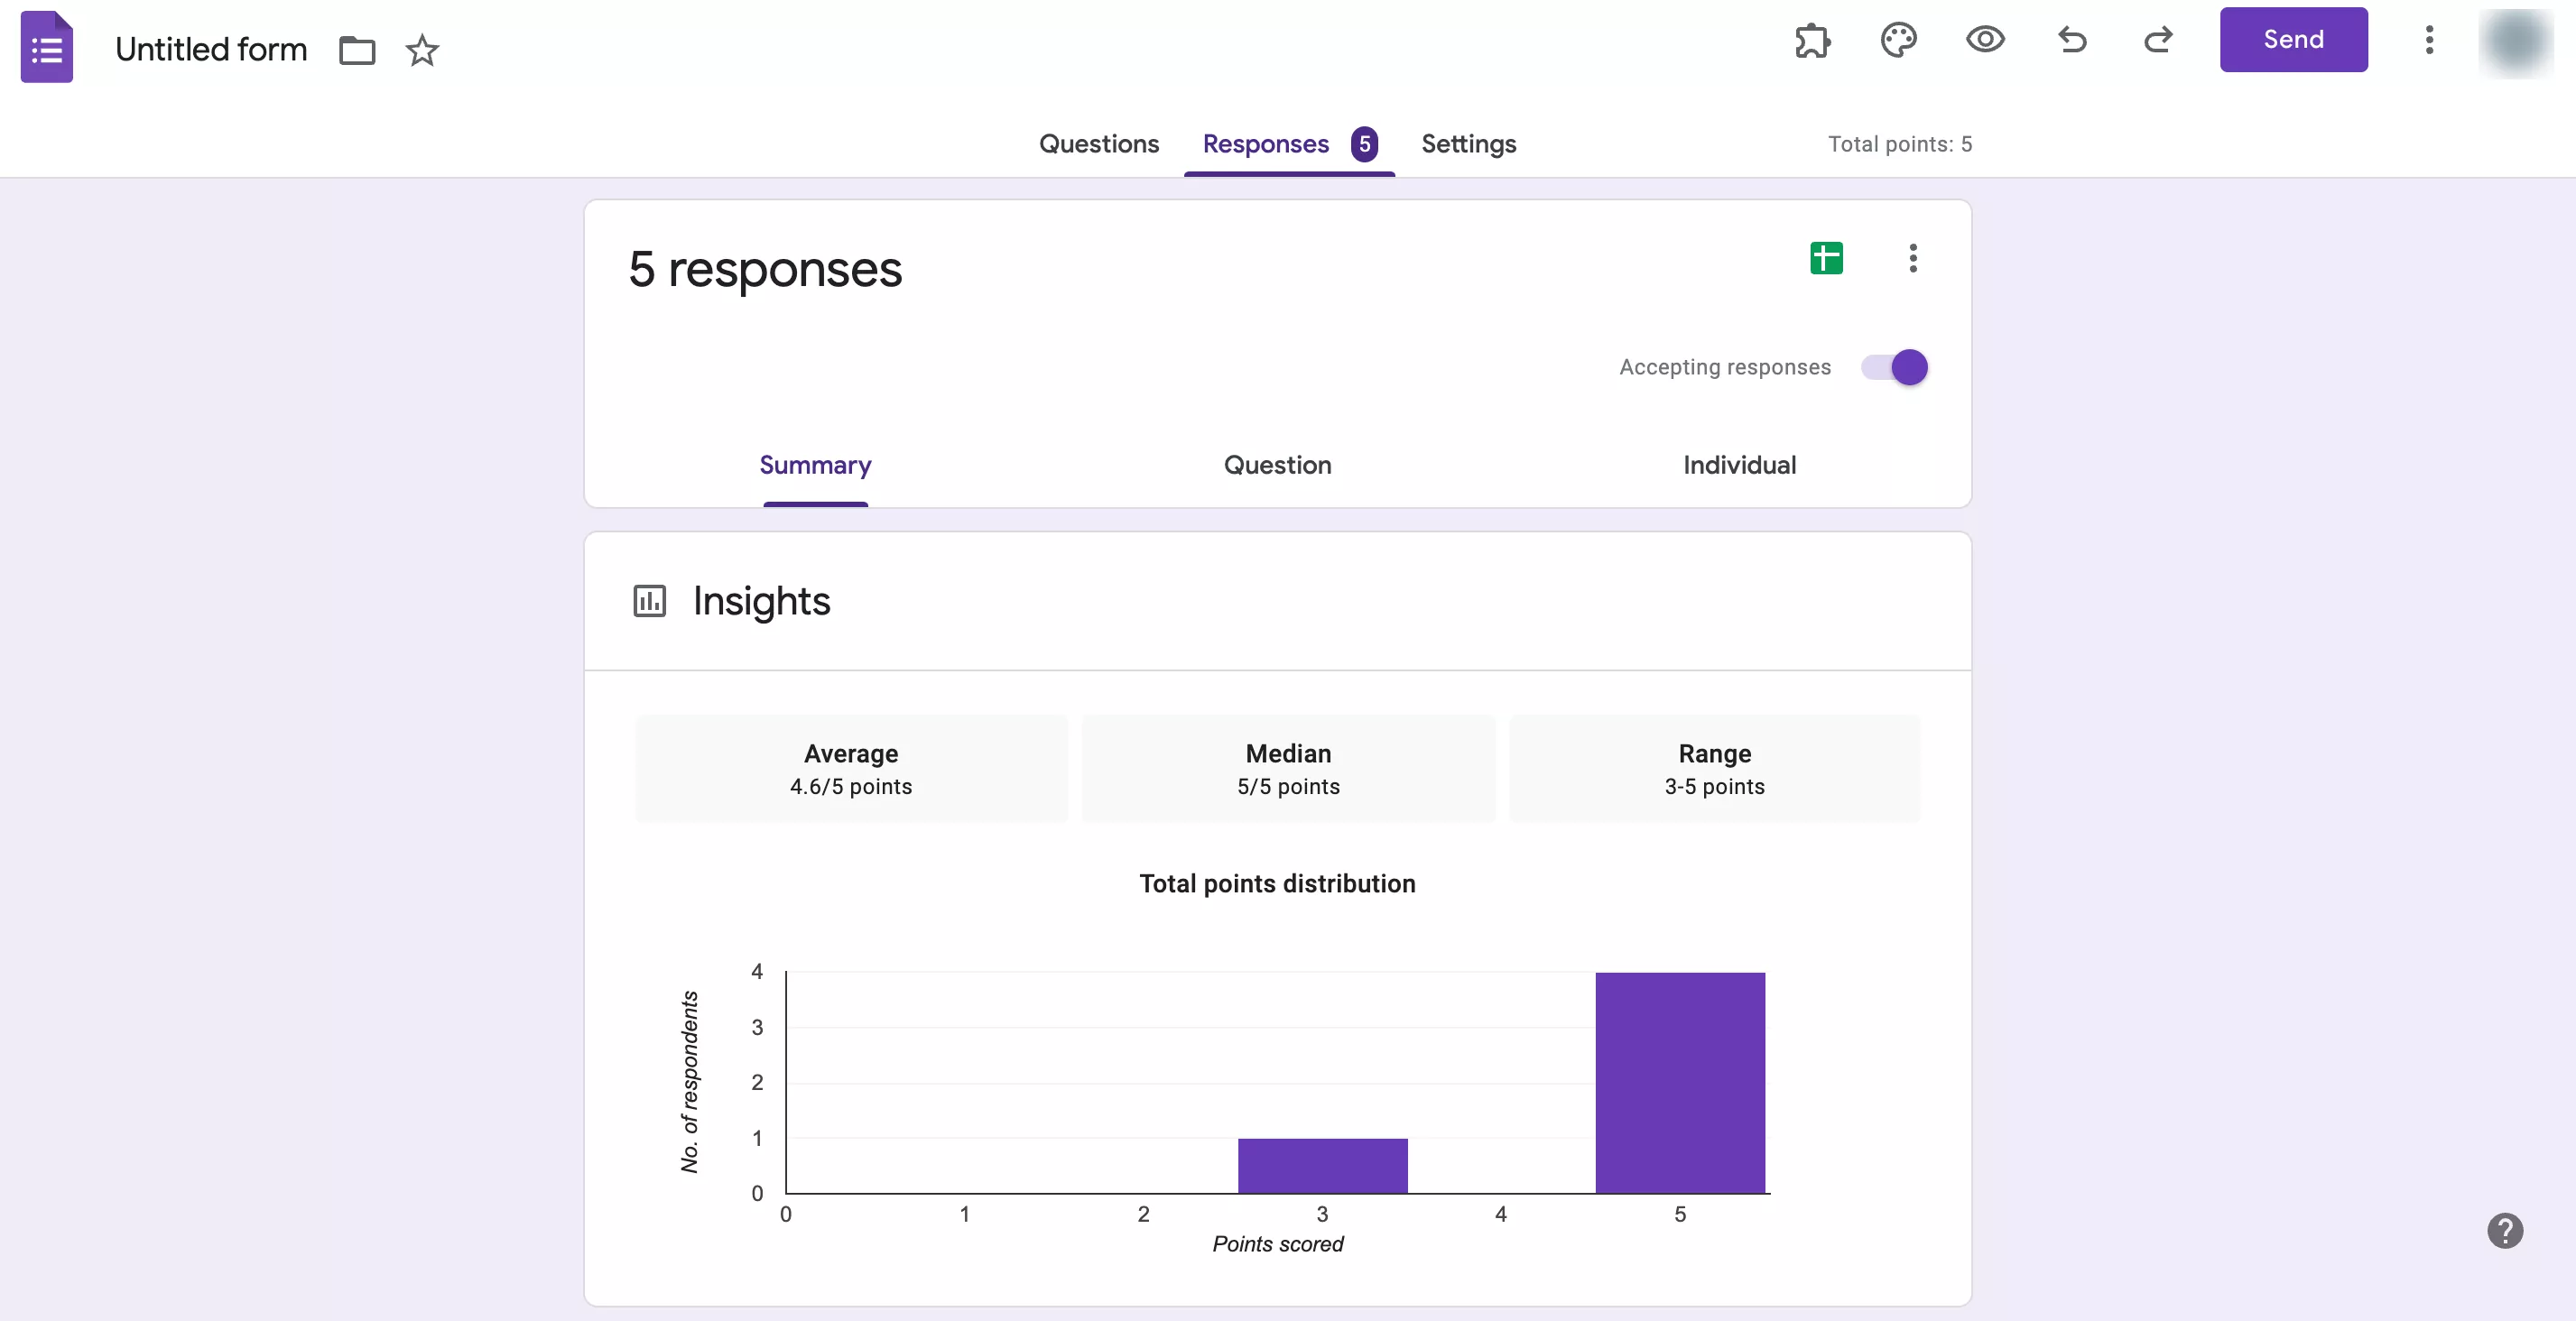
- Once you start receiving responses, you can review those responses under the ‘Responses’ tab. The Google Forms data collection can be viewed either as a summary of responses or individual responses for every question.
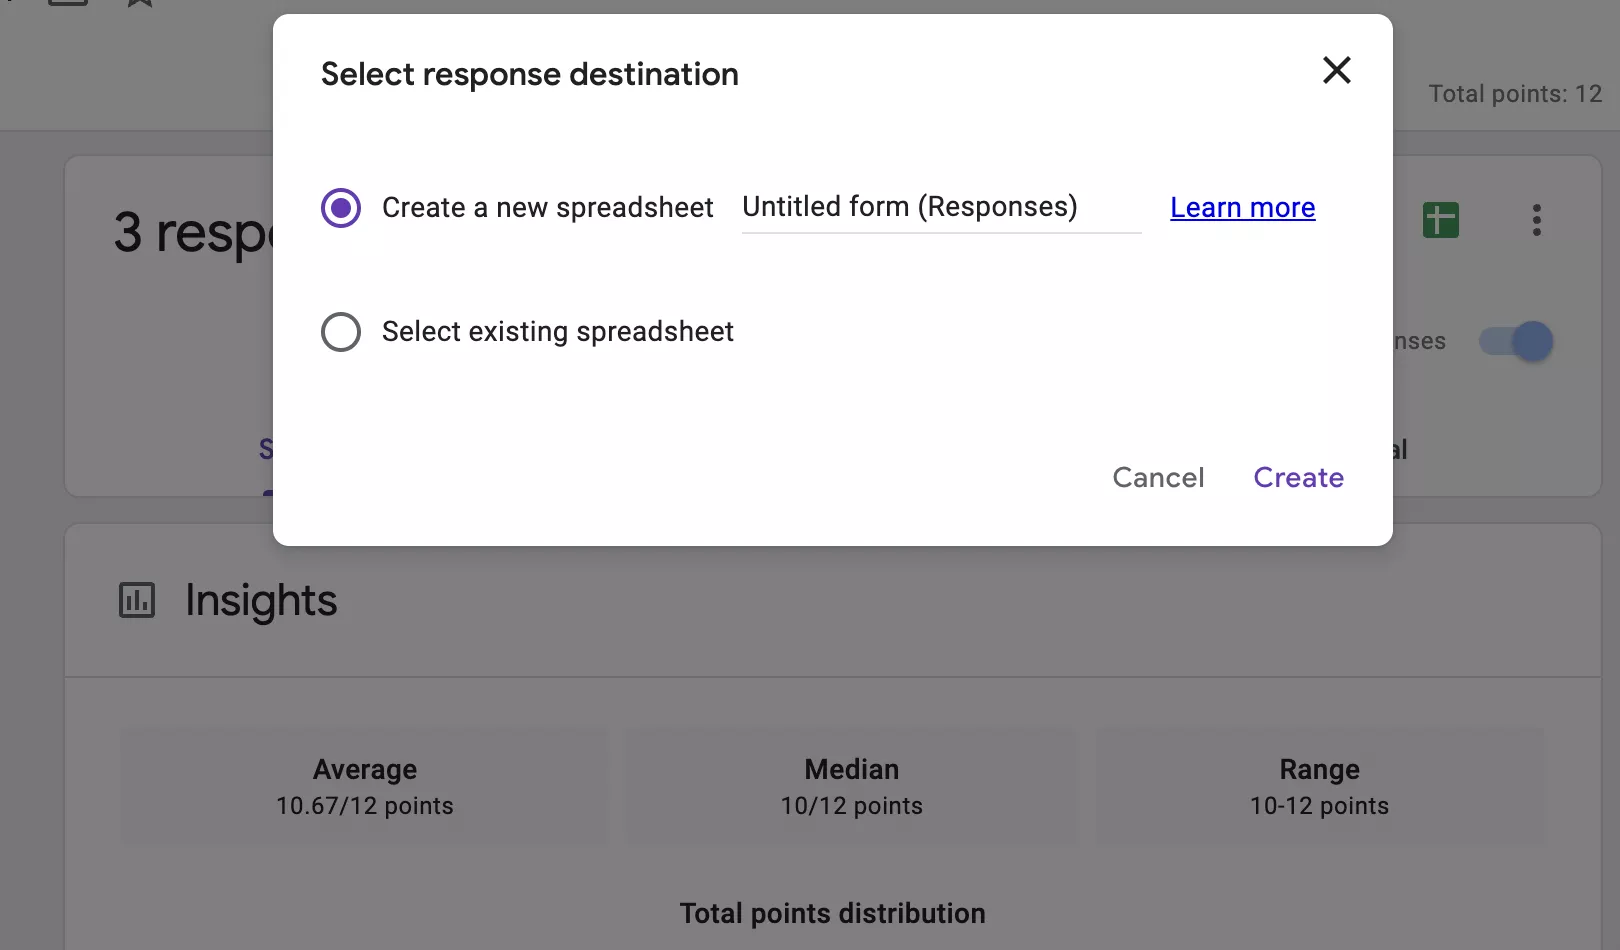
- Apart from that, you can also collect data in your Google Sheet (this step can be done while creating the form or after you receive responses, there’s no hard & fast rule).
- For that, you have to link your form with Google Sheets, so click on the Link to Sheets button in the ‘Responses’ section. You can create a new sheet or link this one to an existing one. All your data will be stored in that Sheet, you can then review, analyze, filter, or create graphs/charts of that data.
- If you want, you can download the responses CSV file. Further, you may choose to receive an email whenever you receive a response. In the ‘Responses’ tab click on the three dots icon and select ‘Get email notifications for responses.’
These are the steps to use Google Forms for data collection.
Step 2: Collect Data With Extendedforms Add-on
Another way through which you can collect data is with the help of the Google Forms add-on. ExtendedForms add-on is a timer & proctor app that you can use to make your Google forms into a timer quiz and test. Apart from that, you can use the app to send forms through a link or email with personalized invitation messages.
Further, you can see Google Forms data in the ExtendedForms dashboard. It shows you the summary of responses, and report of each respondent which includes trust scores, tracking detection, and duration of quiz attempted.
Setup ExtendedForms
- Firstly, install the ExtendedForms and go to the ‘ Get Add-ons’ option in the ‘፧’ More settings at the top right corner. Search ExtendedForms and install the app.
- Once the app is installed, you’ll see the Add-ons (puzzle shape icon) option at the top, go to ExtendedForms > Configure and a settings box will appear on the right side of the form.
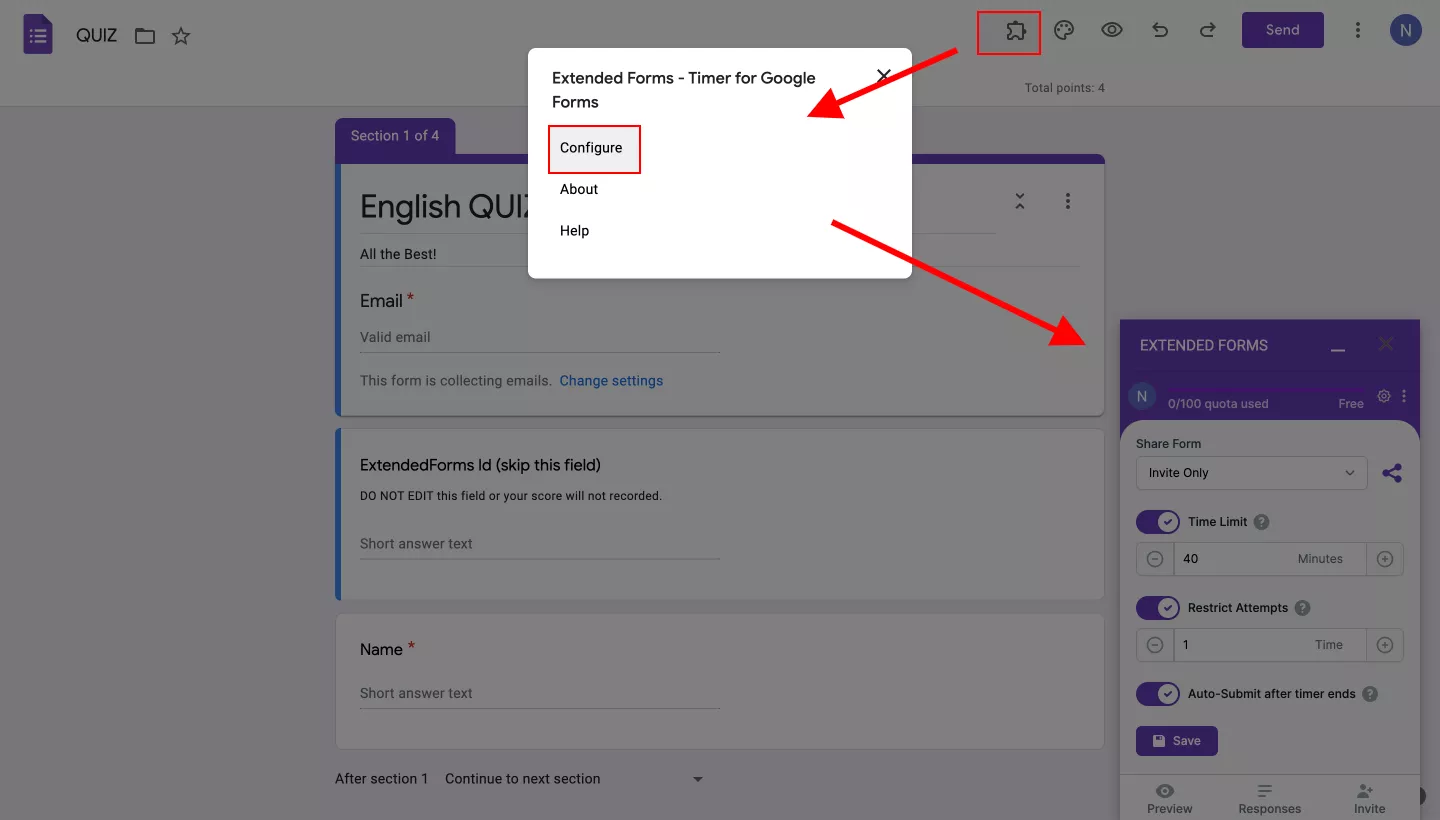
[If you can’t see the puzzle icon, refresh the page once. The same goes for the ‘configure’ option, if you can’t see it, refresh the page]
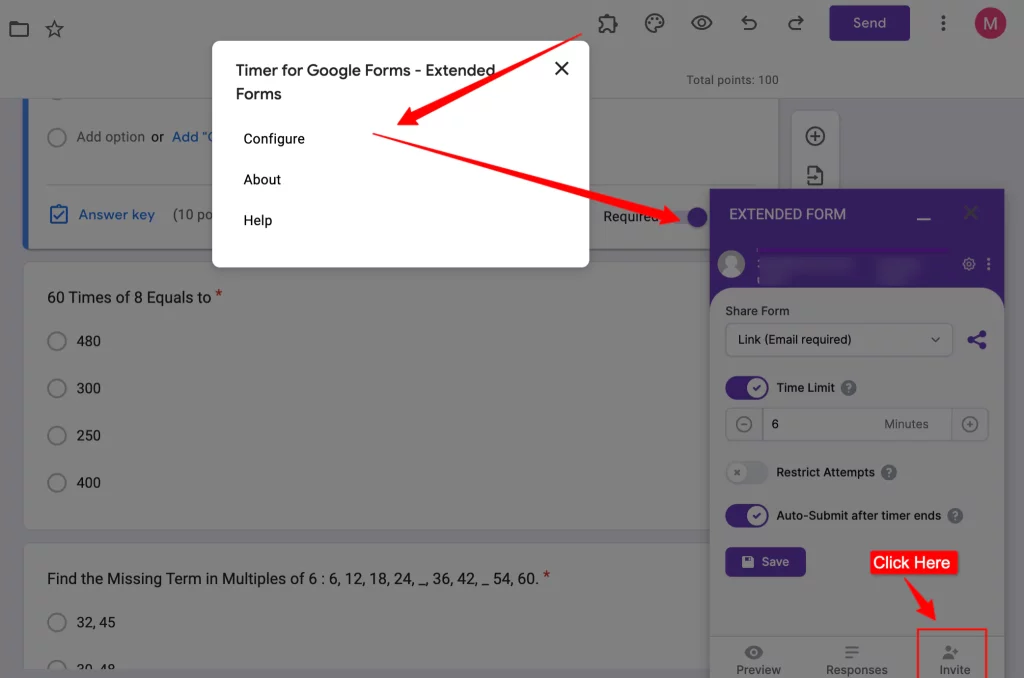
- Configure the timer, restricted attempts, and share form option (you can directly click on the share icon and the link will be copied).
- Then, ‘Save’ the settings. Once that is done, you can go through the ‘Responses’ to the main page of ExtendedForms.
Share the form via ExtendedForms
If you want to share the form through email,
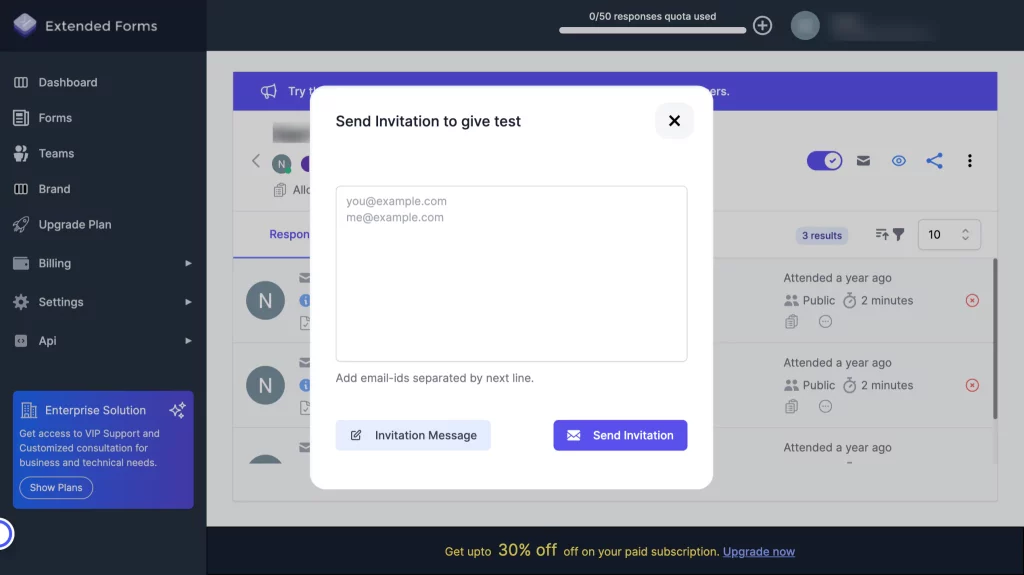
- Either, you can directly click on the ‘Invite’ option in the settings box in Google Forms. It will directly lead you to the ExtendedForms main page where a send invitation pop box will appear.
- Click on the ‘Invitation Message’ button and an invitation message box will be presented. Write the message and click on the ‘Update Message’ button. Then go back to the send invitation box, add email addresses, and send the invites.
Another way to navigate to the invitation message is in the dashboard;
- Go to the ‘Forms’ section, and select the form you want to send.
- Click on the ‘Send Invitation’ icon and follow the above process. Or you can go to this icon ‘፧’ > ‘Invitation Message.’ Add a personalized message and send the invitation.
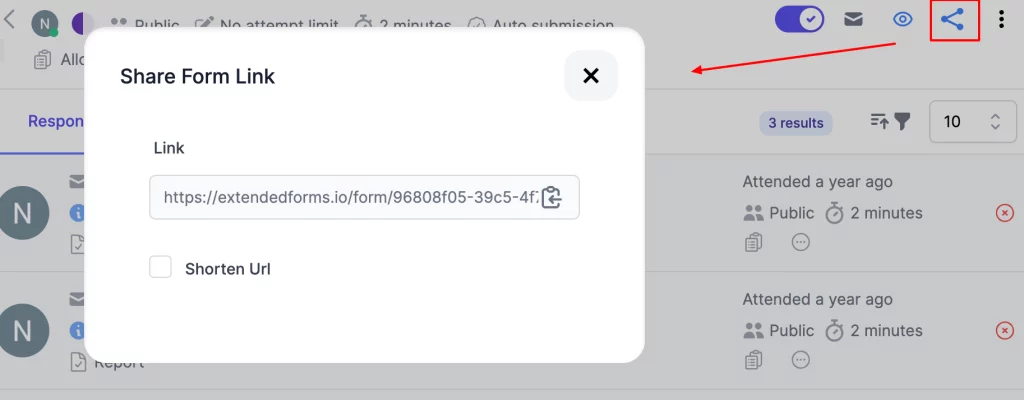
- Now, to send the form for data collection, go to Forms (in the dashboard) > your selected form > click on the ‘Share’ icon and copy the link. You can also shorten and customize the link as well.
View data collected in the dashboard
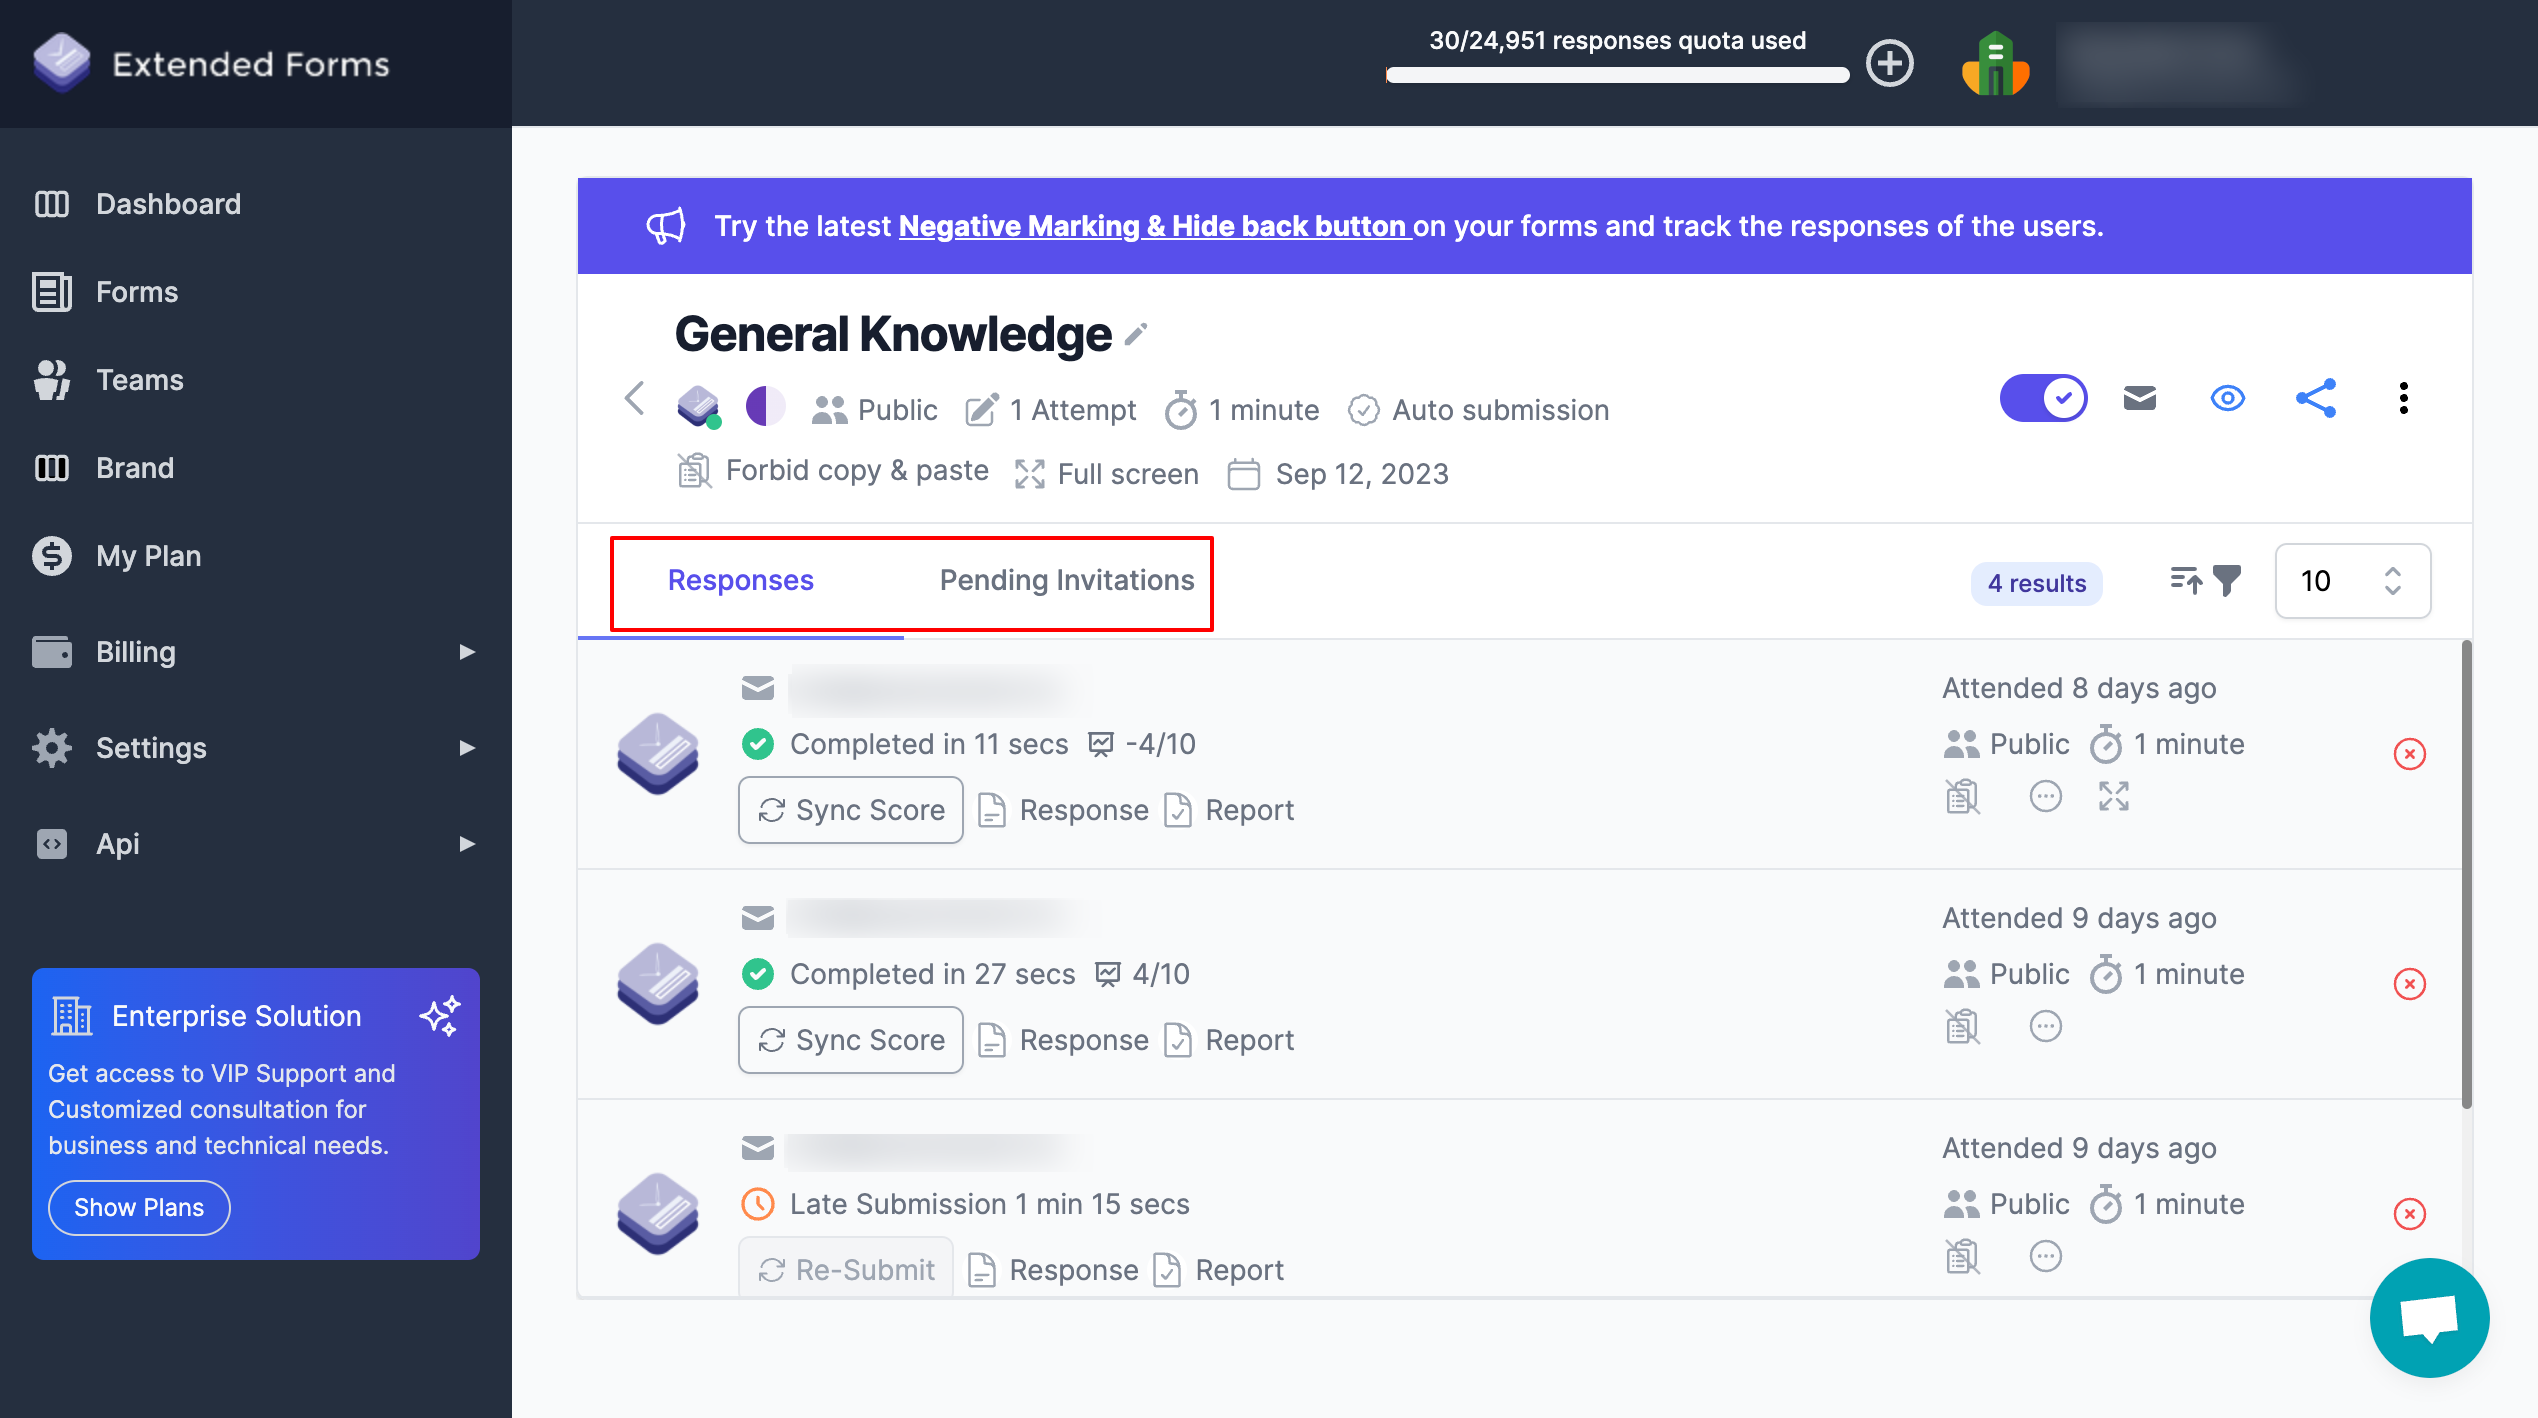
Once you send your form, and then you start getting responses. The collected data can be seen in the dashboard of the ExtendedForms app. Besides, In the Forms section, under the potential form, you’ll see all the responses you’ve received and pending invitations.
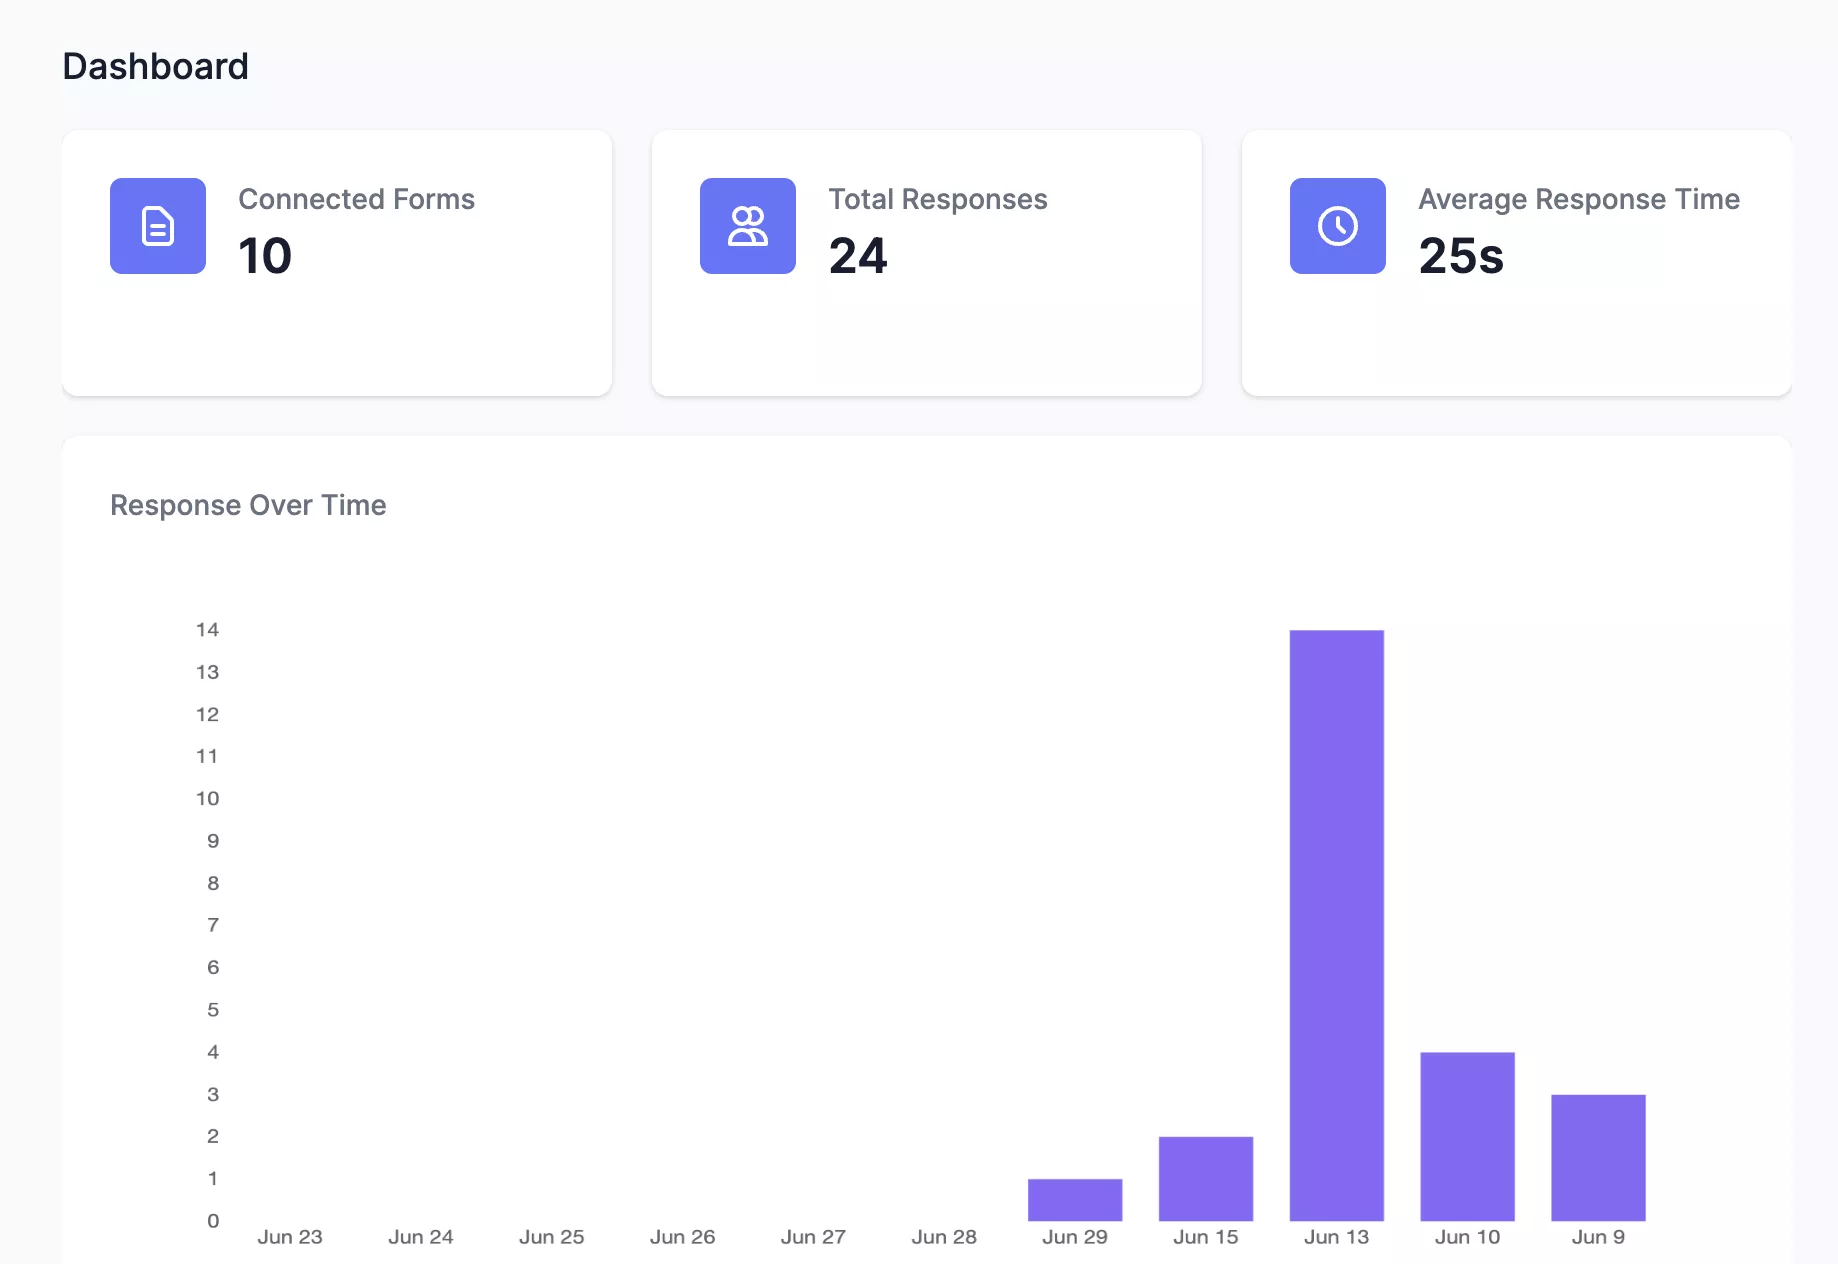
In the dashboard, you will see collected data shown in the graph form, the total number of responses, connected forms, and average response time. Apart from these, in the dashboard, you will also see the list of the last 10 respondents’ status, time taken, and score.
If you’ve the pro version of ExtendedForms then you can export CSV files and open data in an Excel sheet as well.
This is how with the help of the ExtendedForms add-on you not only add a timer feature but also send and collect data with Google Forms.
Concluding Everything
Now that you know how to collect data with Google Forms, it’s time to enhance your forms with the ExtendedForms app. This app adds a valuable timer feature, ideal for quizzes or timed tests.
ExtendedForms is a leading timer and proctoring add-on available in the Google Workspace Marketplace. It stands out as a top alternative to other timer apps, offering easy setup and a wealth of features. You can start with its free version to get a countdown timer and, if needed, upgrade to one of the affordable subscription plans for additional features that provide great value for your investment.
If you like reading this blog, also read our detailed guide on Best Google Forms Test Maker: ExtendedForms and How to Make Google Forms Accessible. [In 4 Steps].