This guide will go through the steps to create a Google My Map using Google Forms responses. Google My Maps is a powerful tool that allows users to create custom maps with markers, lines, and shapes to represent information visually.
When combined with Google Forms, users can collect data through a form and then plot that data on a map in real-time. This integration can be useful for a variety of purposes such as tracking customer locations, plotting events, or visualizing survey results.
Google My Maps operates similarly to other cloud-based tools offered by Google. You have the option to work on maps independently or collaborate with other users on projects by sharing the maps. By the end of this guide, you will have a fully functional map that updates automatically as form responses come in.
Table of Contents
Purpose of Using Google My Maps With Google Forms
One of the main purposes of using Google My Maps with Google Forms is to collect data and represent it visually on a map, especially when it’s location-based. This integration allows users to create forms, collect data, and then plot the responses on a map in real-time. This makes it easier to analyze and understand the data, especially when dealing with large amounts of information.

Another advantage of using Google My Maps with Google Forms is the ability to collaborate on projects with other users. By sharing maps and forms, multiple users can contribute to a project, making it a powerful tool for team projects. The real-time updates also make it easy for team members to stay up-to-date. Additionally, the ability to access maps from anywhere with internet access makes it a convenient tool for remote teams.
Steps to Create Google My Map Using Google Forms
Let’s quickly look into the process of creating Google My Map using Google Forms. It is a very easy and simple process of linking Google Forms and maps, within a few steps you will add Google Maps to Google Forms. Let’s see
Step 1: Setting up Google Forms
- Creating a new Google Form – go to Google Forms, or through G-Drive open Google Forms. Choose a blank form or quiz!
- Adding questions to the form – Next add questions to the form, geography-based questions, or if you’re taking a survey then add location-based questions.
For instance, ask quiz questions like ‘Where is the Eiffel Tower located?”
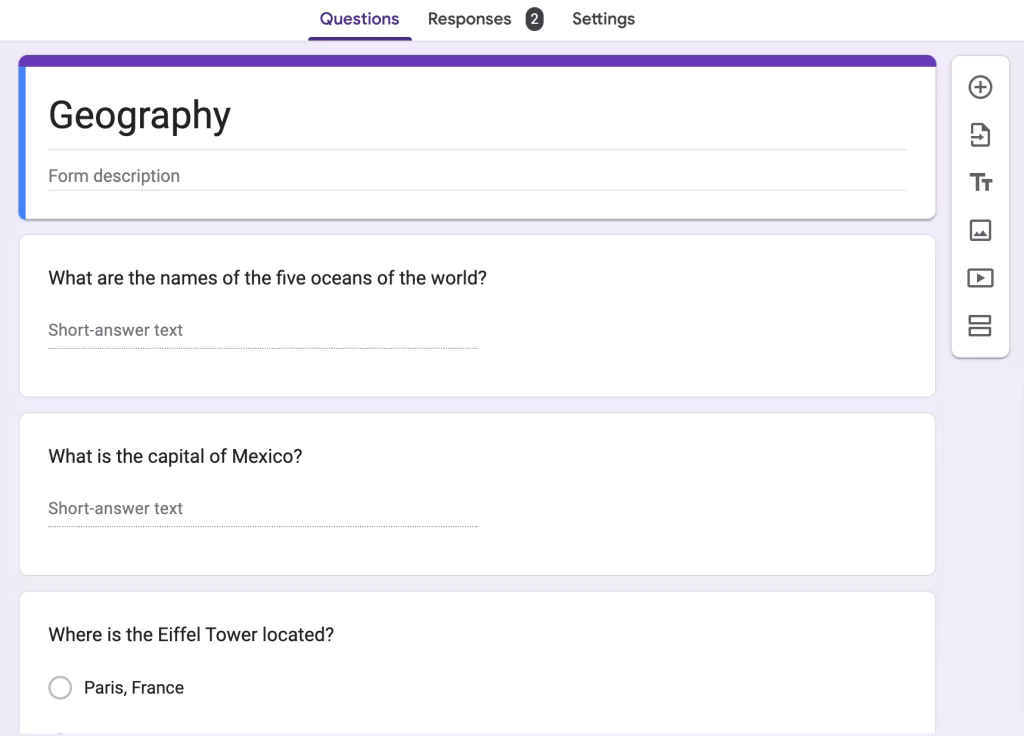
- Choosing the form response destination – After your form is created, connect it to Google Sheets. Go to the ‘Responses’ tab, click on the ‘Link to Sheets’ option, and your forms will be linked to sheets. All the responses will be saved in the sheet as well.
Step 2: Creating Google My Maps
Now that Google Forms is created, the next step will be to create Google My Map.
- Accessing Google My Maps – Go to the G-Drive, click ‘New’ > More > Google My Maps. This will create a new editable map.
- Creating a new map – A new map will be created, go ahead, and add the title of the map in the place of ‘Untitled map.’ For example, I’ve titled it as ‘geography’ the same as my Google form’s title. You can add a description if you want.
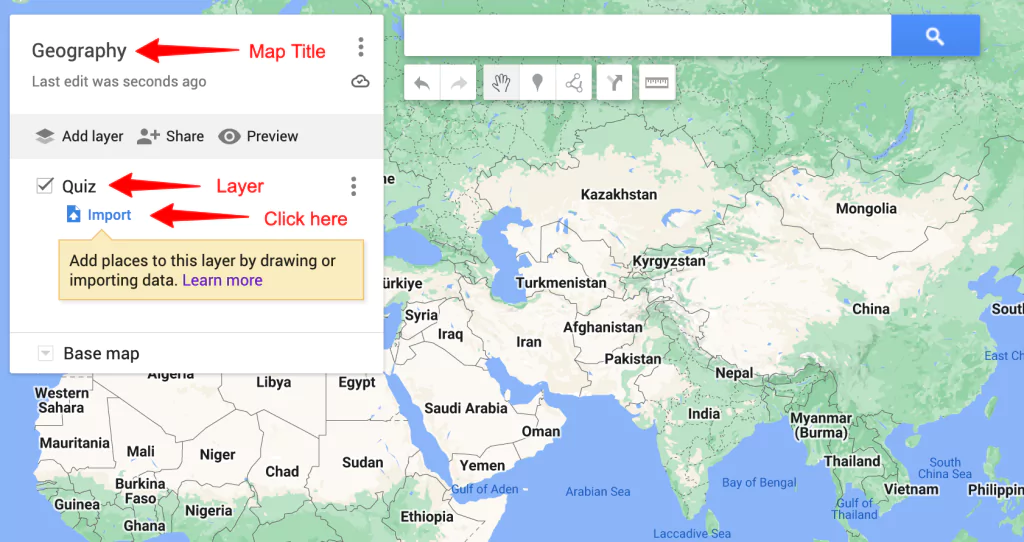
Further, rename the ‘Untitled layer’ if you want to. Next, if want to customize the map style, click on the ‘base map’ dropdown and choose from the following options.
Step 3: Integrating Google Forms with Google My Maps
Once Google My Maps is created, connect it with Google Forms.
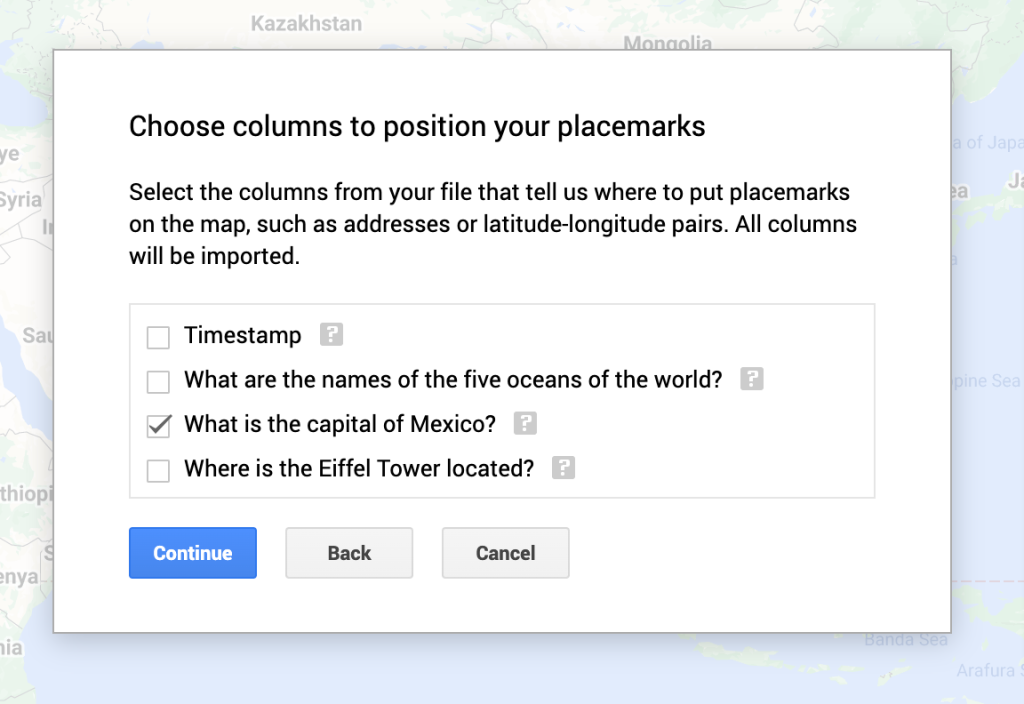
- Connecting the form responses sheet to the map – To connect Google My Map with Google Forms, click on ‘Import,’ select Google Drive, and choose the response spreadsheet for the Google form.
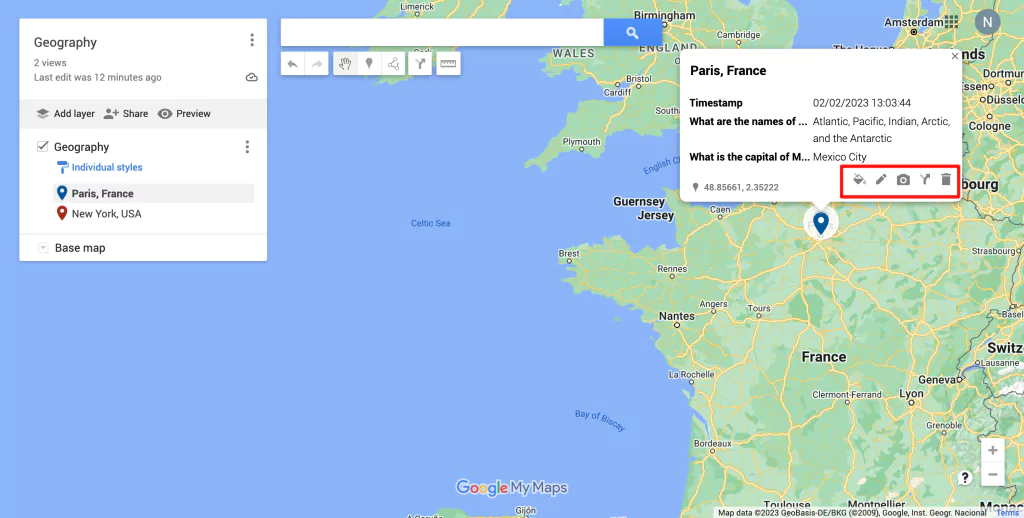
Then, a pop-up box will appear asking to select a column (spreadsheet field) that will be located in the map. In simple words, choose the question whose answers you want to locate on the map. For example, choose ‘Where is the Eiffel Tower located?”F
Then continue, and select the title of the marker, for instance, ‘Name.’ It will help you know who has answered what for the question.
- Added markers to the map as form responses – Click ‘finish’ and you’ll see all the markers appear on the map. You can click on the marker and you’ll see additional information. Including, descriptions or other questions added in the Google Forms.
- Customizing the markers on the map – You can customize the markers with different colors, add images, and add directions to reach places. Besides, new layers can be added and google sheets can be imported for other questions that you want to mark on the map.
- In the end, you share the map with students, colleagues, or anyone else in Google Drive, or as a link share with them.
Wrapping Up
In conclusion, creating a Google My Map using Google Forms is a simple and efficient way to organize and present data. It allows you to easily collect information from different sources and display geographic data in a clear and interactive map format. This makes it an ideal tool for businesses, organizations, and individuals who need to present geographic information in a visual manner.
Note, if you are a Google Form user or going to be one because of this cool integration, then you must know that you can advance the forms with an add-on. One such add-on is ExtendedForms, it is a great timer and proctor feature that is free to install and use (it does have paid subscriptions).
In addition to a timer and proctor, the add-on boasts a plethora of features such as customer support via email, the ability to restore responses’ progress, options to enable/disable copy and paste, and much more. It enables you to establish a team brand, customize branding, and send tailored invitation messages among other things.