Planning a public event, wedding, or private party with a grand success? Then ensuring all guests’ RSVPs is crucial. But keeping track of RSVPs is a daunting task, made easier with Google Forms.
RSVP form in Google Forms helps you easily collect and organize event responses. You can customize the form to ask for guest names, contact information, and attendance. The reactions are automatically organized and updated in real-time, simplifying event planning.
Like other online builders, Google Forms comes with an RSVP template that is completely free to use. Here in this blog, we will take you through a detailed guide on building an RSVP form in Google Forms.
Table of Contents
What Is an RSVP?
You must have seen this on invitations. RSVP stands for the French phrase – “répondez, s’il vous plaît,” which literally means “respond if you please” or “please respond.”
Most people who send an invitation that includes RSVP want their guests to let them know whether they accept or decline the invitation. RSVP invitation form gives the event organizer an idea of how many people are attending leading to complete preparedness.

If the RSVP says, “regrets only,” you only need to respond if you’re unable to attend. Because if you don’t respond it will be a sign to your host that you’ll attend. RSVP requests often include a deadline for response, as the host needs to finalize event details. It’s best to respond as soon as possible rather than later.
Reasons to Use RSVPs
If you are one of those who think what is the benefit of RSVP people then you must know that it has several benefits that make it worth extra effort.
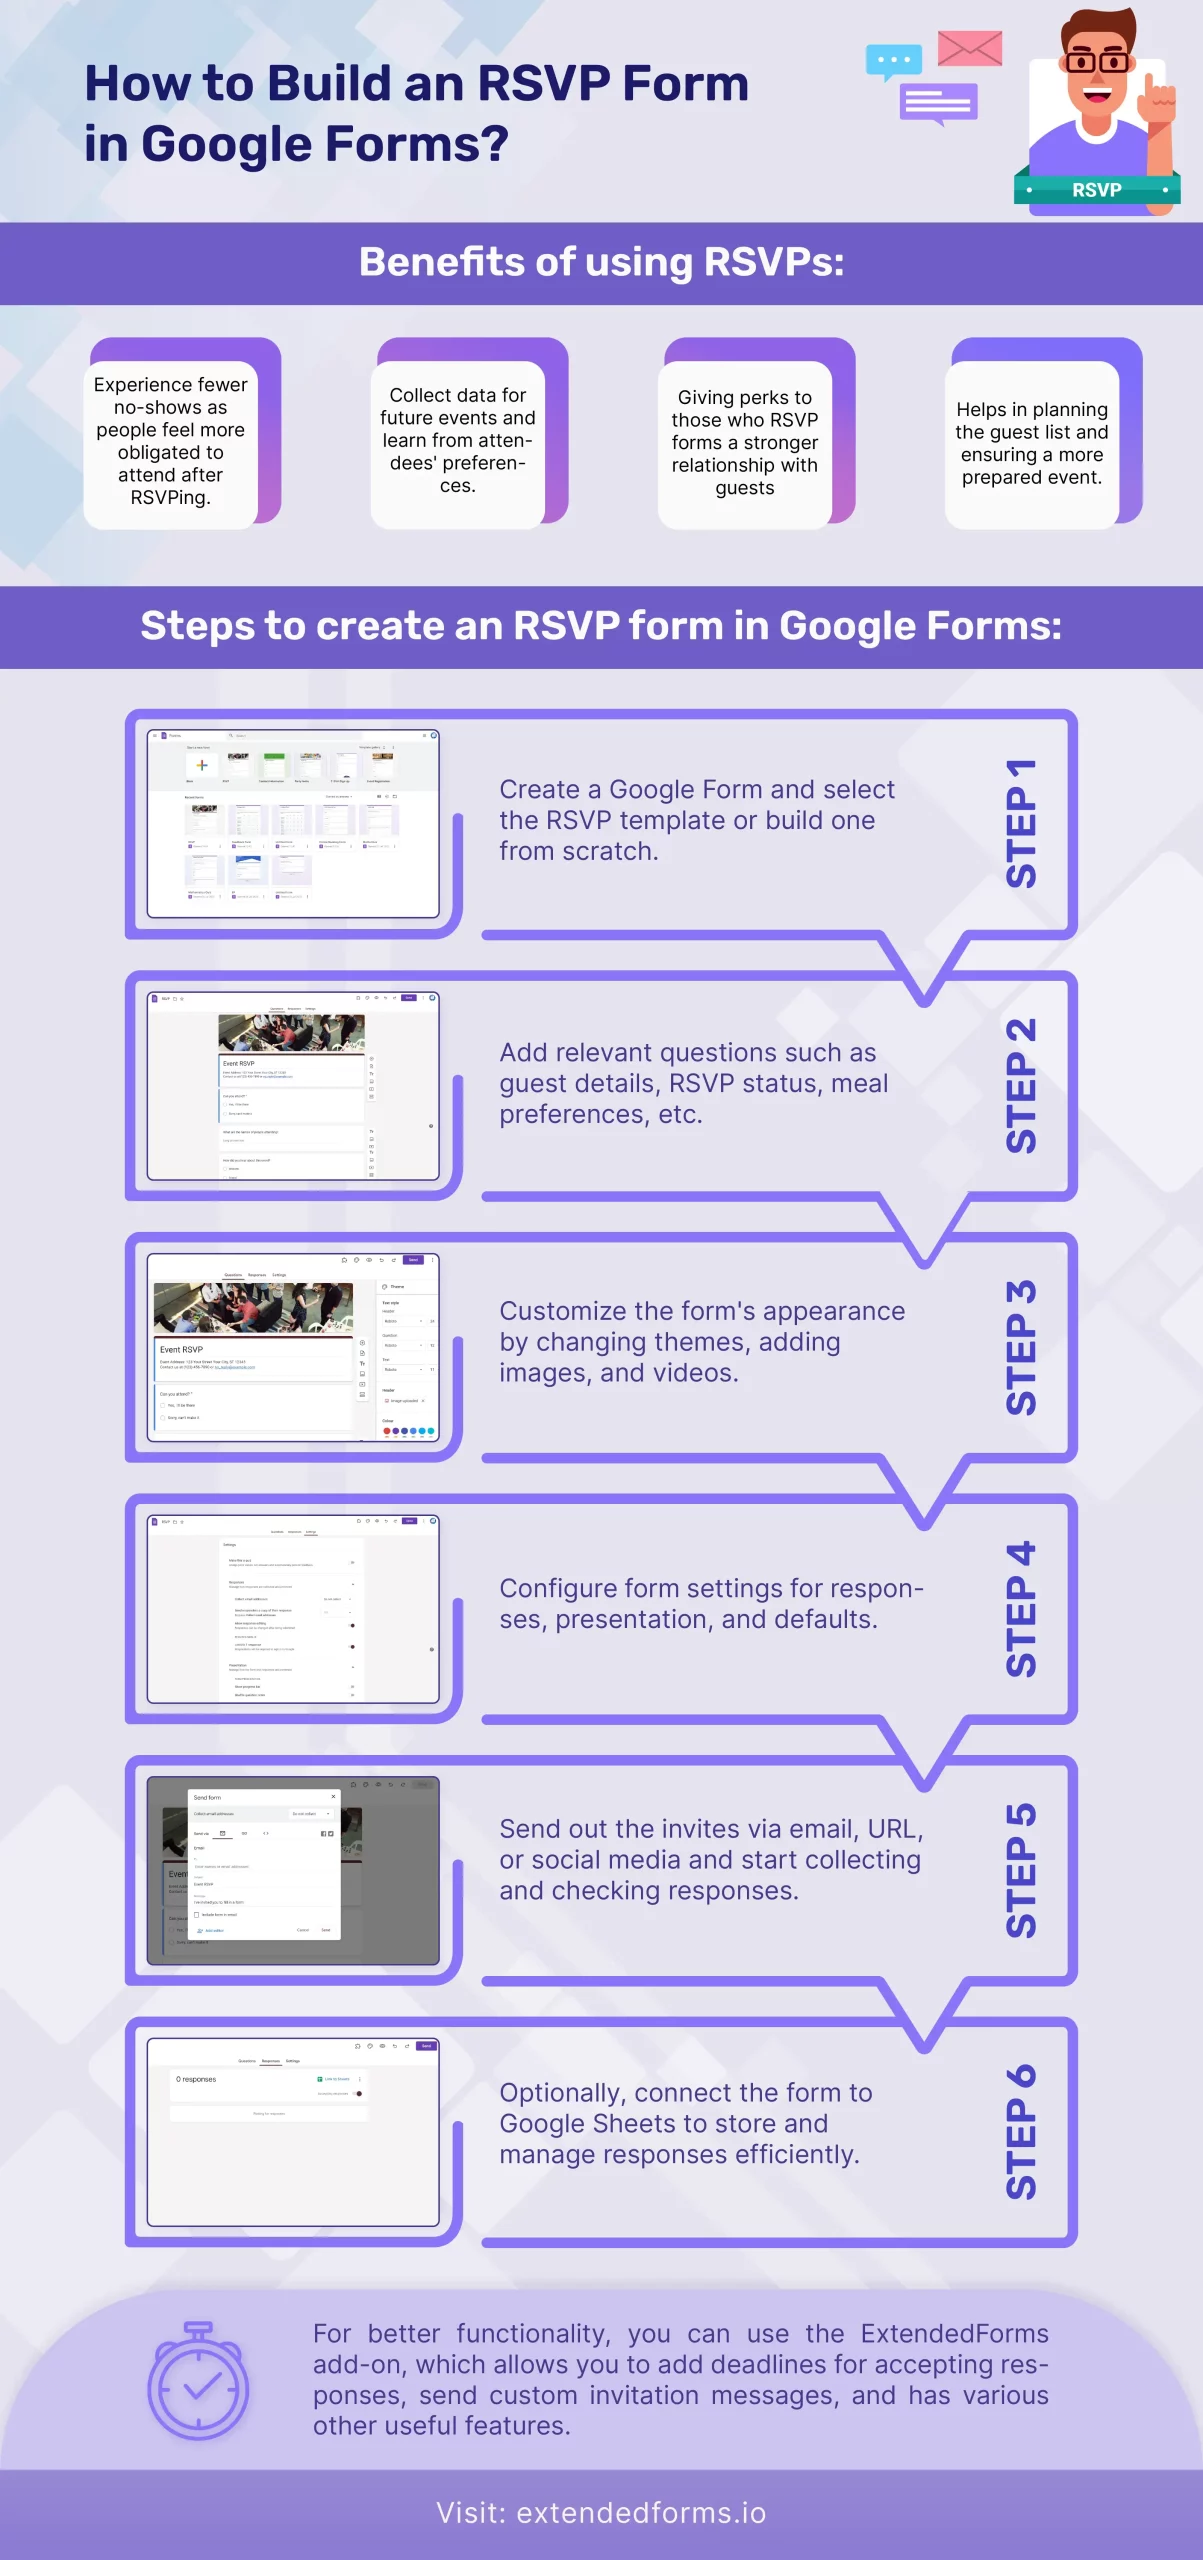
- Experience fewer no-shows – If people RSVP to an event they will feel more obligated to show up [though there are still exceptions]. Therefore, it leads to fewer no-shows because more people will come to a free event.
- Collect data for the next events – Having online RSVPs allow you to collect data from people who respond, even from those who don’t show up or respond no.
Learn from what your attendees want to plan a more successful event next year. You can also use the for future events and to help with marketing your company.
- Giving perks forms a relationship – You can have an incentive for RSVP and have only the people who reply give perks that others will not receive. It can be a free drink ticket, gift hampers, or no cover charge, etc.
Perks give those who respond to free events another incentive to be present. So you won’t be left with a bunch of people who said yes but didn’t show up.
- Perfect for planning guest list – With an RSVP, you can give your event planner a guest list that they can take into account when planning for the event.
An approximate head count leads to more prepared event that run smoothly and efficiently. You can also make sure that you’ve perfect venue for the event with the number guests going to be presented and not spend extra money.
Aside from these common benefits certain benefits that are specifically for online RSVP are –
- They are convenient and efficient to use, host can create the RSVP invitation in online form makers from scratch. In fact, most online makers provide array of customization options. Aside from freedom of creativity, it instantaneously sends and receives the RSVPs.
- They are cost effective, even if host or guests have to change their plans RSVP forms doesn’t cost the cards, envelopes, and mailing charges.
- You can get real-time information and can start planning in no time accordingly.
How to Create an RSVP Form in Google Forms?
It’s a task to create an RSVP invitation form and try to collect and keep track of the RSVP form. But there is an easy way to build and organize RSVPs using Google Forms. It is a free and simple tool to create surveys and forms, which means you can also easily create an RSVP form free.
Here, we will go through guided steps to understand how you can create a RSVP form in Google Forms. Let’s get into it
Step 1: Create a Google Form
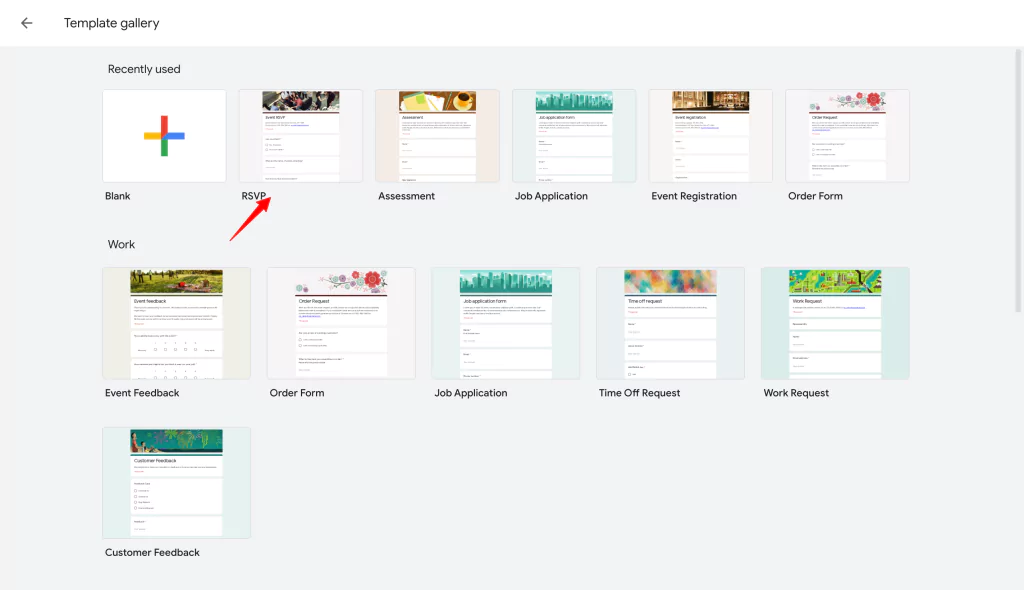
The first step is to set up a Google form for RSVP invitations, there are multiple ways to go to Google Forms. You can go to forms.google.com in your web browser or open it directly from Google’s homepage.
Once you are on the homepage, you will find various templates, scroll down to see the RSVP template and click on it. We are going to use that template for creating the RSVP in Google Forms.
Looking for extensive customization of the timer in Google Forms? Read, ExtendedForms Unveils: Customized Timer Themes.
Step 2: Add Questions
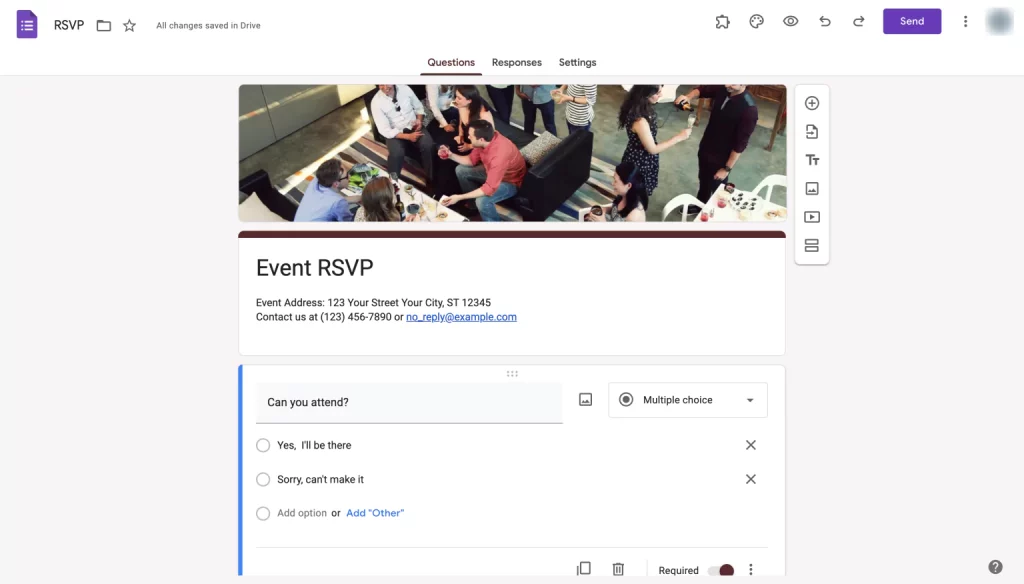
Now that we have selected the template, the next step is to add questions to your form. You’ll find a certain list of questions that are pre-created in the template. You can definitely edit the questions by clicking on the particular question. Or add the questions by clicking on the ‘➕’ icon.
Add the title and description to your form, for example, Wedding invitation, 50th Birthday Celebration, etc. And in the description, you can add one line about whose party it is, where & at what time, etc.
Note that you can ask in your RSVP form certain questions like –
- Guest Details questions – Name of the guest and name of the plus one
- RSVP status – whether they are going to attend or not?
- Address
- Meal Preferences – confirming details like dietary restrictions, meal selection, etc.
- Accommodation & Travel – questions like ‘Will you be joining us at our hotel block?’ You can share accommodation details in the invitation itself. Besides, for travel ask them to reserve a seat on a bus to & from the venue.
There are types of questions available to add apart from multiple choice types. You can also select the ‘date’ and ‘time’ options for a question that requires it. Also, add an ‘Other’ option for each question so that guests can enter their responses.
Note* – Don’t add too many questions keep it minimum and to the point.
Step 3: Customise the RSVP Invitation
The next step to create an RSVP form in Google Forms is to customize it. Google Forms allows you to do the basic customization of your Google Forms like changing the font size, type, and color of the form. Adjust the settings according to your brand identity.
You can do this by changing the theme, go to the ‘Customize theme’ option and can change the theme color, font style, and sizes, and add a header image.

Apart from that, it is easy to add images to your questions or choices. Click on the ‘Image’ icon from the field option box beside the question tab. You can add images from your computer or choose from the web.
Just in the same way, you can add a video, click on the ‘Video’ icon below image one and add from the computer or insert a URL.
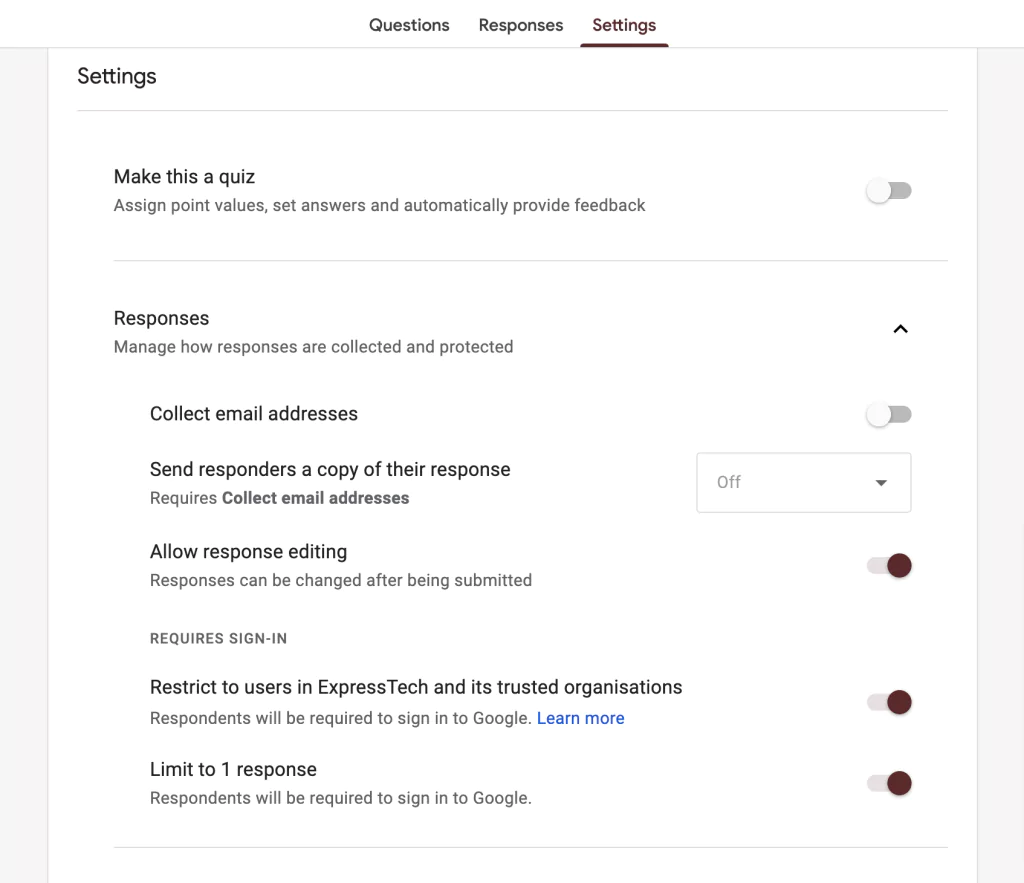
Step 4: Configure the Form Settings
After the form is customized to your liking, configure the form settings as per required. To do this, click on the ‘Settings’ option, and in the window, you can manage ‘Responses’, ‘Presentation’, and ‘Defaults.’
You’ll see the ‘make this a quiz’ option first and foremost however it is not necessary to enable it when we are creating an RSVP in Google Forms. Under the Responses tab, you can manage how to receive and protect the responses.
In the Presentation tab, you can choose the way your form is to be presented. There’s also a confirmation message option in this tab where you can add a thank-you message or redirect them to some other form or website.
Lastly, in the Defaults tab, you have to manage forms default like email addresses and question defaults such as make question required.
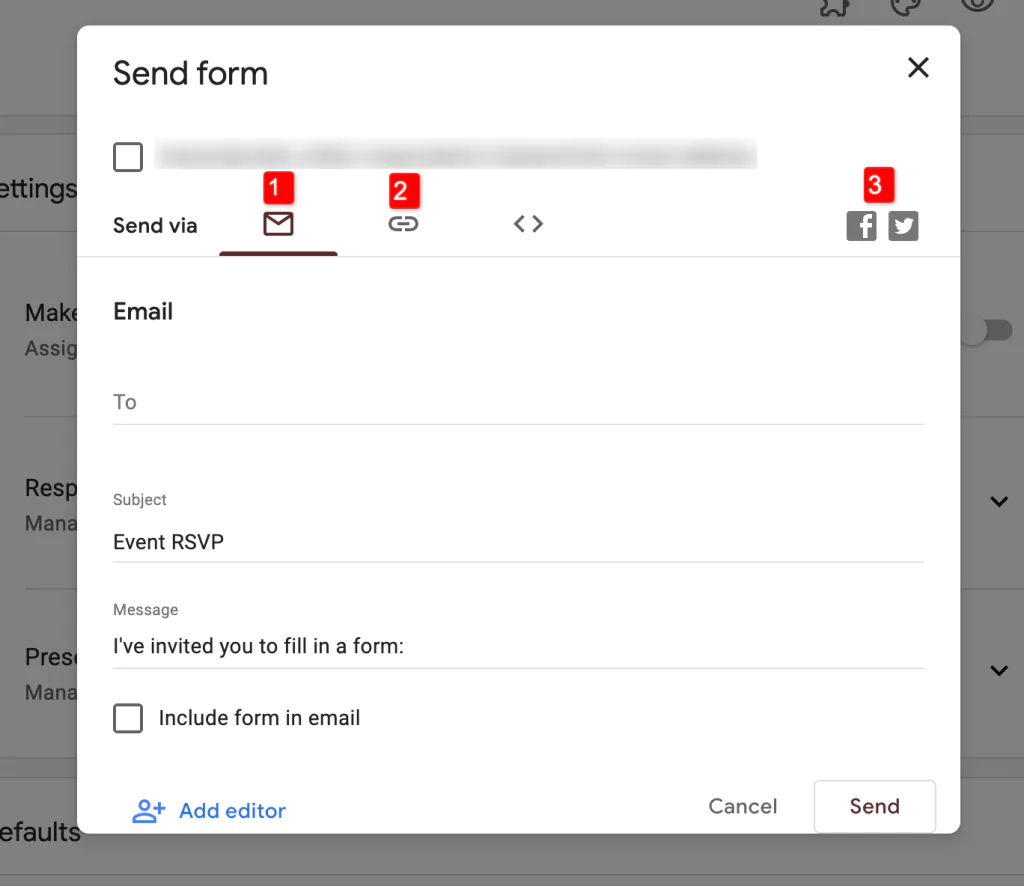
Step 5: Send Out the Invites
The last step after creating an RSVP Form in Google Forms is to send out the invites. There are three options we’re talking about to use them and send invites –
- Via Email – click on the ‘Send’ option, on the pop-up that appears enter the email IDs of the people you want to invite. Although optional, add a message to give better personalization and send the email.
- Via URL – Aside from sending the Google forms RSVP via email. You can create the link to let all guests have access to the form through the web.
Navigate to the ‘Link’ section of the ‘Send Form’ window. Check on the ‘Shorten URL’ to create a short version of the link, and hit the copy button to copy the link. Then share this RSVP link as a text, via apps, or on your webpage.
- Via Social media – Sharing the RSVP form through social media is a great option if you’re planning a public event. Here’s how –
In the Send form box, tap on the Facebook icon to share the RSVP on the Facebook page. Or tap on the Twitter icon to share on Twitter.
Now start collecting and checking responses
RSVP form in Google Forms is created and sent now check the total number of guests who agreed to your RSVP. And create a data sheet for the same to make the process more efficient.
- Click on the ‘Responses’ tab in the form, here you’ll be presented with the summary of all responses. You can also check out the individual responses.
- To create a data sheet where all responses will be saved, tap on the Google Sheet icon and connect the form with sheets.
- Also, select the ‘Get email notifications for new responses’ to let Google notify you when a new response comes.
Wrapping Things Up
RSVPs are an important part of any event and Google Forms makes it easy to create them. Just follow these simple steps to know how to create an RSVP form in Google Forms and you’re good to go!
If you want to add deadlines to your RSVP invitation then ExtendedForms is a great tool for you. It has the feature ability to add deadlines to accept responses – from & till, after that, no one will be able to fill the form.
The add-on is a great timer add-on with other features and benefits to look out for especially if you use Google Forms to create quizzes and assessments. Such as, it has a custom invitation message feature that lets you add a custom message while sending form invites via email.
If you like this guide on how to create an RSVP Form in Google Forms, you can also consider reading our detailed guide on How to Allow Multiple Domains for Form Sharing With an Organization. and How to Add Tables in Google Forms? [2 Ways].