If you’ve ever wondered how to go beyond the basic, cookie-cutter look and functionality of Google Forms, prepare to be amazed. In this ‘Customize Google Forms‘ comprehensive guide, we’ll delve into the customization options & incredibly powerful features that will transform your mundane surveys and questionnaires into stunning, interactive experiences.
Google Forms has a customizing feature that allows you to customize your forms. Besides, some less obvious settings in the tool also help to make it more specific of your form.
Undoubtedly, Google Forms is one of the versatile form-maker tools when it comes to collecting, analyzing, customizing, and storing information. Unveil the secret to crafting custom Google Forms with our step-by-step guide! Plus, we’ll reveal a nifty Google Forms add-on for effortless brand customization.
Table of Contents
Create a Masterpiece: Customize Google Forms
We are going to look into all the steps to customize Google Forms. There are small and big steps to creating a masterpiece and here we are going to focus on how each step plays a role in customizing the form.
Before starting with the customization process, first, create and set up Google Forms. Once you’ve created a new form, go through the below steps to customize it.
1. Customize Questions
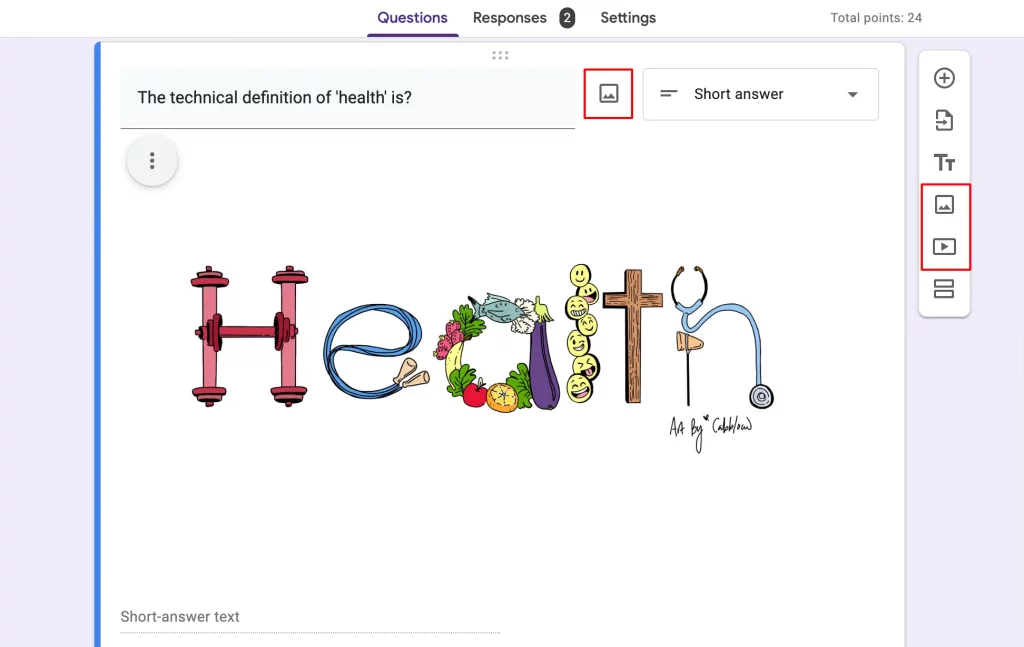
STEP 1. To elevate your Google Form, you can first start by customizing your question tab. Aside from all the question types available in Google Forms, you can add images and videos to make it more engaging, especially in the case of a quiz form.
You can add photos through Webcam or upload them from your device or add them from Google Photos. In it, users can align the image, resize it, or even add a caption to it.
STEP 2: Then you can also take it up a notch with the ‘File Upload’ question field, it is great to use if you want a document or portfolio file from your public.
STEP 3: Further, you can add a title and description in between questions to make it more systematic and organized. By adding the title & description section, you provide respondents with more information and what further to expect from questions.
2. Add Sections to Customize
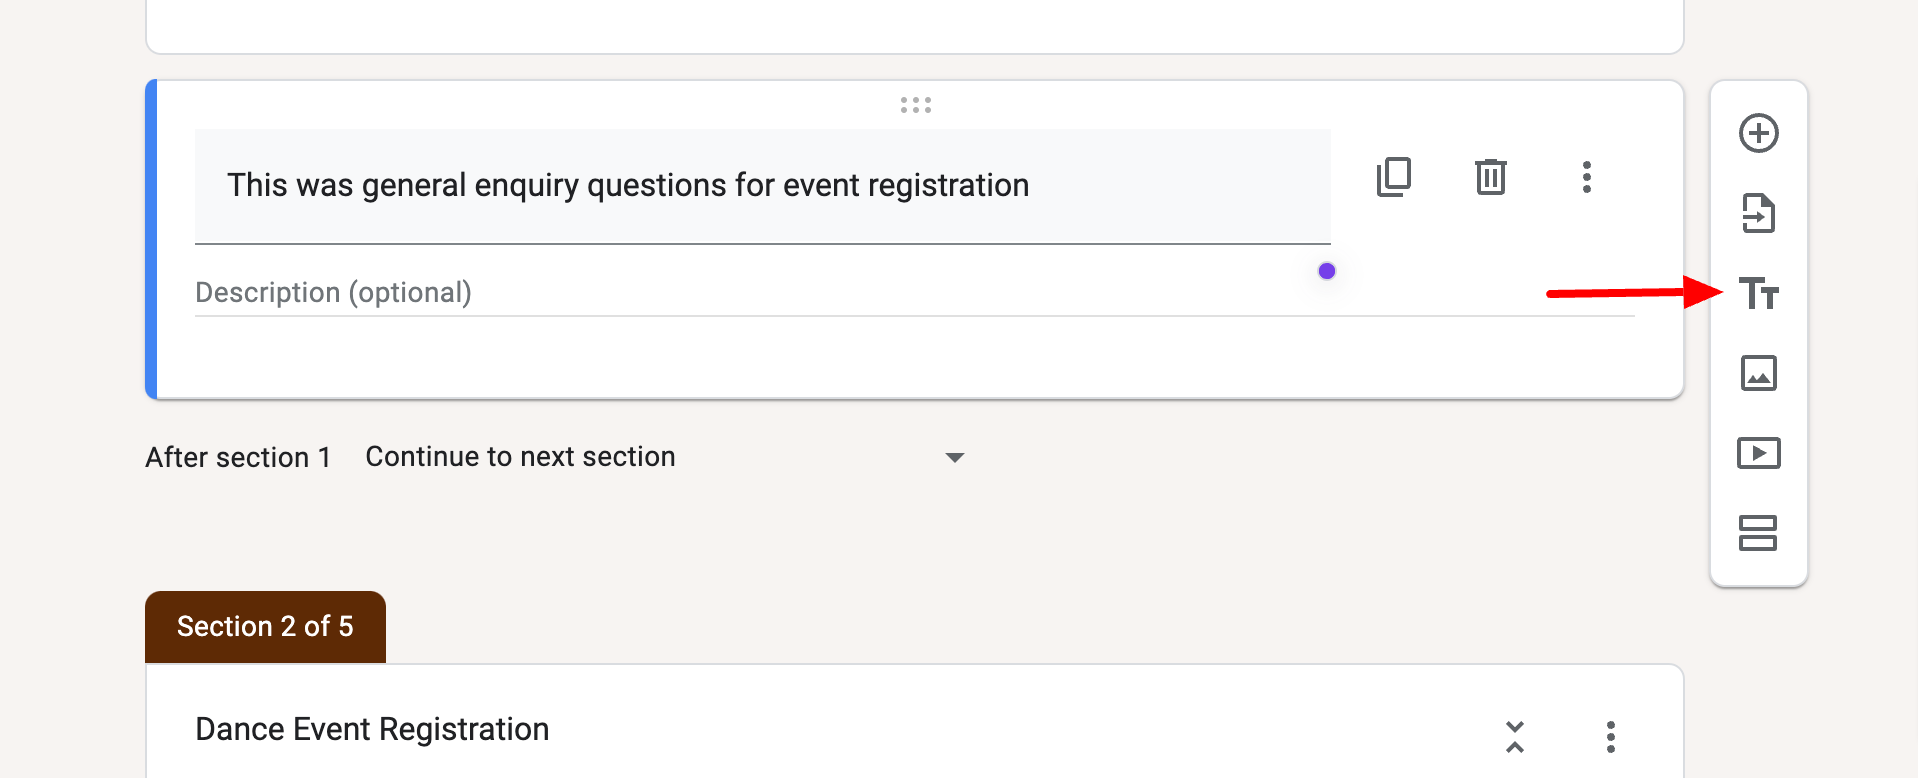
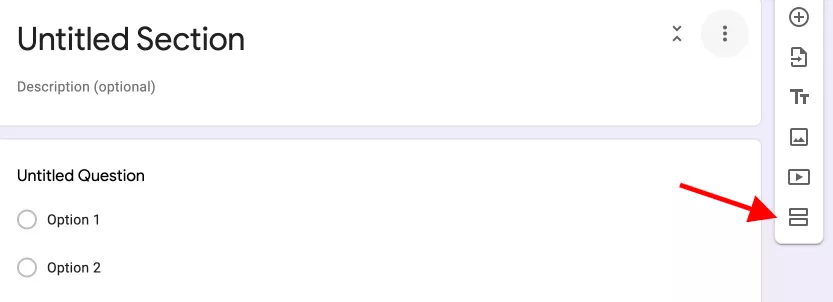
STEP 4: Google Forms has a ‘Section’ setting that allows users to do different steps in the form-filling process and it is one of the ways to avoid respondents knowing in advance what questions there are.
In the floating toolbar beside a question tab, click on the last option to ‘add section’ in between questions. It only makes the form look professional and organized. Especially if a form consists of varying factors of questions.
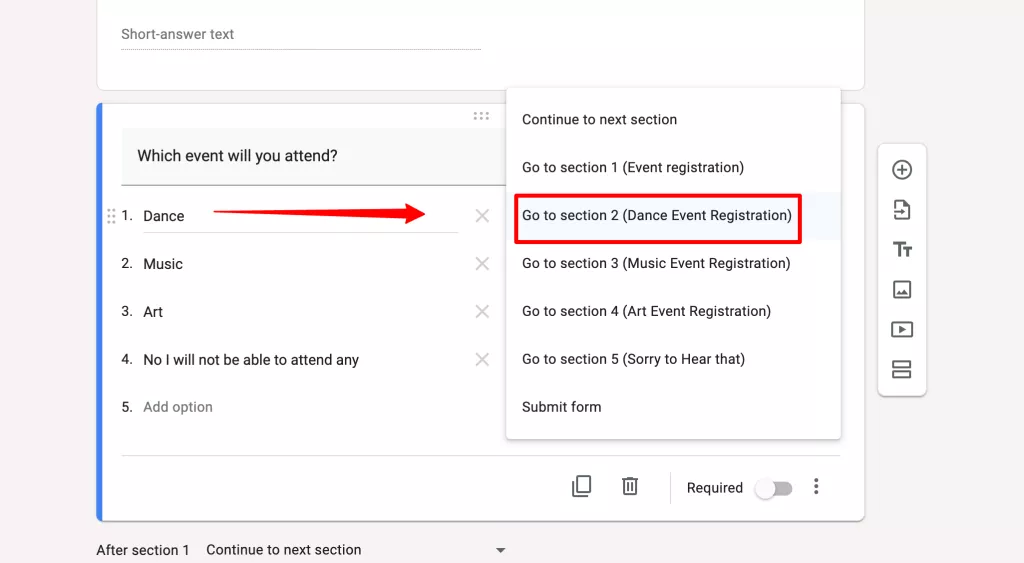
STEP 5: If you want to customize Google Forms then make the question conditional branching and you get a basic version of this feature. This feature is only workable if you add sections in the form and in MCQ and dropdown question types.
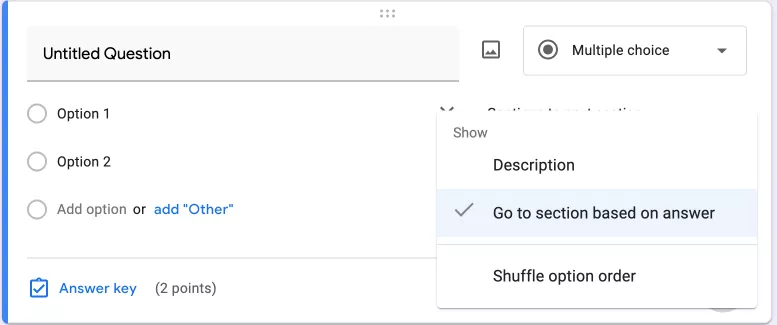
In a particular question section, click on the ⋮ icon > click go to the section based on the answer. Then beside each option choose the leading section.
3. Set Fonts & Header Image
STEP 6: Click on the palette icon – ‘Customise Theme’ at the top right of the page to bring up the ‘Theme’ options box.
Customise Text Style – You get the first option of text style to customize. In that, you get three different text style options –
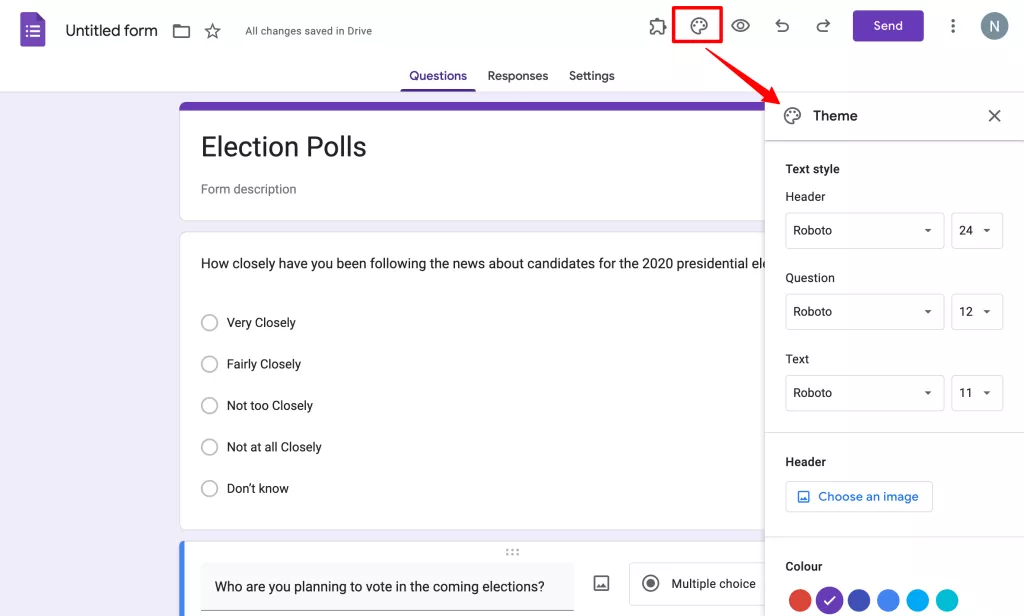
- Header text font – You can change the font and font size of the main title and section titles of your form. In the drop-down box, you get different fonts to choose from, however, they are limited.
- Question text font – From here you can change the font style and size of your questions. It might change a bit appearance of your form and might make it more attractive. [However, keep in mind to use fonts that are readable and clear.]
- Text font – This is to change the font and size of your answers section and description.
STEP 7: Now, the next step is to customize your Google form header image. It is a great way to visually describe what your form is all about. You get various available header images in different categories under the ‘themes’ option.
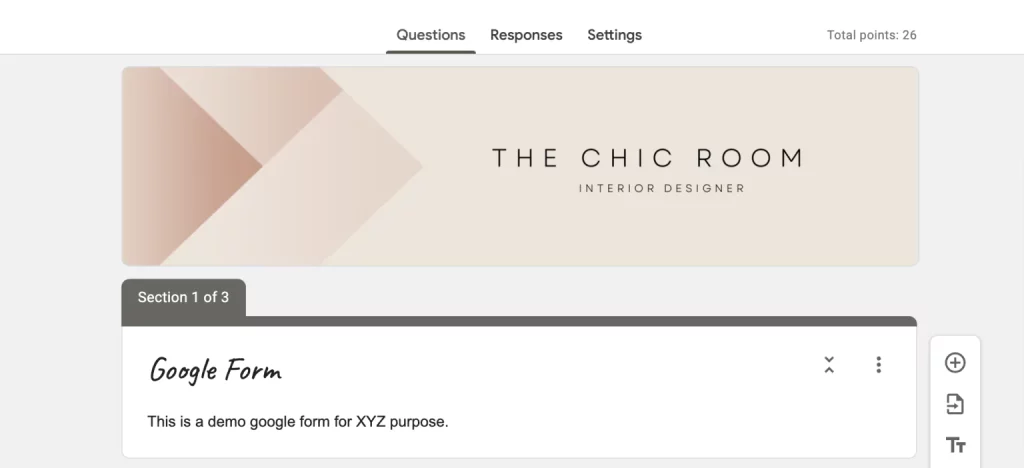
You can also upload the image from your device or choose from the Google Photos library. However, the header image size comes with an aspect ratio that has to be met if you want to put out good branding.
4. Customize Theme
STEP 8: In the customize Google forms is Google Form ‘background & theme color.’ From the ‘Color’ option, you can select one of the default theme colors or add your own by clicking on this icon ‘+’, and choosing a color with the RGB color picker.
This automatically sets a color scheme for your entire form, including accent colors (they are supplementary colors that typically complement the primary colors used in the form; background color).
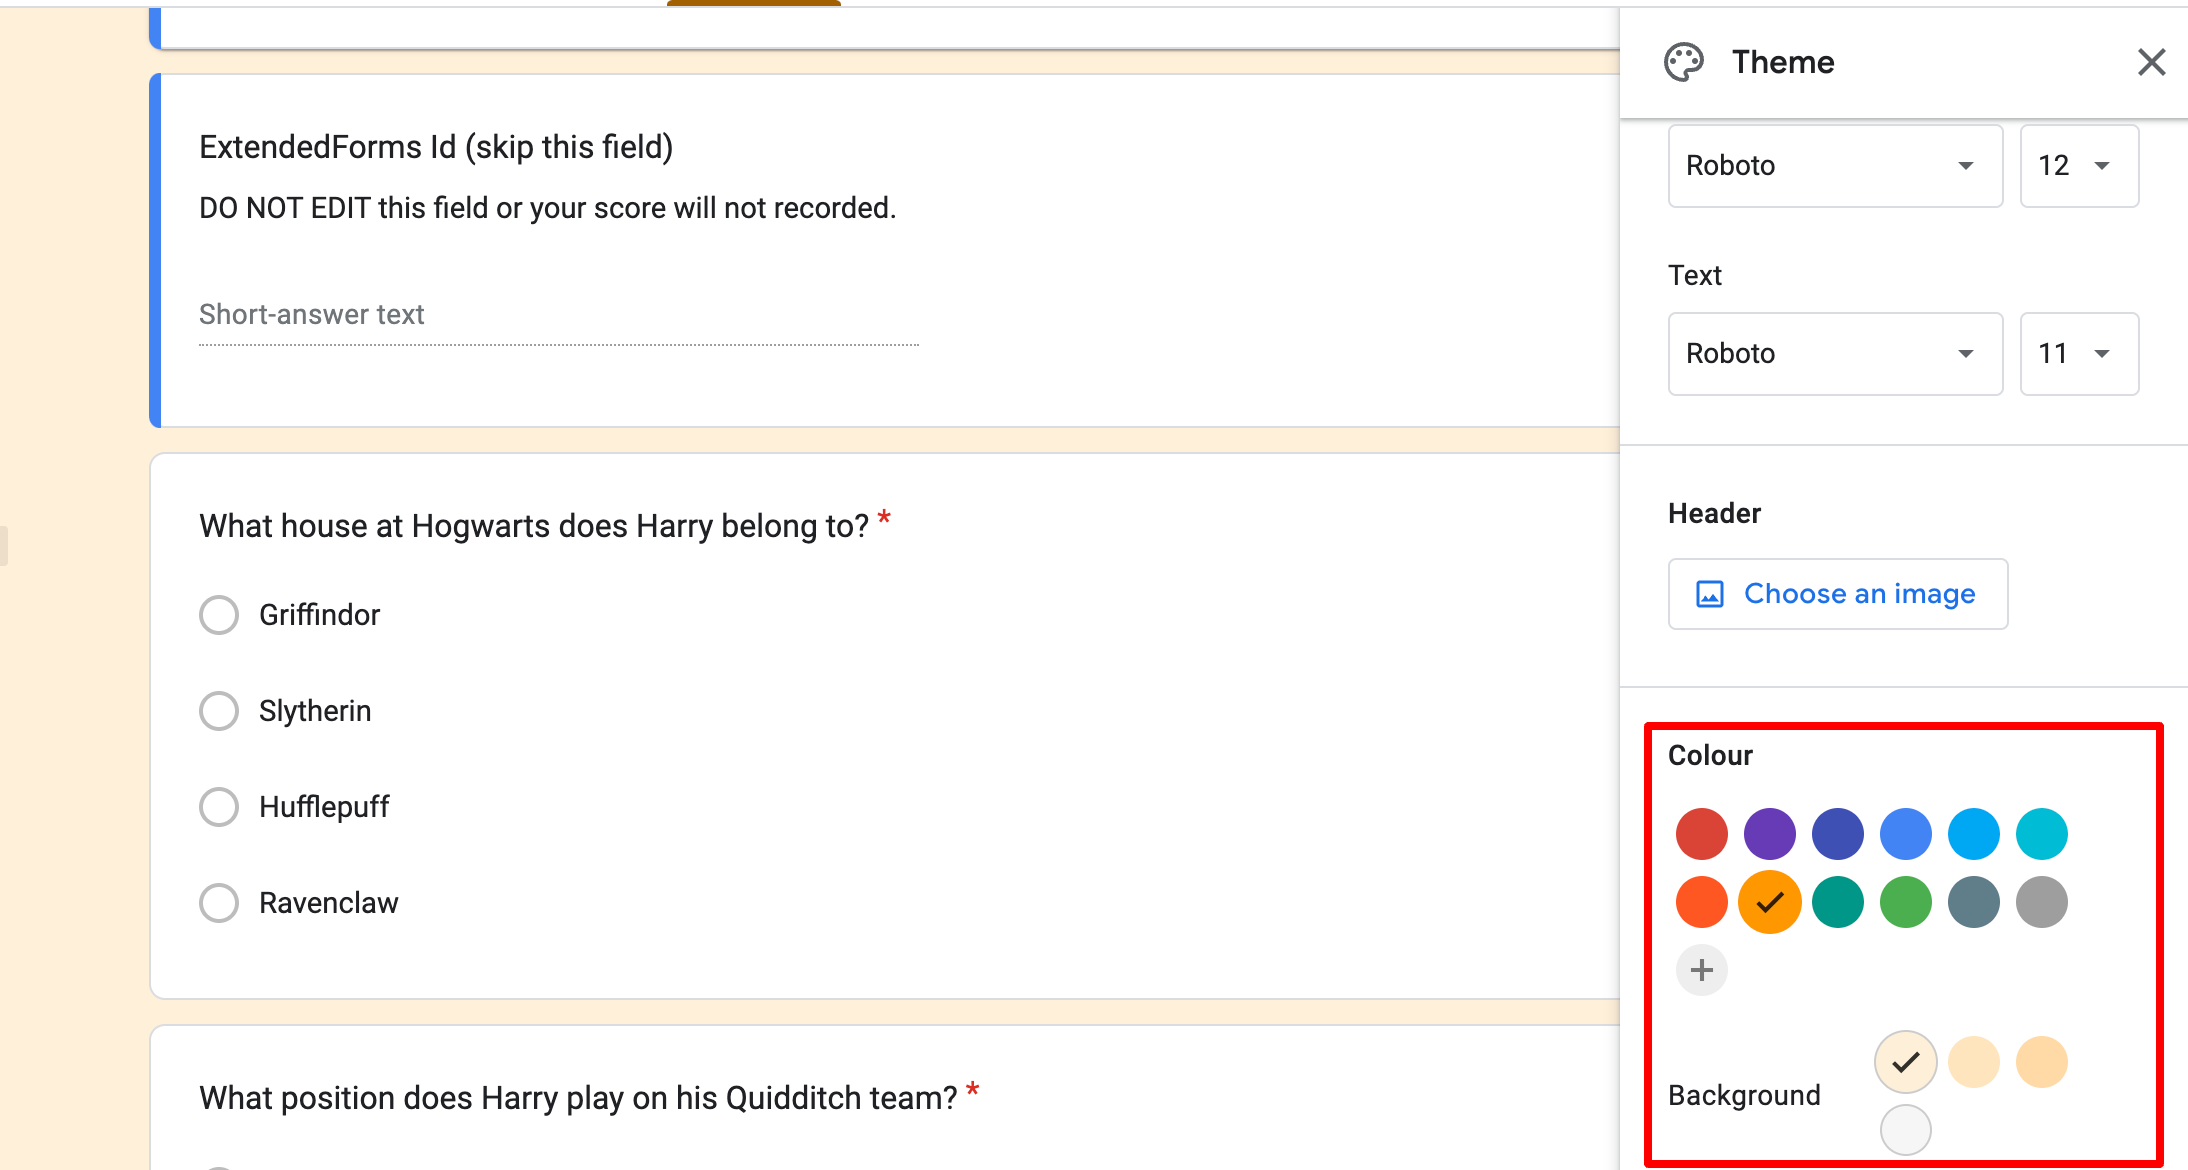
In the background color option, you can select one of the four color options for your form. They include neutral grey and light, medium, and dark colors of your theme color. It means except for grey, the other three colors are in the tones and shades of the color you’ve used as the theme color.
Configure Settings (optional)
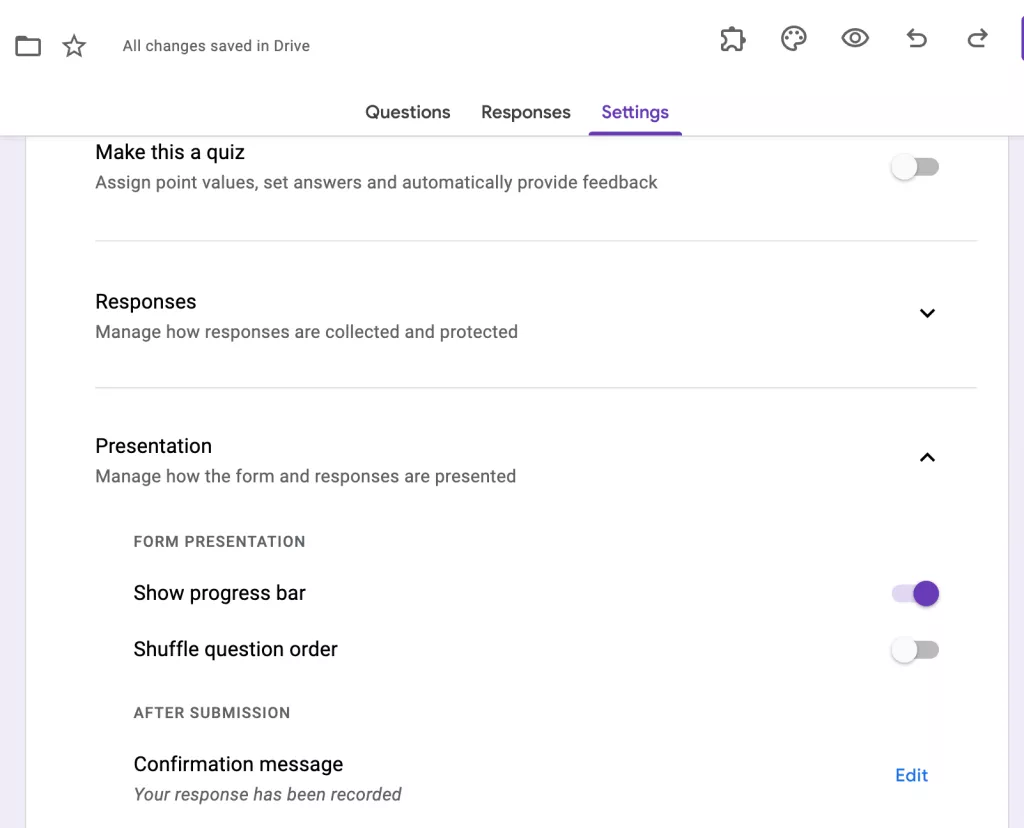
STEP 9: You can start with configuring the ‘Settings’ before moving forward to customize Google Forms themes. Like configuring, ‘Respondent Settings’ (if you make the form a quiz) – you can choose how to release marks whether immediately once the form is submitted or manually afterward. Other than that, you can add default point values.
Apart from that, configure the ‘Responses Settings,’ ‘Presentation’ tab, and Defaults settings.’ Like, you can collect email addresses, limit responses, show a progress bar, enable default questions, customize confirmation messages, etc.
So, these are the steps to customize Google Forms with themes, images, and fonts.
Apart from this, if you have a collaborator (e.g.: editors, teachers) with whom you want to share the online test then you can do so by navigating to “፧”. Click on ‘Add Collaborators’ and add another person’s email or copy the link and make it visible to all.
Pro Tip: Use ExtendedForms for Timer & Brand Customization
As I mentioned earlier, we are also going to talk about a Google Forms timer add-on. We all need a timer & proctor feature, especially when Google Forms doesn’t have its feature. However, the ExtendedForms add-on is not just a countdown Google timer app, it also has features of the brand and email customization. Along with that, it also features customizing Welcome and Invitation Messages.
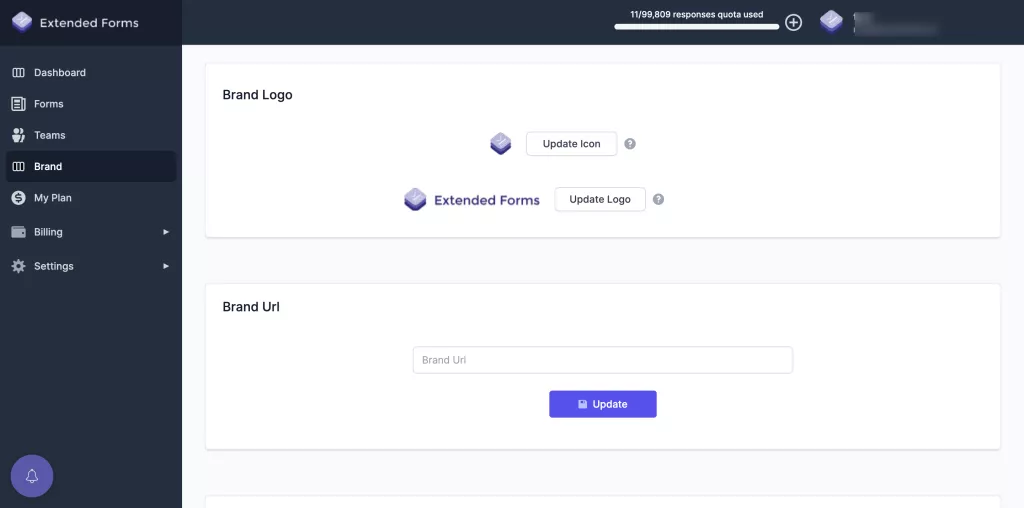
In brand customization, you get the option to add a brand logo, brand URL, and brand theme. So, to customize your brand –
- Install the ExtendedForms, go to the ‘Add-ons’ option in the ‘፧’ More option at the top right corner. Search ExtendedForms and install the app.
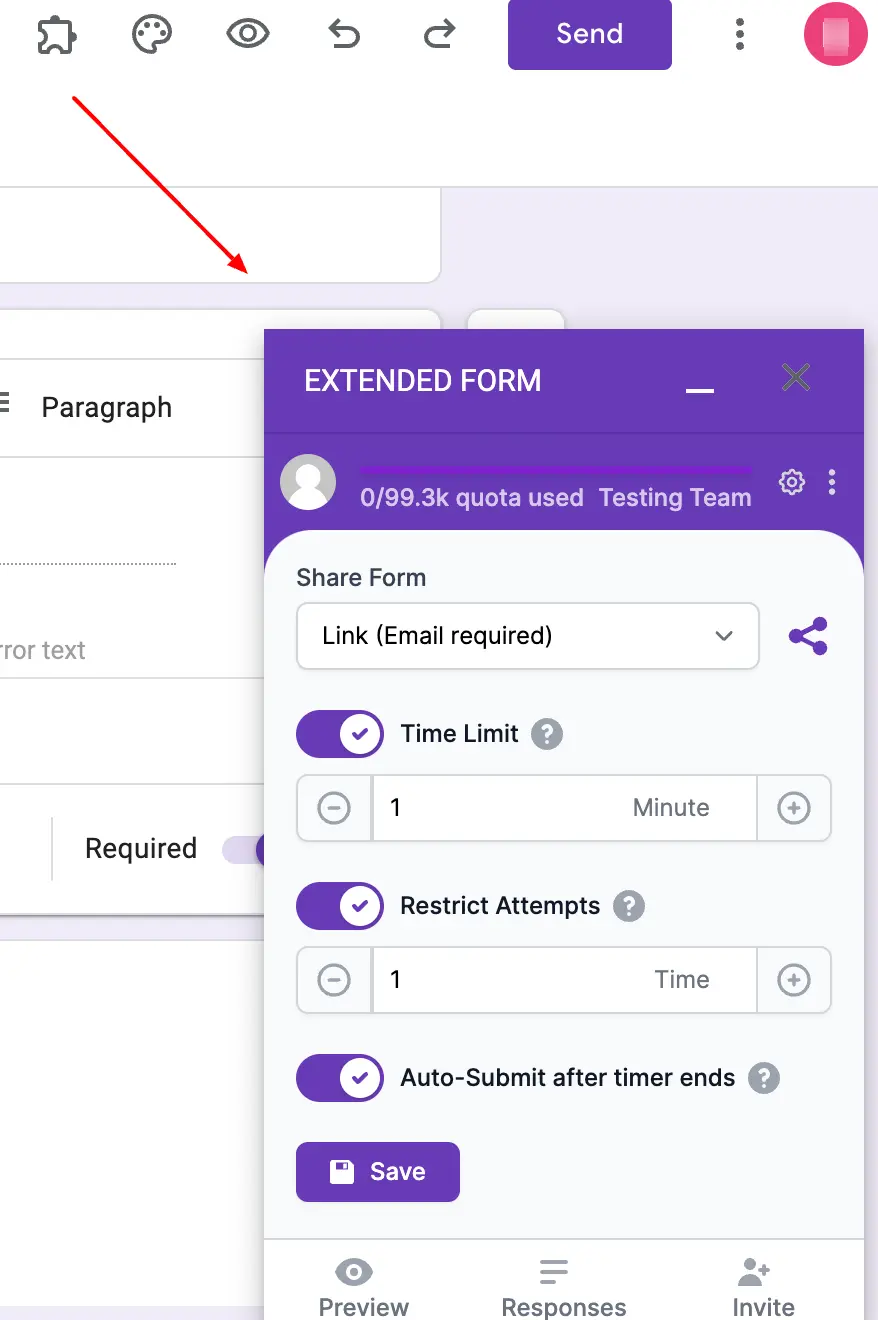
- Once the app is installed, you’ll see a puzzle shape icon at the top, go to ExtendedForms > Configure and a settings box will appear on the right side of the form.
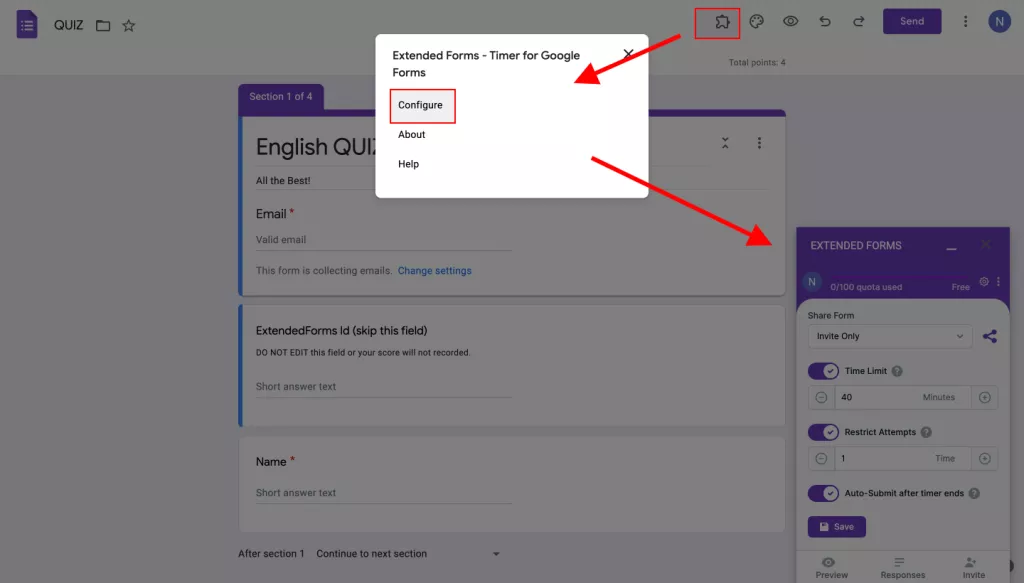
[If you can’t see the puzzle icon, refresh the page once. The same goes for the ‘configure’ option, if you can’t see it, refresh the page]
- Configure the timer, restricted attempts, and share form option. Then, ‘Save’ the settings. Once that is done, you can go through the ‘Responses’ to the main page of ExtendedForms.
- In that, navigate to the ‘Brand’ tab, where you’ll find all the options to update.
Now, if you want to add an invitation message to send to your respondents via email. Also, if you want to add a welcome message that’s shown before you start the timer form on the welcome page. Then follow these steps,
There are two ways to go to the Invitation Message option. Either you can go directly through the Google Form, for that;
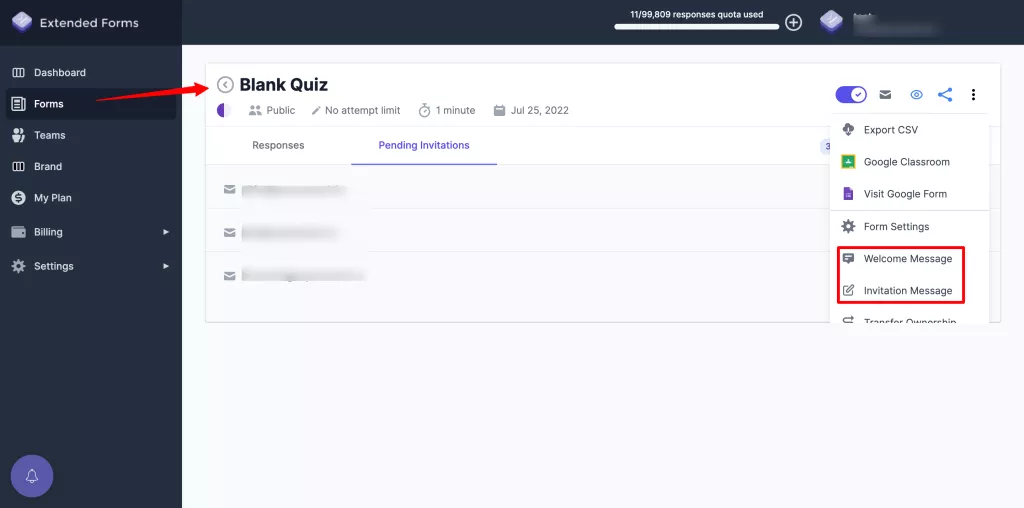
- From the ExtendedForms setting box in Google Forms, click on the ‘Invite’ option at the bottom.
- It will directly lead you to the main page of ExtendedForms where a send invitation pop box will appear.
- Click on the ‘Invitation Message’ button, it will open up an invitation message box. Write the message and click on the ‘Update Message’ button. Then go back to the send invitation box, add email addresses, and send the invites.
Looking for extensive customization of the timer in Google Forms? Read, ExtendedForms Unveils: Customized Timer Themes.
Another way to navigate to the invitation message is if you are on the ExtendedForms main page;
- Go to the ‘Forms’ section, and select the form you want to send.
- Click on this icon ‘፧’ and go to the ‘Invitation Message’ option.
- A box will appear and the further process is the same as above.
- To add a Welcome Message, the steps remain the same as above.
- Go to the ‘Welcome Message’ option above the ‘Invitation message.’
- Write the Message and update it.
Frequently Asked Questions
Is there a way to customize Google Forms?
Yes! Google Forms offers limited customization that you can use to make your form custom. Through the ‘Customize theme’ option users can change the background color, text fonts, font sizes, and header image. There are also limited pre-built templates for different use cases that you can use to make your form custom.
How do I make Google Forms look pretty?
You can make your Google Forms look pretty in a few ways – like, choosing a template for specific form creation, customizing a theme, or a header image of the form. Apart from that, in the form, you can add a progress bar, images/videos in questions, or a custom confirmation message. All these bits will lead to an attractive Google Forms.
How do I edit and customize a Google Form?
Open Google Forms, select a form or blank template > click on the paint palette icon, and customize the form from there like form themes, colors, header image, and text fonts.
How do I customize my Google Form banner?
It is possible to customize the Google Forms banner under the ‘Customize Theme’ settings from where users can change the header image of a form. Besides, to resize the image you have to take help from external online image editing apps.
In a Nutshell
We are at the end of our article – How to Customize Google Forms. In this article, we have discussed steps to Google Forms customization and how using the ExtendedForms add-on you can not only have the timer & proctor function for your quizzes or tests.
But can also use the add-on for its amazing features like brand customization, custom invitations, and welcome messages in different languages that too. It is a quick guide for you to read and follow, however, if you face any queries then do let us know in the comment section.
Note* You can install the ExtendedForms app and try its free version for a countdown timer. However, if you want the benefit of brand customization, you can go for its subscriptions, they are affordable and worth your money & time.
If you like reading this blog, also read our detailed guide on How to Create a Question Bank in Google Forms. [In 2 Ways] and How to Make Google Forms Accessible? [In 4 Steps]