Are you getting started with google forms or looking for software that can help you create a good form? This beginner’s guide on how to make google forms will help you a lot.
Though even if you’re a first-timer using google forms, you’ll quickly realize that it is not hard to understand the tool. But we still intend to make your work as simple as possible with this guide.
Filling up a form for a survey, invitation, order, or usually to request something, or a quiz is a common activity happening now and then in everyone’s life. Though something has changed, paper forms have evolved into online versions. Google Forms is the perfect tool to create a form for any such purpose.
Key Takeaways
- Google Forms is a cloud-based Google software that is part of G-suite package. It is a free tool to create survey, questionnaire, quiz, and other use cases.
- Google Forms is a featured-filled tool that has its own sets of templates. When you open the new form, you’ll see settings like Question tab, Responses, Settings, preview, send, and customise theme options.
- Creating a google form is easy and quite simple, all the main work happens under Question tab The first is title and description, then adding question, google forms field has many question types to choose from along with video, image, and text.
- Once your main work is done, then customise the form and configure settings. Then send the form. However, you can connect form to google sheets before sending or even after you’ve send it.
- Other features of Google Forms are collaborating in real-time, adding logic branching, and advancing the form with help of add-ons.
Google Forms Guide
Google Forms is a cloud-based Google software that is part of the G-Suite package that also includes Google Sheets, Google Docs, and Slides. It is a questionnaire and survey tool that provides you the benefit to create all types of forms for different purposes online.
Here we are taking you for a brief google forms tutorial, in the later section we are going to discuss a bit in detail a few of the features of google forms and how one can make google forms and build a quiz.
After you select a google form to create, you will see the following options in the blank form or template –
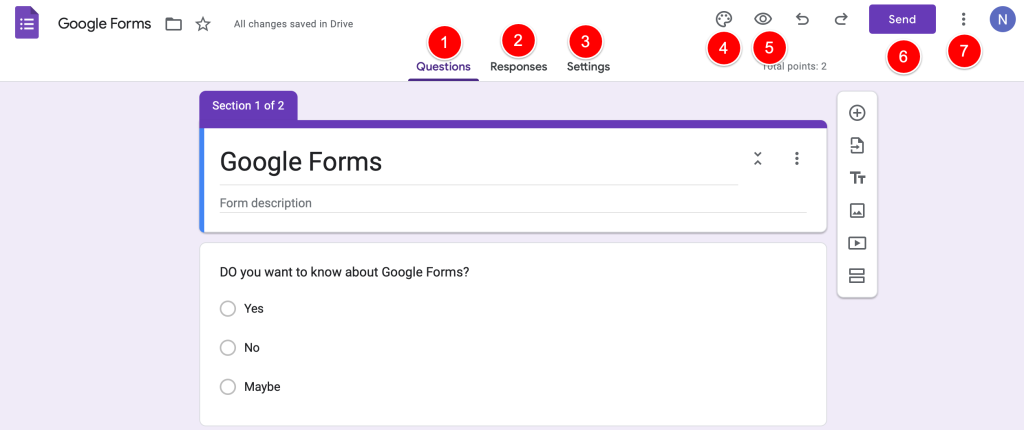
- Questions Tab – When anyone creates a form the first page of the form is the questions tab. This is the body of the google forms handbook, where the magic happens. In short, it is the place where you will build your form. [will explain this in detail in the later section]
- Responses tab – When you click on this tab, it will open to the world of insights into forms’ responses. You can find the summary of the responses, individual responses, and responses based on per questions.
Note* – You can copy the charts and paste them anywhere you want to.Besides, you can also choose to enable or disable accepting responses to not accepting responses. The latter displays a message box to add that the form has been closed.
- Settings tab – Moving forward to the next tab that you can see in the form is the Settings option. In this tab, you will find all the needed settings options to configure to make the form more refined. Like setting up a quiz, how your form will perform, and the way it will be presented.
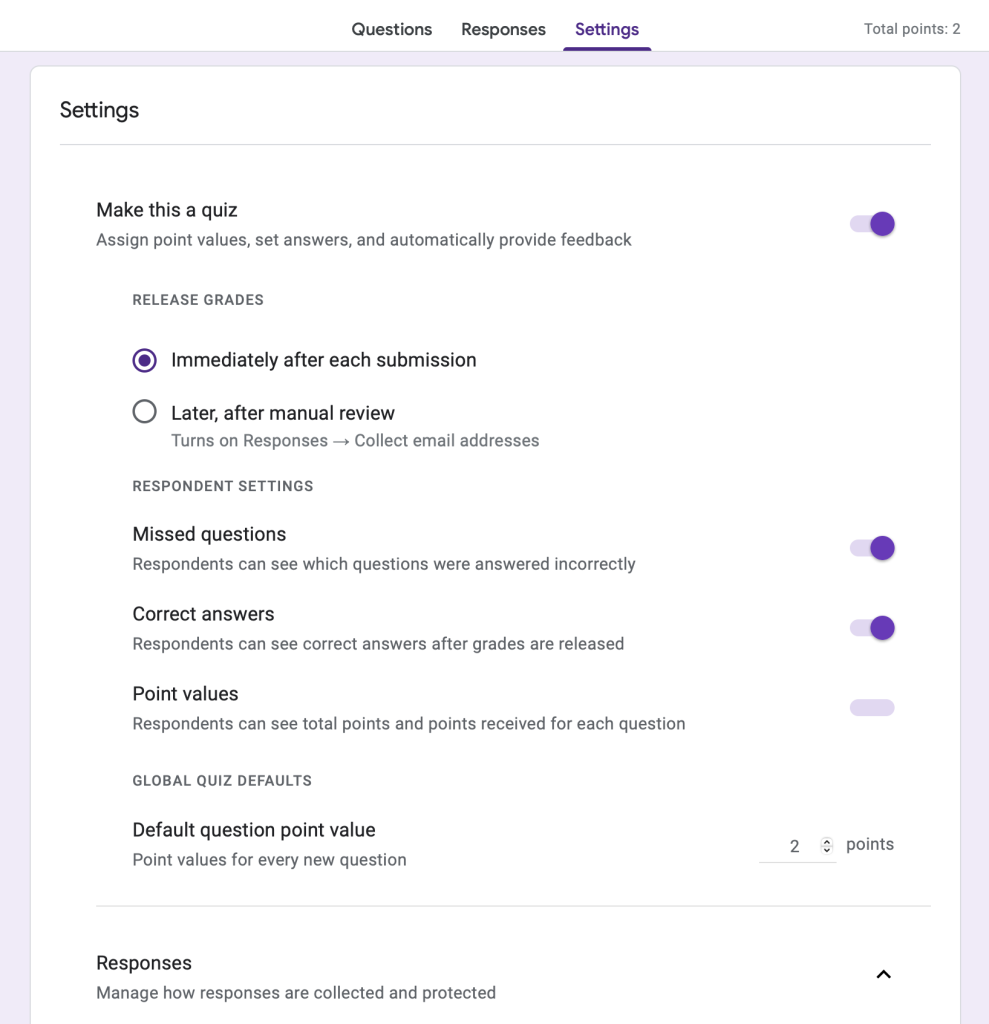
- From here, you can make the form into a quiz, then configure how you want to release marks and other respondents’ settings, also from the settings you can add default point values.
- Under the Responses category, ‘collect email addresses, ‘restrict attempts’, etc.
- The Presentation category implies how you want to present google forms better with options to configure like – show a progress bar, shuffle question order, add confirmation message, and so.
- Lastly, in the settings there is the Default option which allows you to configure form defaults and question defaults.
- Customize Theme – If you want to customize your google form, then this option is what you should click on. Though Google Forms doesn’t have much in terms of customization but it does the work. This option allows you to add a header image, change font styles, and a form theme & background.
- Preview – Not any wild guesses are needed to understand what this option is for. Whatever you’ve prepared you can always preview it by clicking on this icon.
- Send – Next to the redo icon is the ‘send’ option that allows you to send the form in three ways; you can either send them via email as invites, copy links, or embed HTML as a contact page in your webpage.
- More – The last option or three dots icon beside the send option is the More option. When we click on this option we will find options like ‘make a copy’, ‘move to trash’, ‘add collaborators’, ‘add-ons, and more.’ [we will discuss the latter two settings in detail further]
How to Build a New Form? [Explained some features in detail]
Creating a new google form is as simple as the form itself. There are different ways to create or make google forms. The easiest way to start building a form is by directly visiting Google Forms via browser.
- Click here – google forms, or go to the Gmail account menu on the Google homepage on the right side of the page and select ‘Forms.’ Then select a ‘blank form’ or choose a template.
- You can also create a new Google form while using any other G Suite apps like Sheets. This works as a useful shortcut while you’re working on Google Sheets, click Tools > Create a Form to make a new blank form that’s automatically connected with the spreadsheet.
- After you’ve create a blank form, the second step is to type the title and description of your new form. Moving forward, next step will be to set your google forms by adding questions and to do their will be google form fields. Let’s get into it in a bit detail.
Google Forms Fields
If you are starting from a scratch with blank form, you’ll find one question field box. Click on that question box to edit it and further to add question. Google Forms offers several settings options. The floating toolbar on the right is one of them to add more form fields. And other settings option like customize theme, ‘settings’ tab, preview, and all that we discussed above.
Let’s see how to add question field and all the field options in the toolbar beside the question.
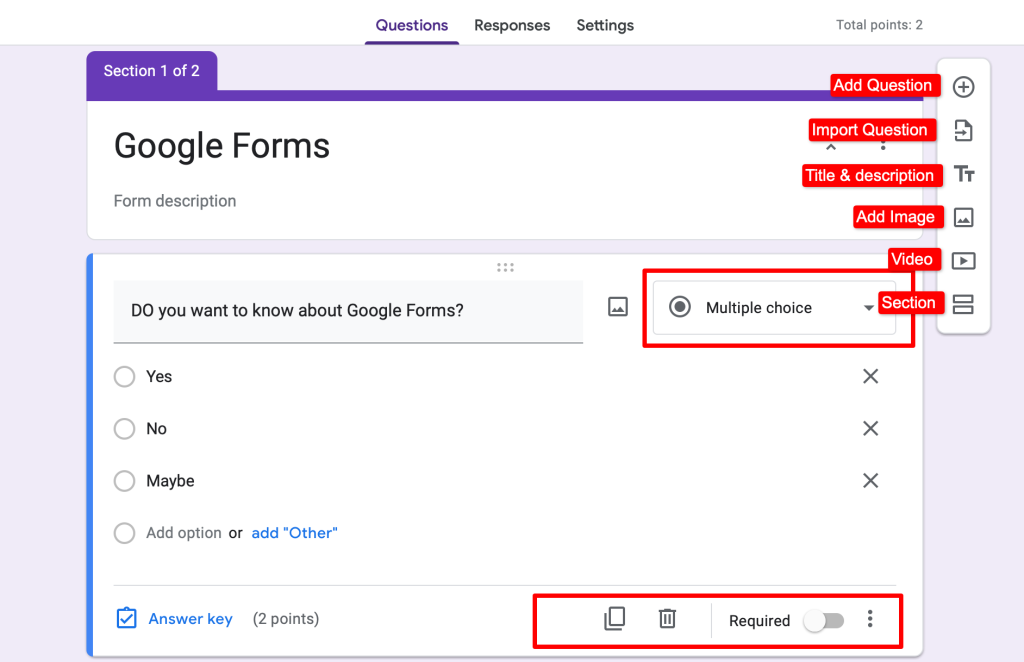
Add Questions – Click on the ‘+’ icon in the right sidebar to add a new question, or if you want to add media like image or videos, then click on those icons respectively present in the sidebar.
Import Questions – The second icon representing sheet with an arrow enables you to import questions from existing forms.
Title & Description – The ‘Tt’ icon represents to add form title and description to your form. It is useful when you want to separate different small sections with distinct subjects.
Add Sections – The last option with two bars aligned icon is for to add sections within your google form.
Each question field includes an image option to add image in the question, a button to duplicate the field, delete button, make the field required option, and a menu with extra options on the bottom right-corner. You can mark the following options to be shown on the field – description, response validation, and shuffle option order. Apart from that, it has a dropdown menu with different question types.
Note* – Google Forms include 13 field types – 11 question types, along with text, photo, and video fields.
Question types – Google Forms allows you to add any question from the list of question types it has. It has multiple-choice, short & long paragraph, checkboxes, multiple-choice grid, date, time, file upload, linear scale, image, and video.

- Now that you know all the details of google forms fields. You know how to add question, it’s time to send out the form.
- You also know the other settings [as discussed in the previous section], customize the form, configure the settings, and send the form.
But one feature or step that is left to explain is how you can store google forms data in Google Sheets.
Store data in Google Sheets
Once you’ve created the form, you don’t need to do anything extra to store respondents’ responses in Google Forms. By default, responses will be available in Responses tab as summary graphs and lists of answers. Along with individual response.
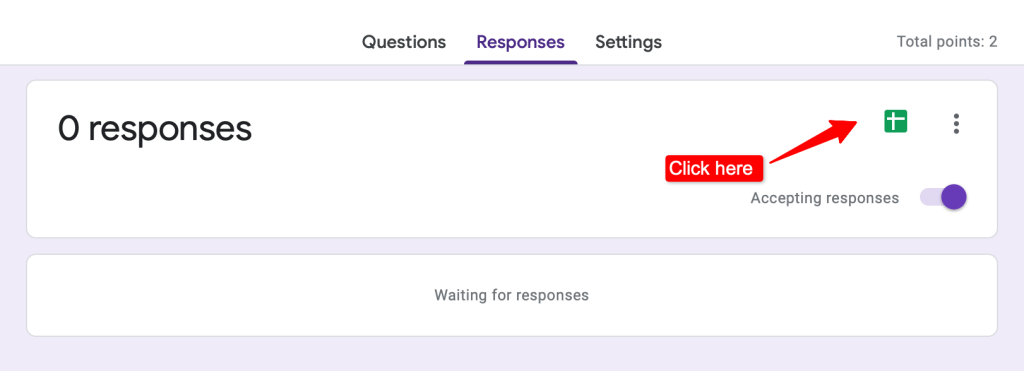
However, for better analysis of the responses, saving them in datasheet can help you to be more organized and analyze it better. Just link your form to Google Sheets. Click on the green Sheets icon in Responses tab or click on the Select response destination option in the menu [in Responses tab itself]. Create a new spreadsheet or select an existing one to store answers.
Google Forms Tips & Tricks
To enhance your google forms experience the first time or every time from there onwards, we have prepared some google forms tips and tricks to make you much more comfortable using this tool. Besides, these are some more prominent features to look out for when using google forms. They might come in handy one of those times.
Collaborate in real-time
Presuming that you’re using to make google forms with your team, it makes sense that everyone can collaborate in real-time. Hence, google forms has the feature to add collaborators!
Click on the More ‘፧’ icon option in the top-right corner and click on ‘Add Collaborator.’ Add people with google accounts and you can change general access, click on done. You can also copy the responder link and share it with people you want to collaborate the form with.
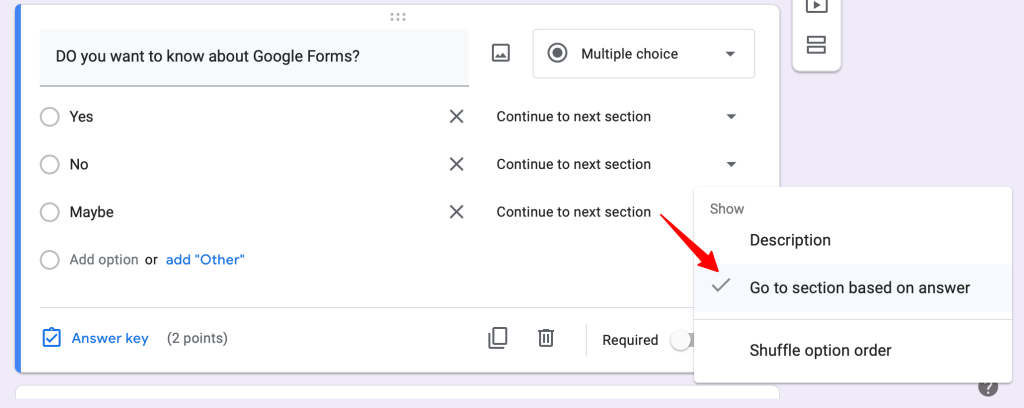
Add Logic Branching
Another interesting feature in google forms you can find is the ‘section-based answer’ functionality. First add sections (just as discussed above) and your form will be split into multiple sections. Name the sections and mention the questions under the same. Now you can add logic branching to your form. *Note that, this feature only works for multiple-choice and dropdown question types.
To apply conditional logic, click on this icon ‘፧’ at the bottom of the selected question to which you want to apply conditional logic to. Click on ‘go to section based on answer’, dropdown options beside each choice will appear. Choose from each dropdown which section you want respondents to be directed to if they select the particular choice.
Share Pre-filled form
If you want to send a form with pre-filled answers, then this feature in Google Forms is the one. In case of contact detailswhere you will pre-fill some similar or duplicate fields on the next form by using content from the first form.
Click on the More > Get a pre-filled link, fill out the responses, and click on the Get Link. You’ll see the share link message at the bottom, click on ‘Copy Link.’
Advanced with Add-ons
G-suite tools are excellent and featured filled in itself, however, what makes it more advanced is the ‘Google Workspace Marketplace,’ a platform where you can find tons of add-ons for each Google tool. Google Forms also have its fair share of add-on and they make the life dealing with Google Forms more simple and easier.
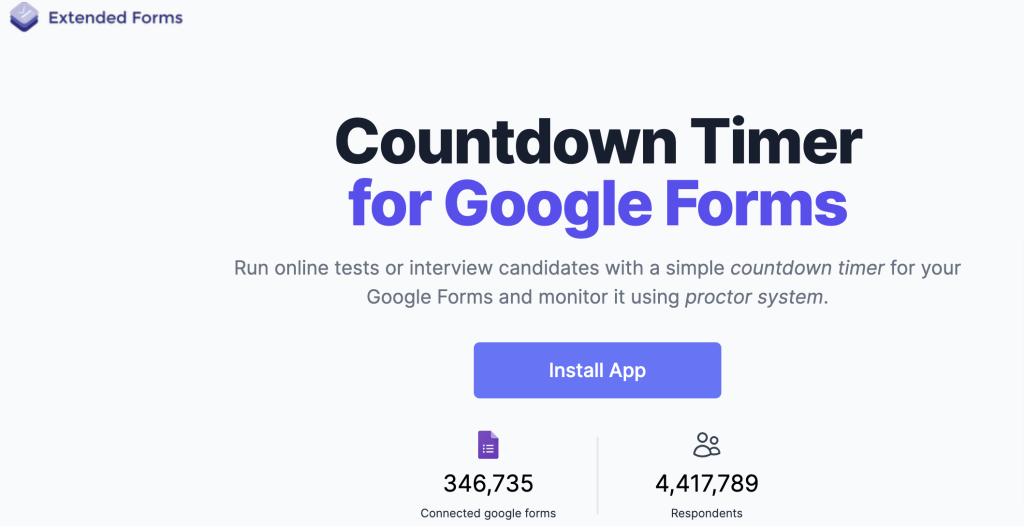
ExtendedForms is one such add-on we are talking about. It is a popular timer and proctor app for google forms. It not only enables the impossible feature in Google forms i.e, countdown timer. But it also helps in preventing cheating if you enable proctor feature.
Apart from that, it has features like auto-submit quiz, brand customization, customize email invites, welcome message in different languages (you can see the message before the start of exam), and so much. Besides, it also have classroom integration such as auto-submit work and add classwork.
How to Create a Quiz?
Google Forms is popular because of its versatility, you can just not only prepare a form but can also use it to prepare a quiz, survey, assignment, and whatnot. To create a quiz in google forms, you’ve to use the Quiz mode. To do that, you can either open a blank quiz instead of a blank form, or you can also use one of the education templates.
The other easy method is what we can do inside the form is – to navigate to the settings > enable make this a quiz option. Further options will be opened to you. When this option is enabled, you’ll find the ‘Answer Key’ button will appear on each question tab.
To add correct answers and feedback, click on the ‘answer key’ option. Besides, if you don’t want to add a default point value for every question, you can in the answer key option itself add point values for each question individually.
Note that except for these few options, overall making google forms into a quiz process remains the same as google forms create for surveys, tests, or regular forms. To know in detail how to create a quiz in google forms check out these articles – How to make Google Forms Quiz?
How to make trivia quiz using google forms?
Wrap-Up
Google Forms turns out to be an excellent choice for people who need quick ways to build forms or quizzes, even for those who want nothing fancy. In conclusion, it is very easy to make google forms, whatever the purpose maybe. Google Forms has all the basic and essential tools you need.
It may not be the most powerful or customizable form builder, instead it is easy and perfect for all my beginners even professionals. Besides, add-ons like ExtendedForms come handy for a lot of situations. You can check out the website to know more about and better so sign in to the app and start your free basic plan.