A QR code for Google Forms revolutionizes participation by providing instant, effortless access for users, driving higher engagement and response rates.
QR codes have evolved into a global standard for convenient access to online content. They’ve made the intricate processes of document retrieval a thing of the past. With a Google Forms QR code at your disposal, you can effortlessly share, collect feedback, schedule appointments, and much more.
Here, in this blog, we will take you through a detailed guide on how you can make a QR code for Google Forms.
Table of Contents
Prefer watching over reading? Watch the complete guide here.
What is a Google Forms QR Code? (Static vs Dynamic)
QR code stands for ‘Quick Response Code’ and is a 2-D barcode type. The purpose of the Google Forms QR code is to connect your Google Forms with a QR code for easy accessibility.
With the help of the QR code, users can scan Google Forms and provide feedback, give tests, or register for an event.
They are one of the most convenient and easy ways to connect to your forms. No more copy-pasting links to open up a form (especially when users cannot access the link).
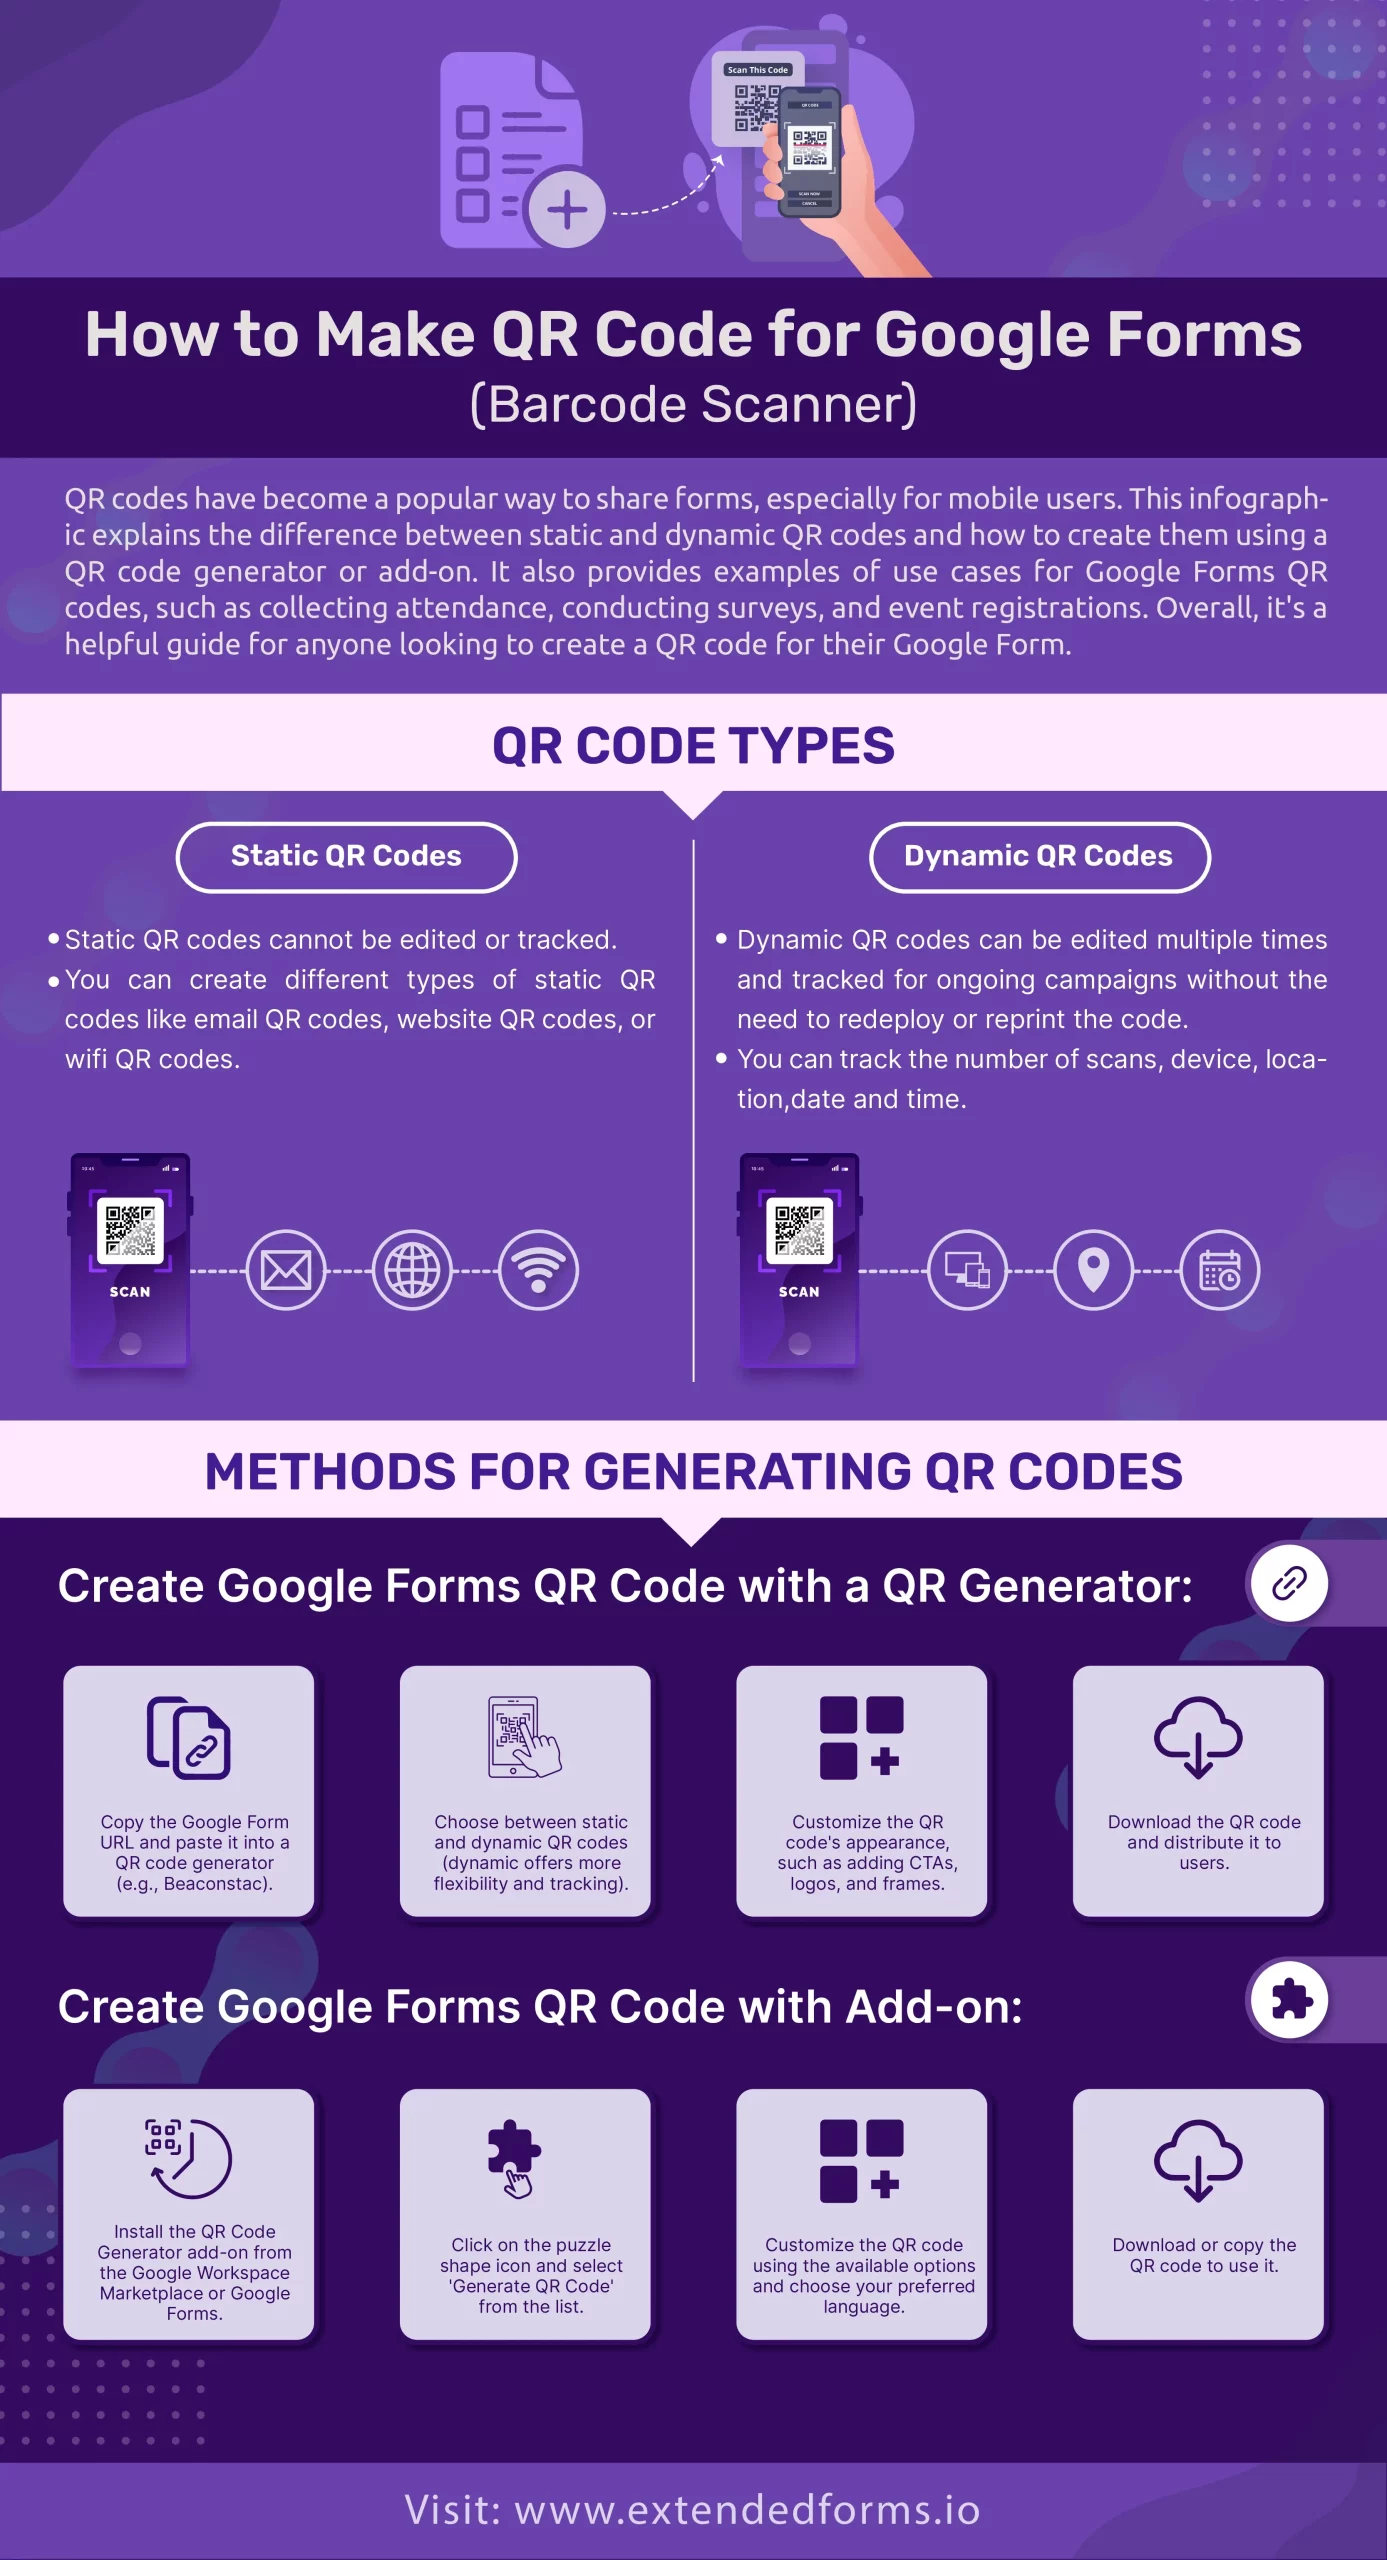
Static vs Dynamic QR Codes
QR Codes are everywhere! But do you know that QR codes are of two different types?
“Static QR code: Static QR code means that the URL once generated cannot be edited or overwritten in the future. It can store information that is uneditable and untrackable.
Static QR Code is of much use in instances where the information is one-time or it is a one-off campaign. You can create different types of static QR codes like email QR codes, website QR codes, or wifi QR codes.
“Dynamic QR code – Dynamic QR Codes are editable and can be edited as many times as needed without having to redeploy or reprint the code.
Dynamic QR codes can be used for many cases where you will need the QR Code multiple times (like campaigns, app downloads) or you want to track and retarget online users (marketing campaigns, ads, etc).
Both QR codes are used for different purposes however, dynamic QR codes have more advantages to them than static codes. So, it is said to be best to opt for a QR Code generator that allows you to produce dynamic QR codes. However, it depends upon what use cases you are using the Google Forms QR code.
Two Ways to Create a QR Code for Google Forms
1. Create a QR Code for Google Forms with a QR Generator
So, the first way to create a QR Code for Google Forms is with the help of a QR code generator. There are different QR code generators online that are good and let you create dynamic QR codes.
However, in this article, we’ll show how the Beaconstac QR Code generator can be used.
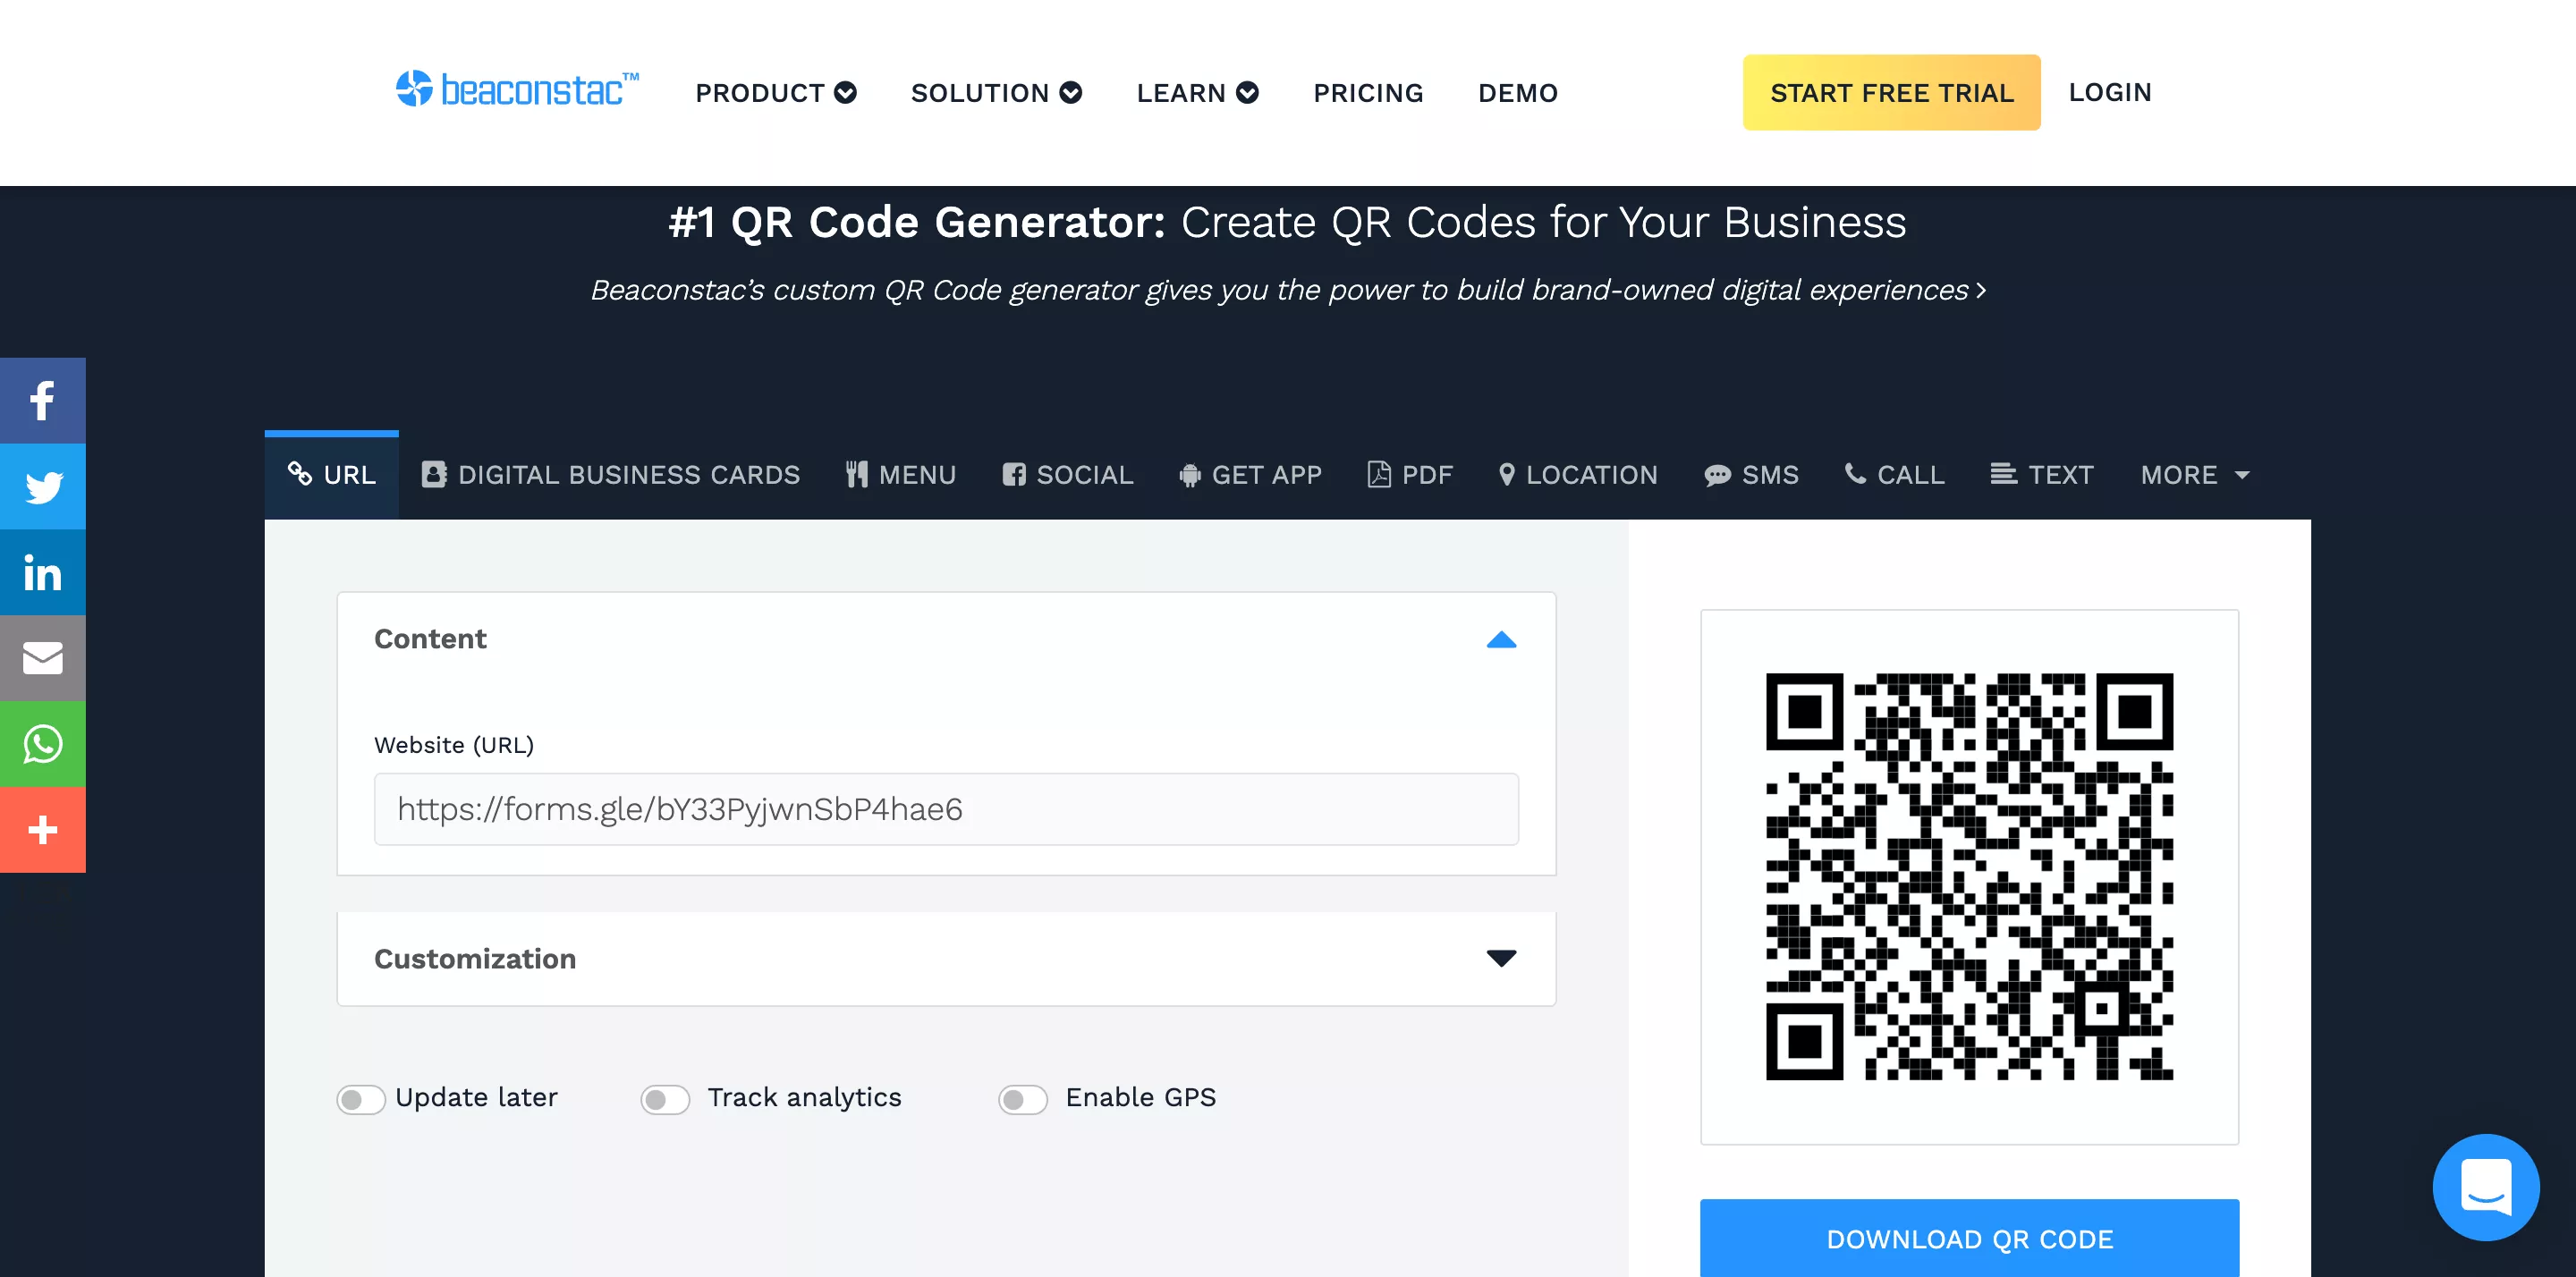
Beaconstac QR code generator is one of the top recommended platforms to generate dynamic QR codes or static QR codes for any purpose. You get all advanced features in paid versions, but you can try its 14-day free trial. On the website, you can create free static QR codes.
Now, let’s get into the steps to make a QR code for Google Forms.
A. Create Google Forms
- First and foremost is to ‘Create a Google Form.’ You must have an active Google account for that, or create one. Once that is done, let’s jump to the situation where you’ve set up your Google form and everything is ready.
- In the second step, you’ve to ‘copy the URL’ of your form and paste it into the QR Code generator (in this case, Beaconstac we’ve used as an example). Go to the ‘Send’ option in forms, click on the link, shorten the URL, and copy it.

B. Generate QR Code
- Now go to the QR Code generator website and paste it – if you’re using Beaconstac for free.
Note* But if you’ve opted for a free trial or paid versions and have an account, then log in to its dashboard. Go to ‘QR Codes’ > +Create QR Code’ > Select ‘Website’ and paste the Google form URL there.
- Once you have copied in the QR Code generator, you must select the code you wish to add – Static or Dynamic codes.
- Besides, if you want your code to be dynamic, then it may provide options like track scan and update later (which automatically implements dynamic codes).
[You can only create static QR Codes on the platform for free unless you have the pro plan.]
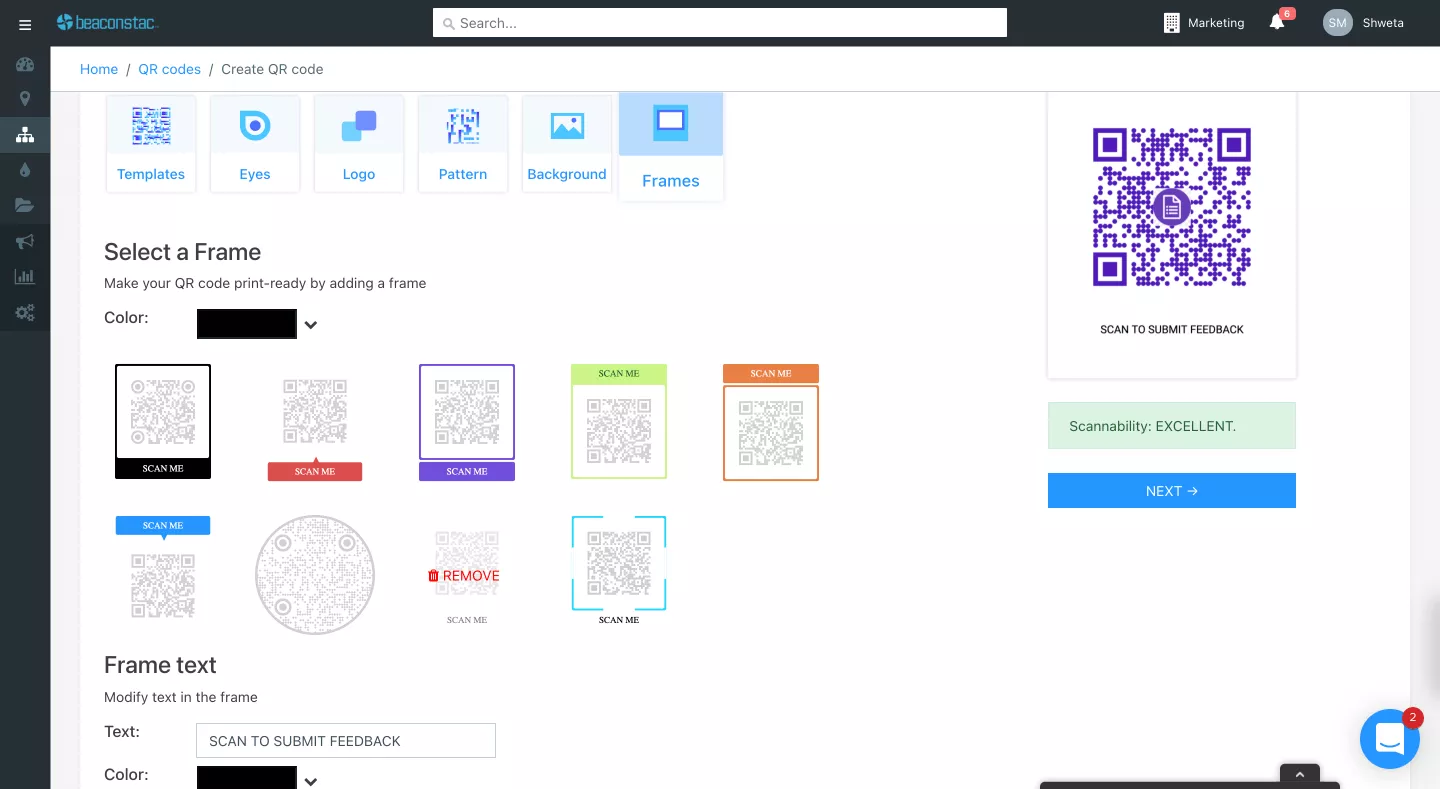
- Then you can also ‘Customize your QR Code scan’ to make it more alluring. Like adding CTA, custom data patterns, logos, frames, etc.
Pro tip: To maximize your QR Code success with Google Forms, customize your process by integrating brand colors and adding CTA like scan me, pay me, etc. Moreover, adding different frames makes it more attractive to users.
C. Share Google Forms QR code
- Once you’ve done all of it, ‘download it’ in any of the given formats. If you want to print, you save it in PNG format.
- If you wish, you can also ‘Save’ the design as a QR Code template.
You’ve not got many options to customize for free in the platform; however, once you’ve opted for the pro, you will get a lot of options in the dashboard
- Once you’ve downloaded the QR code, ‘send it to the right people and motivate them to complete the forms.
Tracking is crucial, especially if you are using it to measure your campaigns. However, most online QR code generators make it simple to track your QR scans.
Beaconstac is one such platform, where you can easily track your scans and all the data stored in one place in the dashboard.
Another QR Code Generator I want to mention here is QR Code Chimp. It is another good QR code generator platform to look for if you are looking to create free dynamic codes with many scan customization options.
Want to create consent forms for your business? Read How Do You Make Consent Forms in Google Forms? (5 Simple Steps)
2. Create a QR code for Google Forms with an Add-on
Another way to create a Google Form QR code is with the help of an add-on. This can be convenient because you don’t have to visit a separate website. Besides, it offers flexibility. Let’s get into the steps;
- To install the app, either go to Google Workspace Marketplace, or you can go through Google Forms. In the Google Form, click on this ‘፧’ icon > Get Add-ons, and search for the QR Code Generator add-on.
- Install the add-on named QR Code Generator for Google Forms.
- Once installed, you’ll see a puzzled shape icon at the top bar that says your add-on is installed. (If you can’t see one, just refresh the page)
- Click on the puzzle shape icon > QR Code Generator > select ‘Generate QR Code’ from the list.
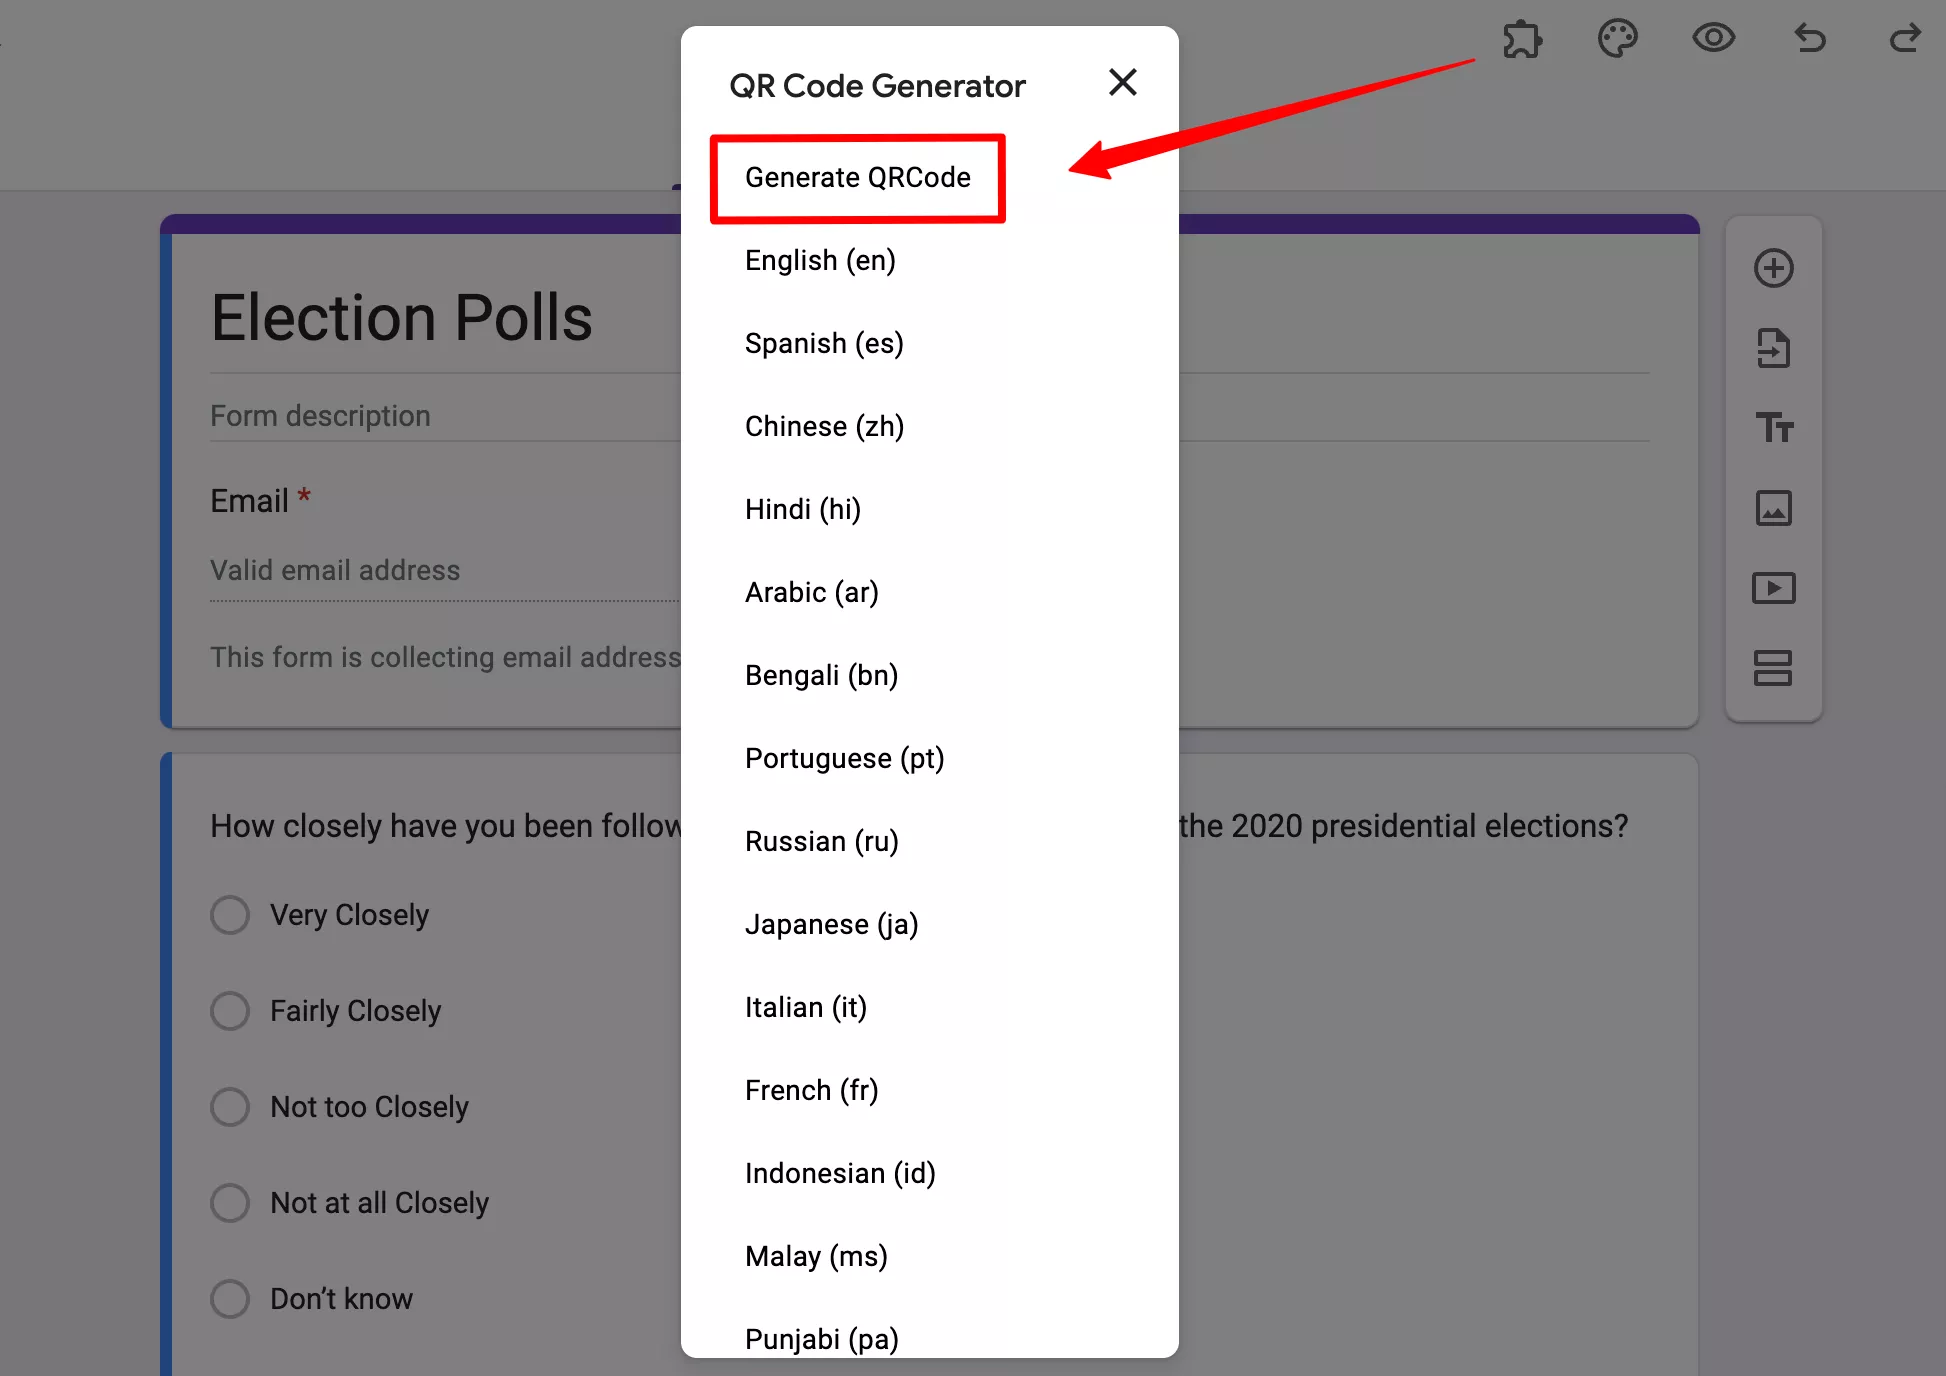
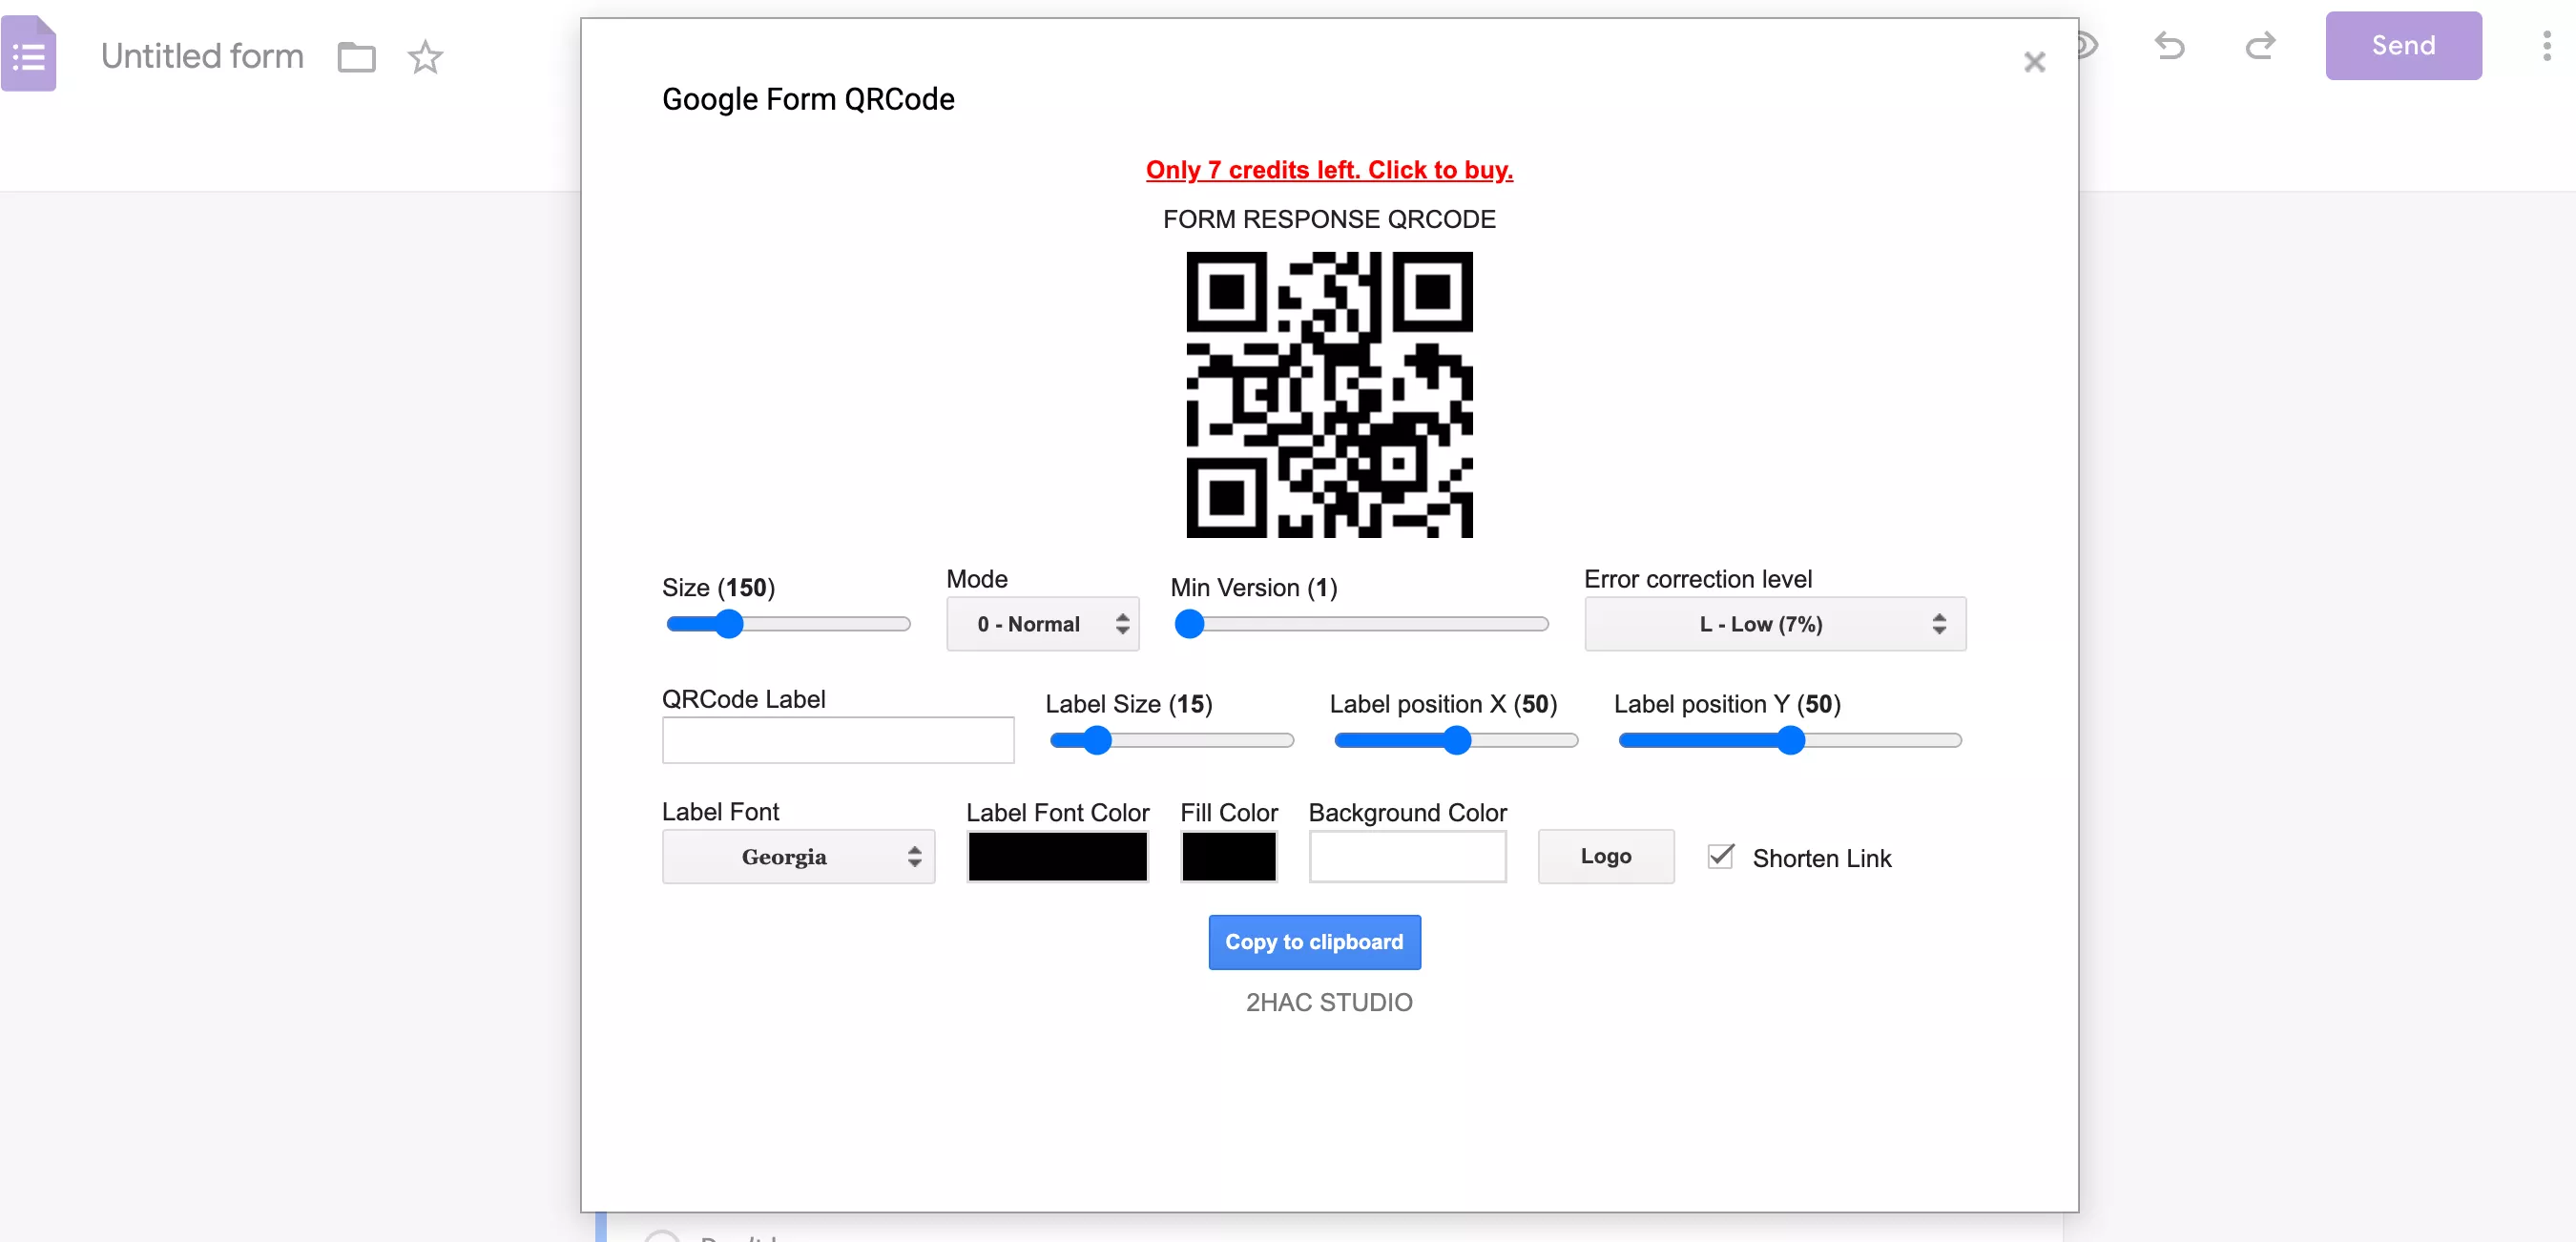
- A pop-up box will appear, and you’ll see a QR Code scan and all the options available. You can customize the QR code using all the options. [QR Code Generator supports multiple languages that you can choose from].
- Lastly, download the QR Code, copy it to the clipboard, and paste it wherever you want. Or you can right-click to save it in the PNG format.
QR Code Add-ons come with their share of limitations. In this add-on, you only get a 14-day free trial, then you’ll have to purchase a premium membership. Along with that, in most of the add-ons, you cannot retarget or edit the QR code scans.
Want to create a voting poll? Read How To Create A Voting Poll In Google Forms? (7 Simple Steps)
How Can You Use the Google Form QR Code?
There are different use cases where you can use Google Forms QR codes. As mentioned earlier, they can be used for almost all the purposes you use Google Forms for, and they are extremely effective and easy.
Using QR codes doesn’t change any aspect of forms, just enhances your Google Forms a bit more. Here are a few of the use cases of a Google Forms QR code.
- Collect/Track school attendance
- Conduct market research surveys & polls
- Collect feedback for your product & service
- Make creative quizzes & tests
- Ease event registrations
Looking for an easy way to add a linear scale in Google Forms? Read How Do You Add Linear Scale to Google Forms? (5 Simple Steps)
In Conclusion
With this, you can easily create a QR code for Google Forms. We have shown you two different ways. Any of the approaches is your call to take; however, keep in mind that QR Code add-ons have their drawbacks, especially if you are looking to create dynamic QR codes.
When talking about add-ons, Google Forms has a powerful add-on named ExtendedForms, for the countdown timer and proctor feature. The app comes with more bundle of features that can be used in Google Forms,
The best part about this app is its easy configuration and user-friendly process. Users can try the free plan of the app or buy the paid plans that are affordable. You can check out our app from the website and try the free plan.
Ready to go one step ahead with your timers in Google Forms? Read ExtendedForms Unveils: Customized Timer Themes.