
Are you looking for a way to customize the grading system for your Google Form quiz or test? In this blog post, we will show you how to add points in Google Forms manually.
This feature can be especially useful if you want to give extra credit or create a more complex grading system. By the end of this tutorial, you’ll be able to set up a customized grading system that meets the needs of your students. Let’s get started!
If you need to create an online quiz, such as a math exam for a third-grade class or a marketing quiz, you will likely turn to a quiz-building tool. One popular option is Google Forms, which is free, easy to use, and can be accessed by anyone with a Google account. It is particularly useful for creating basic forms.
And when it comes to adding points in google forms, it is easy to get stuck. However, Google Forms has answers for that as well. Let’s step-by-step see how to add grades and provide scores to a quiz in Google Forms.
Table of Contents
Step to Add Points in Google Forms
There are different procedures for adding marks in Google Forms. One option is to add point values manually to each question. This allows you to assign different weights to different questions, depending on their difficulty or importance.
Apart from this manually in-built feature, you can use various add-ons that come with more settings it for adding Google Forms scores and calculations, etc.
However, In this blog post, we will show you how to manually add point values to your Google Form questions. This can be especially useful if you are using Google Forms for graded assignments or assessments and want to assign different point values to different questions.
By default, Google Forms assigns a point value to each question, but you may want to customize the point values to reflect the difficulty or importance of each question.
Let’s see how to add points in Google Forms as default or manually per question.
Step 1: Turn Your Form Into a Quiz
You can from the start create a Google form quiz by choosing a blank quiz or template. However, if you’ve selected a form then from within the form it can be turned into a quiz.
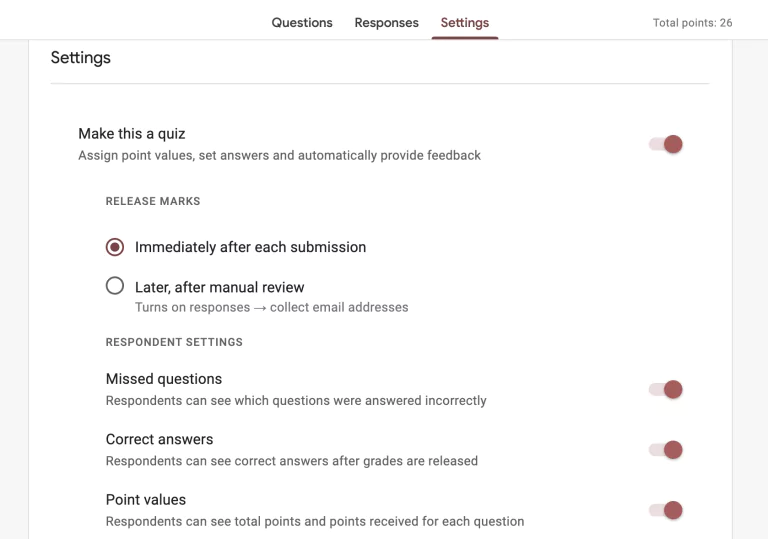
Open the Google Form that you want to use as a quiz. Click on the “Settings” button beside the Responses option. Enable the box next to “Make this a quiz.” Now, your form is turned into a quiz, and more options are available under this setting (we will discuss this in more detail later).
Step 2: Add Questions
The next step to add points in Google Forms is to add the question fields. Return to the Questions tab to add questions to your quiz.
Click on the “Add question” button from the sidebar input field menu and select the type of question you want to add. Google Forms has 11 question types input fields excluding image and video question options.
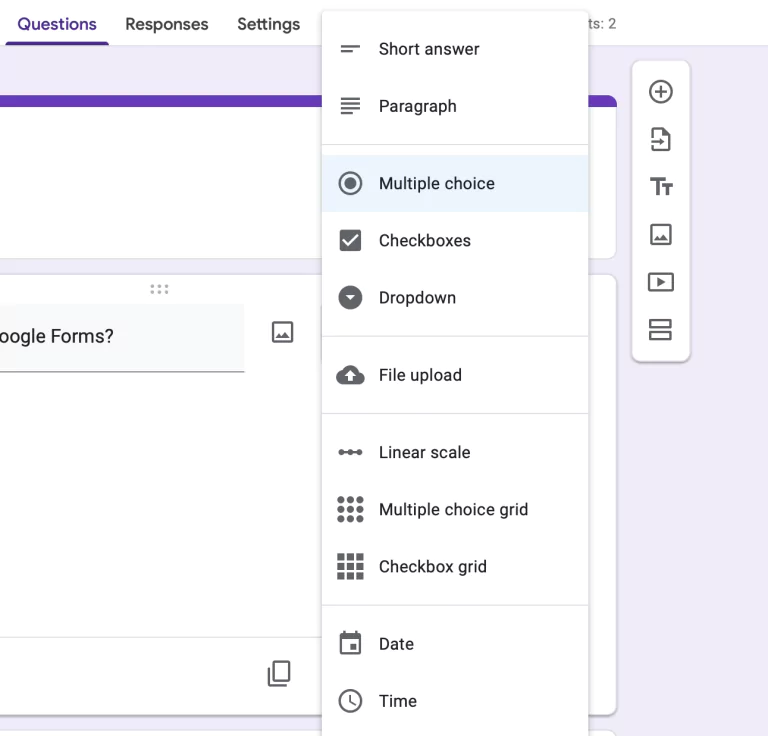
You can add point values and feedback for all the question types. Add and label your questions according to your use case and describe what respondents have to do in the question correctly and to the point.
You can also reorder or delete questions as needed.
Step 3: Assigning Point Values to Questions
Once you’ve finished preparing your questions, it’s time to assign points to your quiz/test. You will need to apply this process to each question or answer.
Note* As mentioned before, when we turn the form into a quiz, by default the point values are assigned to each question. From the settings, you can change the default point values for every new question.
Now back to assigning points in Google Forms exams or quizzes manually. Click on a specific question and select the ‘Answer Key’ blue button at the bottom left corner.
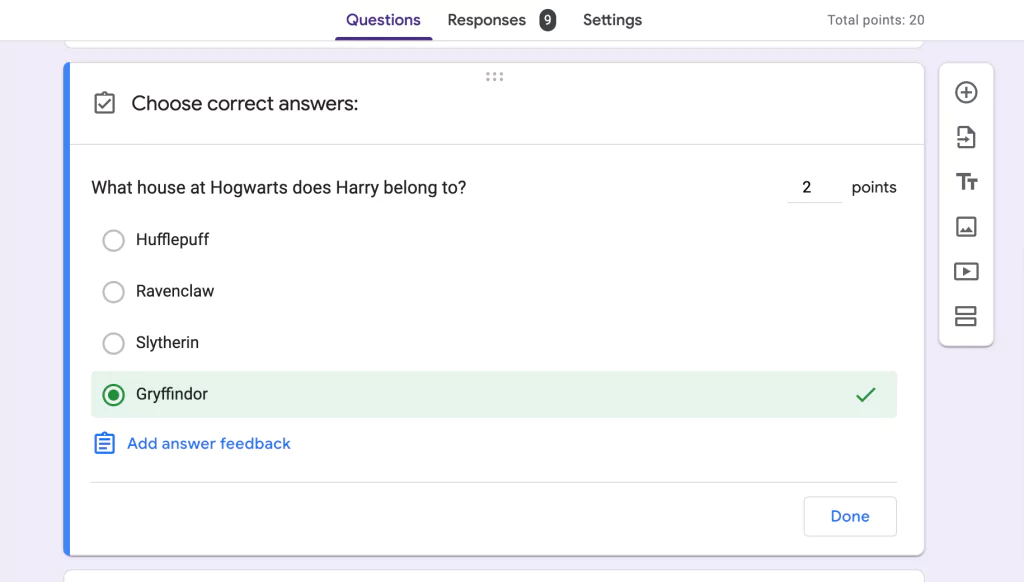
From here select the correct answer or answers to your question if you’ve opted for multiple choice, checkboxes, grid, dropdown, or short answer question types.
On the top right corner, you’ll see point values from there you can add points in Google Forms questions. For the grid choice questions, you have to add point values to each option.
This way complete the process of adding points to each question in google forms.
Want to create business forms in Google Forms? Read, Creating Business Forms Using Google Forms (7 Simple Steps)
Step 4: Add Answer Feedback
This step though part of the quiz or test is completely optional but recommended. It helps automate a bit more of the grading process, making it more transparent for respondents to understand where they went wrong.
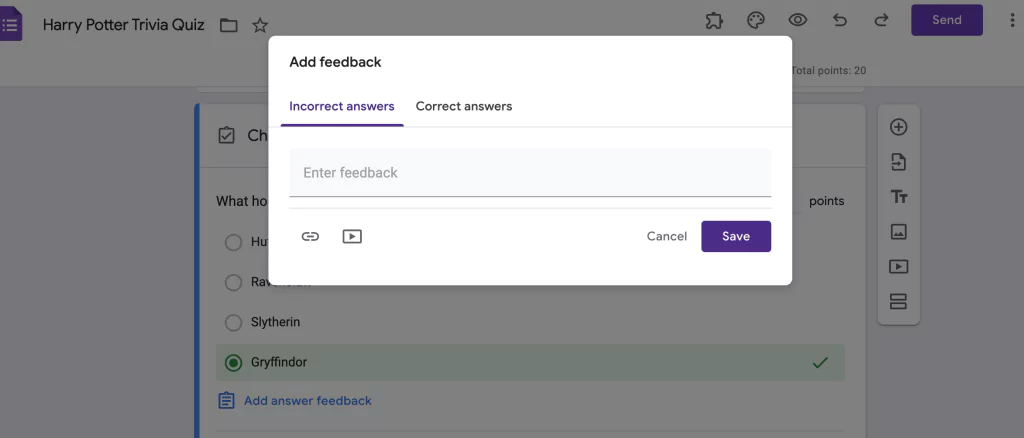
The Google Forms’ feedback allows you to provide both correct and incorrect feedback options for specific question types {multiple choice, checkbox, and dropdown}. Aside from these, in all other question types except multiple choice grid & tick box {these two don’t have the option to add feedback at all}, you can add general feedback.
To create automatic response feedback, click on the Answer key icon and select “Add answer feedback.” You can add a link or youtube video in the feedback as well. The feedback will be displayed to the respondents when they check their Google Forms scores.
Step 5: Configure Settings
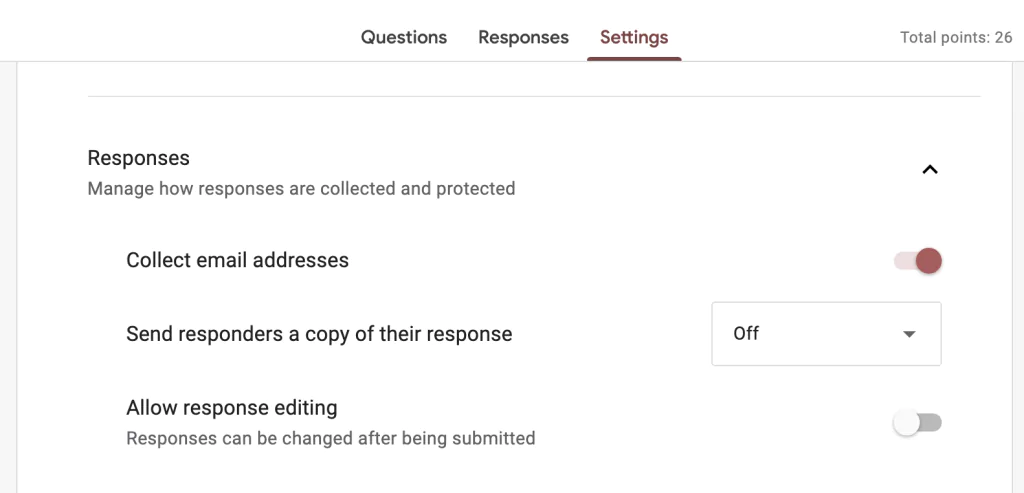
Now that your quiz is created, points and feedback are added and you’re ready to share it with your participants. Firstly, let’s head over to the ‘Settings’ tab to tweak some settings configuration.
Below the ‘make this a quiz’ option, more settings are expanded, like ‘release marks’ you can choose it now whether you’d like scores to be shown immediately after submission, or later after manual review.
Further, you can choose respondents to see incorrect/missed answers, correct answers, and total points they received. From here, you can change the default point values, collect email addresses, and whether you want to share the quiz with outside members of your organization.
Once you’ve configured all the settings for the quiz, preview it and send it to your participants. And that is how you can easily add points in Google Forms.
How to Grade a Quiz in Google Forms?
Moving forward to discuss with you another important part of this blog i.e., how to grade a quiz in Google Forms. After you’ve added points in Google Forms, you must know how to grade the forms manually.
Users can see the quiz results as the summary of the responses, including frequently missed questions, graphs marked with correct answers, and average, median, and range of scores. There are two ways to grade responses in Google Forms if you want to review them manually.
Let’s look into both processes.
Method 1: Evaluate Individual Responses
The first process is to evaluate individual responses and provide feedback on respondents’ responses. If you collect email addresses, you can assign points & leave feedback on individual responses. Remember to save your changes after grading each response.
- In Google Forms, open a quiz that you want to evaluate.
- At the top, click Responses. Click Individual.
- Then, find the questions/questions of the respondents you want to grade.
Note* You can move between individuals, and click on Previous or Next responses.
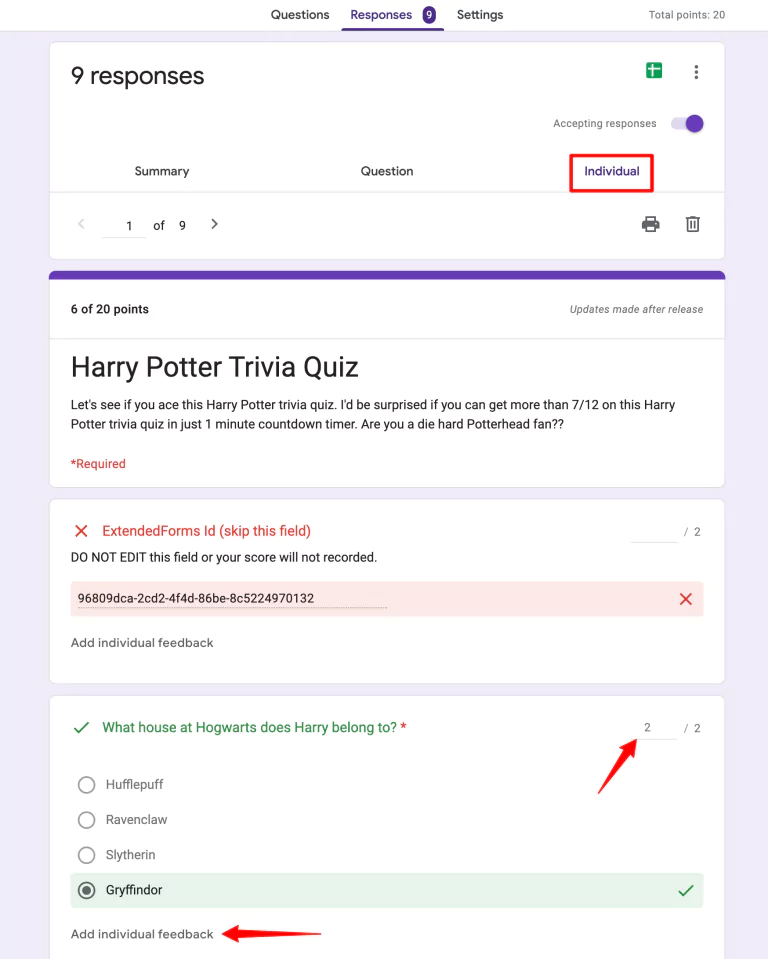
- On the top right corner of the question, enter the marks the response earned. You’ll get the ‘edits are pending’ notification at the bottom, hit the Save button.
- Under the answers, click on the ‘Add individual feedback.’ Enter your feedback and Save the feedback.
- You’ll again get the same notification, click on the Save button once all the changes are made in the response.
Method 2: Grade Question-By-Question
Another way to grade the responses is question-by-question. It means users will grade or provide feedback to a group of responses through each question at once. For example, if the question is Which amongst them is beverage? 5 respondents select ‘tea’ and the other 5 ‘water.’
Then, users as per question grading will mark tea as the correct answer or give them points depending upon their answer. And the other options for that specific question that some have opted for will be marked as incorrect. Hence, all the responses that are marked as correct will be given points, and others with incorrect answers will not get a point value.
You can select the specific response to each question that is ungraded and it will take you to the individual responses section.
- Under the ‘Responses’ tab, go to the ‘Questions’ section instead of the ‘Individual’ Select the question,
- Then to add points for a group of answers:
Full points: Click Mark correct ✔️
Partial points: Enter the number of points you want to award.
No points: Click Mark incorrect ×
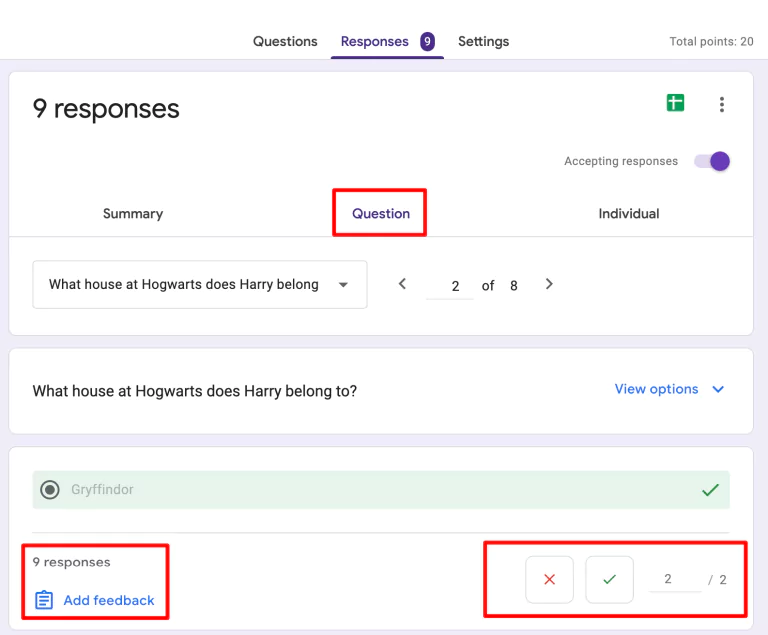
- Then, click on ‘add feedback,’ add written or YouTube video feedback.
- Save the changes and hit the ‘save’ button below.
Looking for an easy way to add CAPTCHA to your Google Forms? Read, How to Add CAPTCHA to Google Forms? (4 Easy Steps)
Pro Tip: Share results
If you collect email addresses, you can share results either immediately or manually later. Though by default, grades are shared immediately which doesn’t require an email-id.
In Settings under Make this a quiz option choose immediately after each submission if you directly want to give them the result without manually working on it.
However, if you choose to email results after review, select the later option.
- Further, At the top, click Responses > Individual.
- At the top right of a response with a recorded email address, click Release Score.
- Check the boxes next to the people you want to email.
- Click Send emails and release.
Wrapping Things Up
Add points in Google Forms to create quizzes and automatically grade responses, making it easier to assess student performance or gather scored survey data efficiently. By assigning different point values to each question, you can adjust the weight of different questions depending on their difficulty or importance.
This can be especially helpful if you want to give extra credit or create a more complex grading system. With this feature, you can easily create a customized grading system that meets the needs of your students or clients.
Besides, if you’re planning to create a test or quiz, without a timer it is not an exam. You don’t have to worry about that because we have the perfect add-on for anyone using Google Forms as a quiz or for assessment – ExtendedForms. It is a great countdown timer and online proctor app that also comes with tons of features.
You can, for example, auto-submit your form once the timer ends, hide your user email to keep it private and anonymous, have a welcome message in different languages, and so much more.
If you like this detailed guide on how to add points in Google Forms, you can also consider reading How to Allow Multiple Domains for Form Sharing With an Organization. and How to Add Tables in Google Forms? [2 Ways].